If your current Web Hosting package is too large, you could choose to downgrade it to a smaller Web Hosting package.
Keep in mind that the smaller Web Hosting needs to support enough web space, e-mail addresses, and databases..
To downgrade your Web Hosting manually, you will need to create a backup of your database and website files. Afterwards, you need to cancel the current Web Hosting and request a new, smaller Web Hosting package. You then upload the backups of your database and website files to the smaller Web Hosting.
- Please note that discounts applied to your webhosting are not applicable to a downgraded package.
- We do not recommend downgrading your Web Hosting if this means removing functionality from your website in order to fit into a smaller package, at the risk of breaking your website.
Check your Web Hosting's specifications
In order to downgrade a Web Hosting package to a smaller one, it is important to check if the content of your current Web Hosting fits in the smaller Web Hosting.
A downgrade won't be possible (yet) if the amount of web space, databases, or e-mail addresses you're currently using is larger than the amount available on the smaller Web Hosting. This is why we recommend checking your current web space, databases, and e-mail addresses and checking how much the desired Web Hosting package has available.
The Web Hosting product page shows the specifications of the Web Hosting package you wish to downgrade to. You can check how much web space your current Web Hosting is using by visiting the control panel:
Step 1
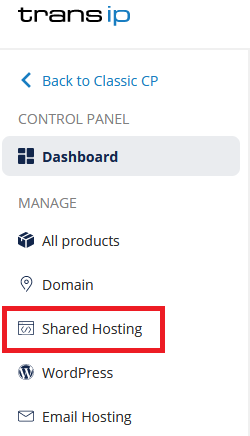
Log in to the control panel and click 'Shared Hosting' in the menu. Next, select your domain below 'Products'.
On the overview page, a pie chart shows how much space is in use on your hosting package.

Keep this page open and go to Step 2.
Step 2
You can see how much web space (disk space) is available per Web Hosting in the image below. Check how much web space, databases, and e-mail adresses you are currently using, and if your smaller Web Hosting choice has sufficient web space, databases, and e-mail adresses to perform the downgrade.

If the smaller Web Hosting choice doesn't have enough web space, try to free up web space on your current Web Hosting before continuing.
I want to downgrade manually
I want to keep using my email addresses as well
The steps in this article describe how to downgrade your Web Hosting manually while retaining your website. If you want to keep using your email addresses as well, we recommend creating backups of them. Once the downgrade is complete, restore the backups using your email client.
Create a backup of your website files
Once you're sure there's sufficient web space on the smaller Web Hosting choice, you can proceed with the downgrade. Start by creating a backup of your website files using an SFTP client.
In this tutorial, we'll be using Filezilla. If you're using a different client (such as Cyberduck), the steps are largely the same.
Step 1
Log on to Filezilla. Use the article 'How to use SFTP with Filezilla' to read how.
Step 2
Once you're logged in to Filezilla, select the local folder you want to save your backup to. In our example we're using the folder 'My website files'.
Step 3
Now right click on the 'www' folder on the right and click 'Download'.
The 'www' folder and all its content will now be copied to the local folder you've selected on the left hand side. Once the download is complete, you'll have succesfully created a backup of your website files.
If there's data present in any of the other folders on your Web Hosting (for instance 'Subsites' or 'restored-backups'), you can download these in the same way.
Make sure to remember in which local folder you've saved the files of your website. We will be uploading these to the smaller Web Hosting later.
Now it's time to create a backup of your database(s).
Create a backup of your database
A database contains important data for your website. If you want to transfer your current website to a small Web Hosting, you will need to backup your database as well.
At TransIP we use phpMyAdmin to create and manage databases. That's why we'll first show you how to log in to phpMyAdmin, after which we tell you how to back up your database.
Step 1
Log in to the control panel and click 'Shared Hosting' in the menu. Next, select your domain below 'Products'.

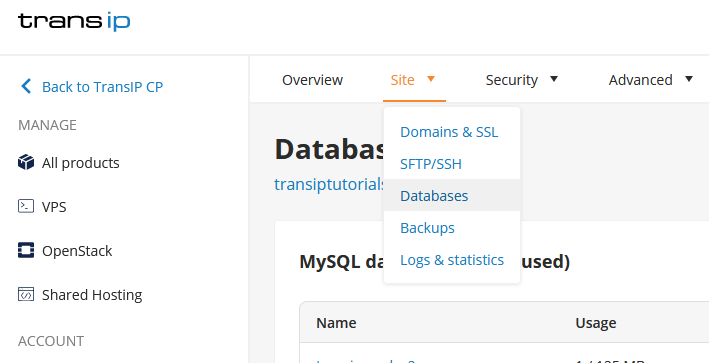
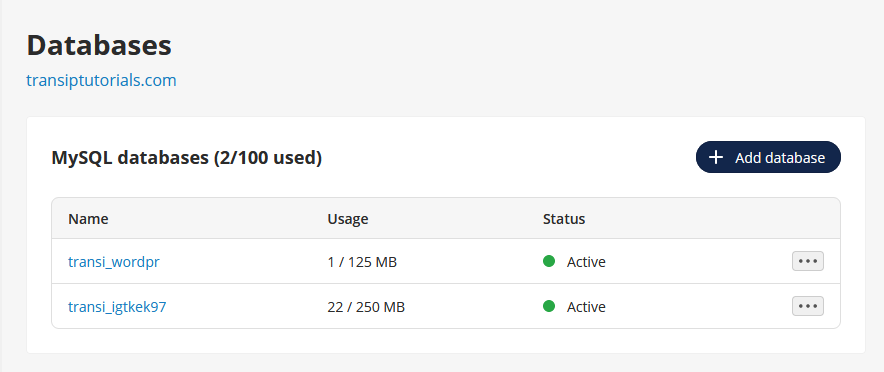
Now click the 'Site' tab, followed by 'Databases' to open de database overview.
Step 2
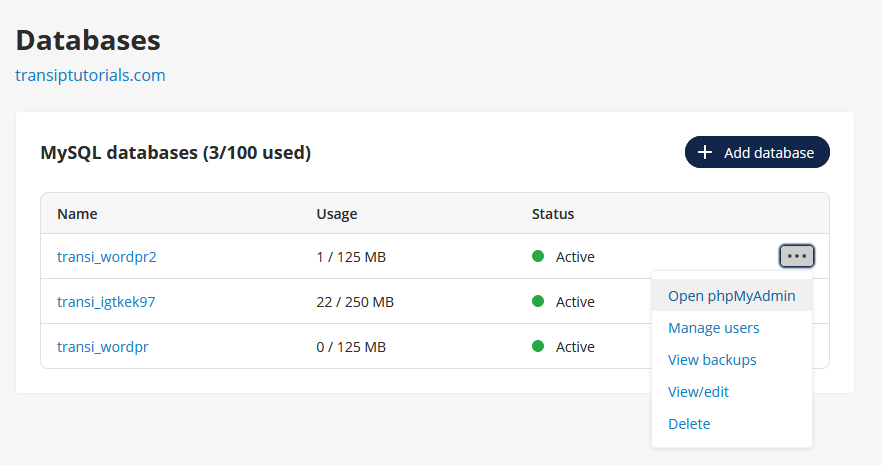
This page shows how many databases you are currently in use, as well as the database name, the amount of assigned web space and the status of the database.
Click the three dots next to the database, followed by 'Open phpMyAdmin' to autmatically log in to phpMyAdmin.
Step 3
Once you're logged in to phpMyAdmin, you will see an overview of your database.
In our example we've installed WordPress on our Web Hosting, which can be seen by the various "wp_...." files.
- If you've created a custom website and uploaded your own database, the data from that database will be shown here. In that case the steps for creating a backup are exactly the same.
Now make sure you've selected your database in the left column. The database in our example is called 'transiptutorials_com_wordpress'.
Now click on 'Export', which is marked red in our example.
Step 4
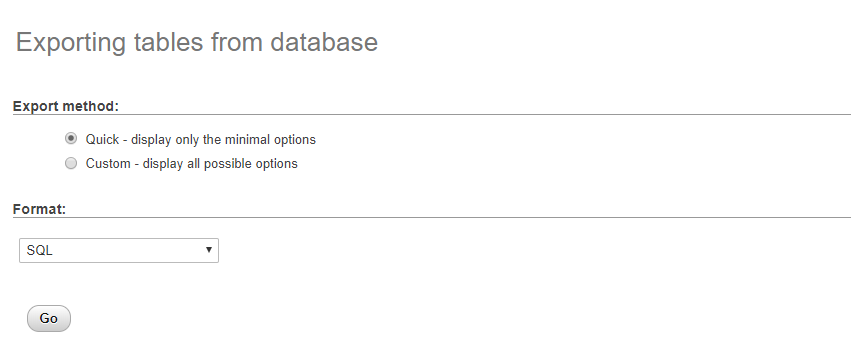
On the next page, make sure the 'Export method' is set to 'Quick' and the 'Format' is set to 'SQL'.
Now press 'Go' to save a backup file of your database. Make sure you remember in which local folder you've saved the backup file. We'll be using this file later for the smaller Web Hosting.
Downgrade your current Web Hosting
Now you've secured the backups of your website files and database, it's time to downgrade your Web Hosting. To do so, you will need to cancel your current Web Hosting and order a new, smaller Web Hosting.
In our example we will show you how to downgrade your webhosting to a smaller package.
Step 1
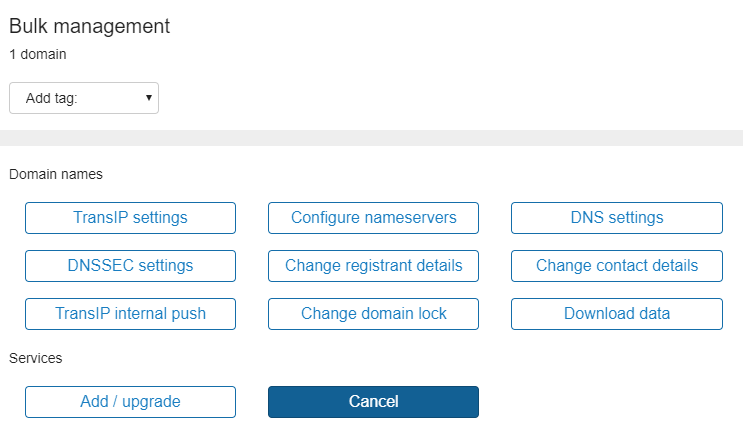
Log in to your control panel again and click on the tab 'Domains & Hosting' at the top. Now check your domain name on the left and click 'Cancel'.
Step 2
Now make sure you uncheck the domain name. If the domain name is checked, that would cancel the domain name itself.
Warning: if the domain name is checked, then this will cancel the domain name. Since you want to keep the domain, make sure the domain name is unchecked.
If you cancel the domain name it will go into 'redemptionperiod' and you will not be able to use the domain name anymore. More information about 'redemptionperiod' can be found here.
Only check the Web Hosting and select 'Immediately' next to Cancel by, then click 'Request cancellation'.

Check if you've only selected the Web Hosting and confirm the cancellation on the right hand side.
Step 3
It may take a few minutes before the cancellation is fully processed. Refresh the 'Domains & Hosting' page untill the Web Hosting icon next to your domain name is gone.
Afterwards, go to the webhosting product page to order a new (smaller) webhosting package. Click 'Order' below the chosen option.

Step 4
Finalize the order and your smaller Web Hosting will be activated after a few minutes.
Take note: Previously your domain name used the DNS settings for the larger Web Hosting. As you've ordered a new, smaller Web Hosting, the required DNS records will have changed.
Make sure to change the domain name's DNS records to match your Web Hosting. We send an email with the required DNS settings right after you order a Web Hosting package. See the article 'The DNS settings of my web hosting package' for the details on setting the correct DNS settings for your Web Hosting.
Upload the backup of your database to the new Web Hosting
Once your new, smaller Web Hosting has been activated, you will first need to upload the backup of your database to the Web Hosting.
Step 1
Log in to the control panel and click 'Shared Hosting' in the menu. Next, select your domain below 'Products'.

Now click the 'Site' tab at the top, followed by 'Databases'.

Step 2
Click '+ Add database'.
Step 3
Give your database a new name and enter the database size. In our example we use same database name we used earlier (wordpr2) and a database size of 125 MB (which is usually more than enough).
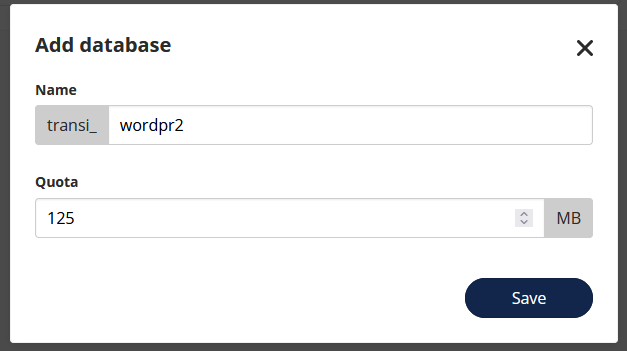
After pressing 'Save', you will find the database in the database overview.
Once your database is created, you'll see a notification that the database credentials are sent to your email address. This email is sent to the email address listed in 'My Account' in your control panel.
If you do not remember the password of your database, click the three dots next to the database in the database overview, followed by 'Manage Users'. You can view the username(s) here or create a new one. To change a user's password, simply click on the username.
Step 4
Open the phpMyAdmin login page by clicking the three dots next to a database, followed by 'Open phpMyAdmin' to log in to phpMyAdmin automatically.

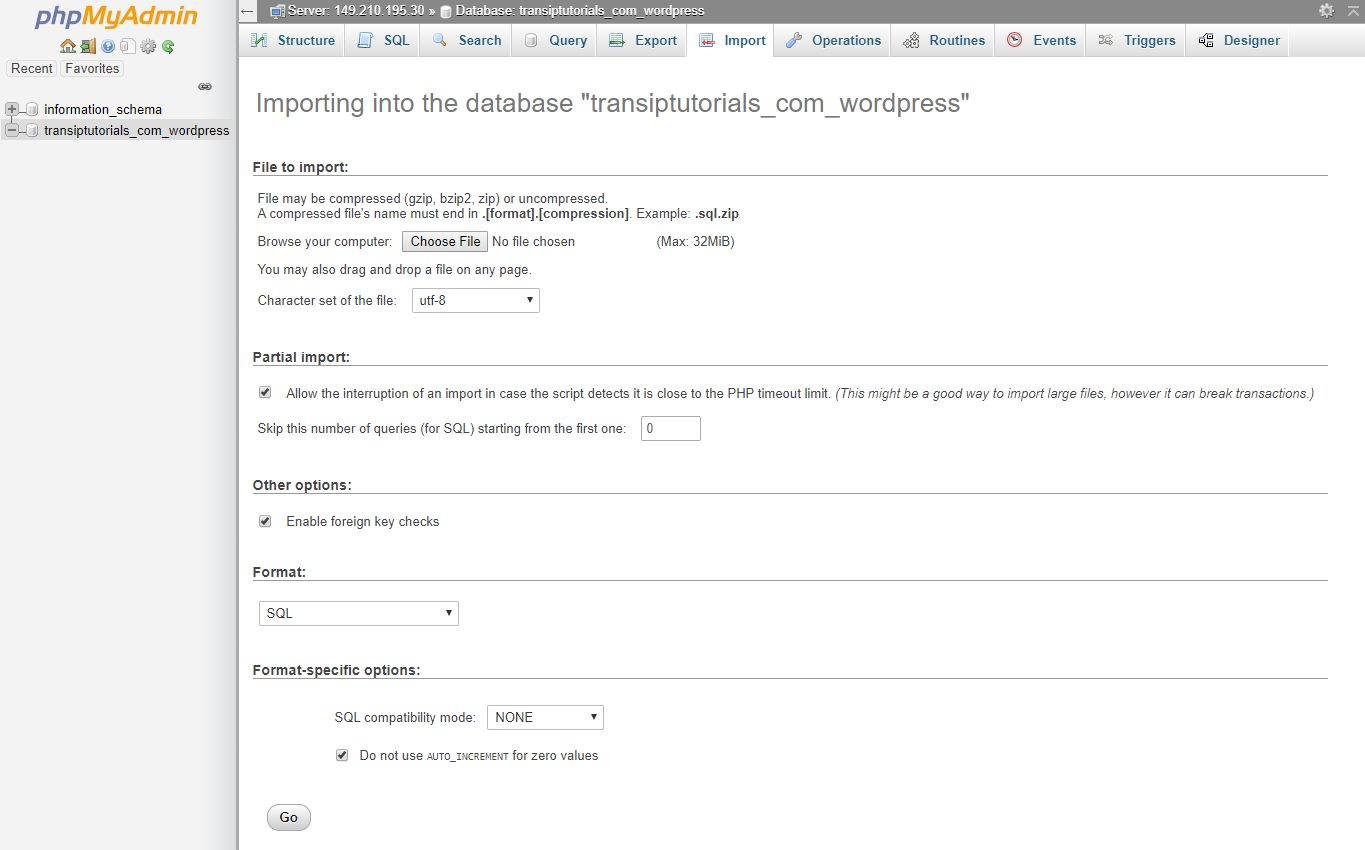
You will now see an overview of your new, empty database. Select the database on the left by clicking it in the left column if it's not already selected. Now click 'Import' as shown in red in the image below.

Step 5
Now click 'Choose file' and select the backup file of the database (with the file type .sql) you saved in 'Create a backup of your database'. Click 'Go' to start the import of your database.
Step 6
The database will be imported immediately, as can be seen by the database files on the left and the notification at the top.

Add your database credentials to your website files
Your website needs to be able to establish a connection to it's database. This connection is configured inside the website files you backed up earlier in 'Create a backup of your website files'.
Because you've created a new database with possibly new credentials, you need to make sure these credentials are listed in your website files before continuing.
Step 1
Locate the folder where you saved the backup of your website files. In this folder, look for the configuration file called 'wp-config.php' (for WordPress) or 'config.php' (commonly used for other websites). Open this file with software that can edit .PHP files, such as Notepad++ or PhpStorm.
Step 2
Search the configuration file for the lines DB_NAME, DB_USER, DB_PASSWORD and DB_HOST. These lines are usually found around line 17. The code block below shows an example of these lines in a wp-config.php file.
// ** MySQL settings - You can get this info from your web host ** //
    /** The name of the database for WordPress */
    define('DB_NAME', 'transiptutorials_com_wordpress');
    /** MySQL database username */
    define('DB_USER', 'transiptutorials_com_wordpress');
    /** MySQL database password */
                                        define('DB_PASSWORD', 'password_old');
/** MySQL hostname */
    define('DB_HOST', 'localhost');
- If you chose to keep the previous database name when you created the new database, you won't have to edit the DB_NAME and DB_USER lines.
- If you chose a different database name when you created the new database, make sure to change the values in parentheses after DB_NAME and DB_USER so that they match your database name (and database username).
- Replace the database password with your current database password in the value in parantheses after DB_PASSWORD. In our example the database password was password_old.
- Replace the DB_HOST with your database's host name.
- You can find the exact database name in the database overview, and the database username by clicking the three dots next to the database name, followed by 'Manage users'. To view the host name, click on the database name.
In our example, our new database uses the following information:
- Databasenaam: transi_wordpr2
- Gebruikersnaam: transi_wordpr2username
- Wachtwoord: new_password
- Hostnaam: transi-wordpr2.db.transip.me
This will look as follows in your wp-config.php file:
// ** MySQL settings - You can get this info from your web host ** //
    /** The name of the database for WordPress */
    define('DB_NAME', 'transi_wordpr2');
    /** MySQL database username */
    define('DB_USER', 'transi_wordpr2username');
    /** MySQL database password */
    define('DB_PASSWORD', 'new_password');
    /** MySQL hostname */
    define('DB_HOST', 'transi-wordpr2.db.transip.me');
Save the configuration file in the exact same folder once you've added the correct database credentials.
Upload the backup of your website files to the smaller Web Hosting
Now that you've created a new database and added its credentials to your website files, it's time to upload the website files to the smaller Web Hosting.
Step 1
Log in to the SFTP server again using the SFTP client you used before (such as Filezilla or Cyberduck).
Step 2
In the SFTP client, search for the folder where you saved the backup of your website files. In our example we're using Filezilla; the folder we used is called 'My website files'. Click on the '+' sign next to the folder to view its contents. The 'www' folder (and any other folders you may have backed up) should be visible.
Step 3
On the right hand side you'll find the folders of your Web Hosting. Click the 'www' folder on the right to open its content. You should now only see the index.php file, which is created by default after ordering a Web Hosting at TransIP.
First, delete the index.php file. Next, drag the contents of the local 'www' folder on the left to the 'www' folder of your Web Hosting on the right.
Step 4
Your SFTP client will now start uploading the backup of your website files to your Web Hosting. Once the upload is complete, your website will be active again on your downgraded Web Hosting! You can check this by visiting your domain name.
My website is not visible yet
In that case make sure your domain name is using the correct DNS settings of your new, smaller Web Hosting.
If you only use your domain name with Web Hosting, we recommend activating the 'TransIP settings'. This makes your domain automatically use the correct DNS settings for your Web Hosting.
If you've configured the DNS settings of your domain name to point to email servers (or other services) from another provider, we recommend adding the correct DNS settings yourself.
See the article 'The DNS settings of my web hosting package' for the details on setting the correct DNS settings for your Web Hosting.
I want to downgrade to webhosting Core or Pro
Downgrade your current Web Hosting
When you have confirmed that your Pro or Max package fits into a Core or Pro package, you can downgrade your package. You can do so by navigating to the ‘Cancel’ page in your control panel. There you can opt to downgrade to a smaller package instead of cancelling.
What happens to my invoice when I downgrade to Web Hosting Core or Pro?
- If you perform the downgrade before you have received the invoice for your current package, your next invoice will only include the smaller package.
- If you perform the downgrade after you have received the invoice for your current package, you will receive a discount on your next invoice(s) for the unused period of the larger package, until the discount has been fully settled.
Step 1
Log in to your control panel again and click on ‘Domain’.
Now check your domain name on the left and click 'Cancel'.

Step 2
If your package is eligible to downgrade, you will see a banner to change your package to a smaller one:

Click ‘Change package’ to view the available options.
Step 3
You can now select which package(s) you can downgrade to. Select the package you wish to downgrade to and confirm by clicking ‘Order’. Your downgrade will be performed immeditately.

In this article we showed you how to downgrade Web Hosting at TransIP.
If you have any questions regarding this article, please contact our support team. You can reach them using the 'Contact us' button below or via the 'Contact' button inside your control panel.


