There's an ever increasing global shortage of IPv4 addresses, as such we embrace IPv6 as the future of the internet. Not every party supports IPv6. Github.com only supports IPv4 addresses for example. Perhaps your VPS makes exclusive uses of IPv6 however and you still like to be able to use repositories on Github.
For this, we offer a (temporary) transparant SSH / HTTPS Github proxy which accepts IPv6 traffic and sends it out as IPv4 traffic. In this tutorial we show you how to easily make use of our Github IPv6 Proxy.
- The Github IPv6 Proxy can only be used for traffic to Github using a VPS from TransIP which uses IPv6.
- We have no control on whether or not Github will for example rate limit our proxy. As such, we offer no warrantees on its continued functionality and instead implore Github to support IPv6.
Using the TransIP Github Proxy in Linux-distros
Step 1
Connect to your VPS using the VPS console in the control panel or SSH, and open the /etc/hosts file:
sudo nano /etc/hosts
Step 2
At the very end of the opened file, add the following lines:
2a01:7c8:7c8::1337 github.com
2a01:7c8:7c8::1337 api.github.com
2a01:7c8:7c8::1337 codeload.github.com
 2a01:7c8:7c8::1337 objects.githubusercontent.com
2a01:7c8:7c8::1337 raw.githubusercontent.com
The file in its entirety could now look something like this:
127.0.0.1 localhost

# The following lines are desirable for IPv6 capable hosts
::1 ip6-localhost ip6-loopback
fe00::0 ip6-localnet
ff00::0 ip6-mcastprefix
ff02::1 ip6-allnodes
ff02::2 ip6-allrouters
ff02::3 ip6-allhosts

2a01:7c8:7c8::1337 github.com
2a01:7c8:7c8::1337 api.github.com
2a01:7c8:7c8::1337 codeload.github.com
2a01:7c8:7c8::1337 objects.githubusercontent.com
2a01:7c8:7c8::1337 raw.githubusercontent.com
Save the changes and save the file (ctrl + x > y > enter). That's it! You can now use Github from a VPS using IPv6. You can for example test this by cloning our API repository:
git clone Using the TransIP Github Proxy in Windows Server
Step 1
Connect to your VPS using the VPS console in the control panel or using Remote Desktop.
Step 2
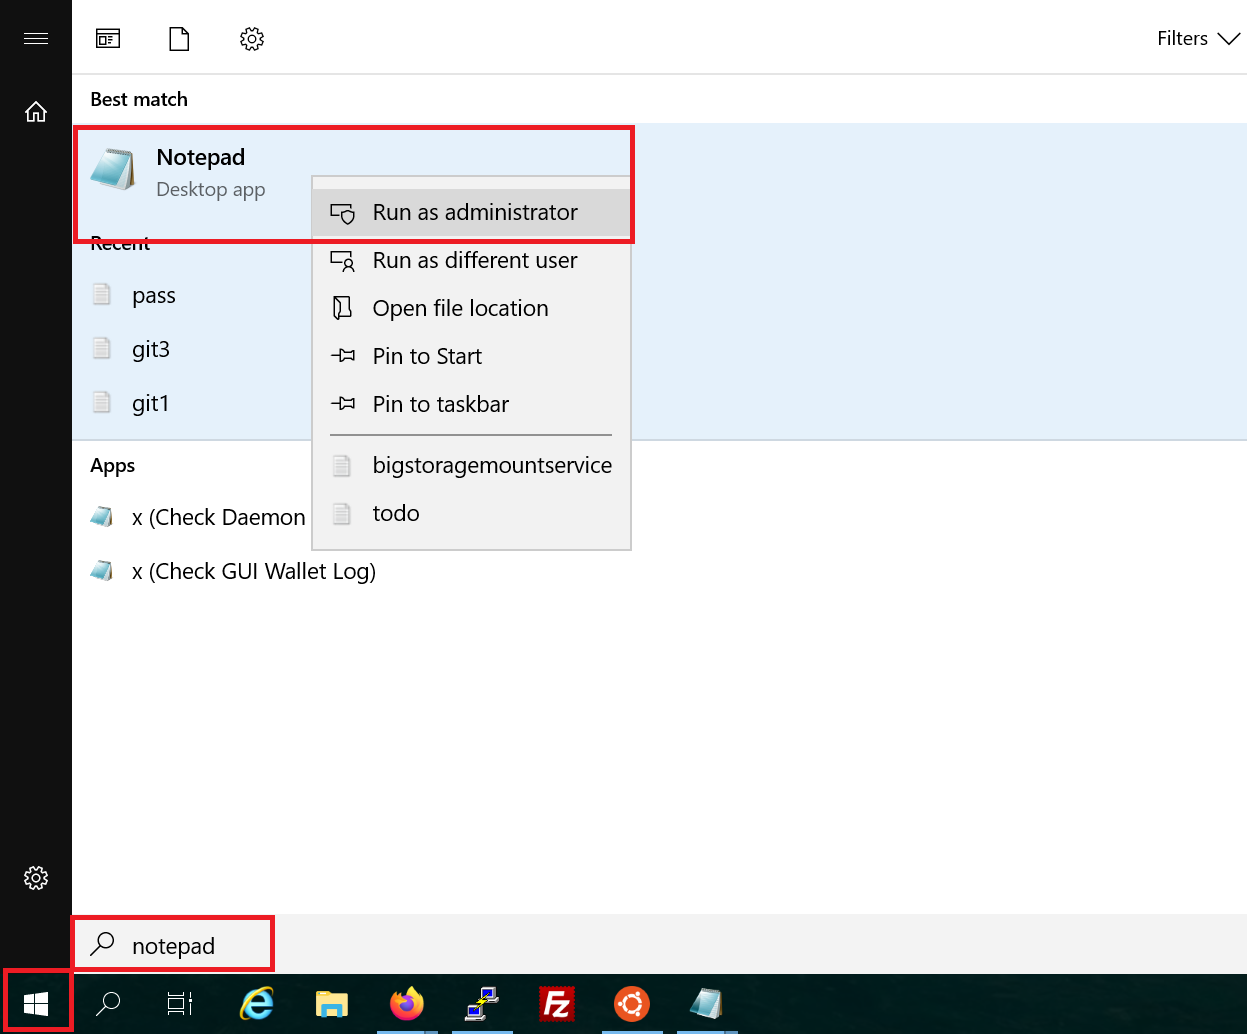
Click the Windows Start button and type 'Notepad'. In the results, click on 'Notepad' using the right mouse button and select 'Run as Administrator'.

Step 3
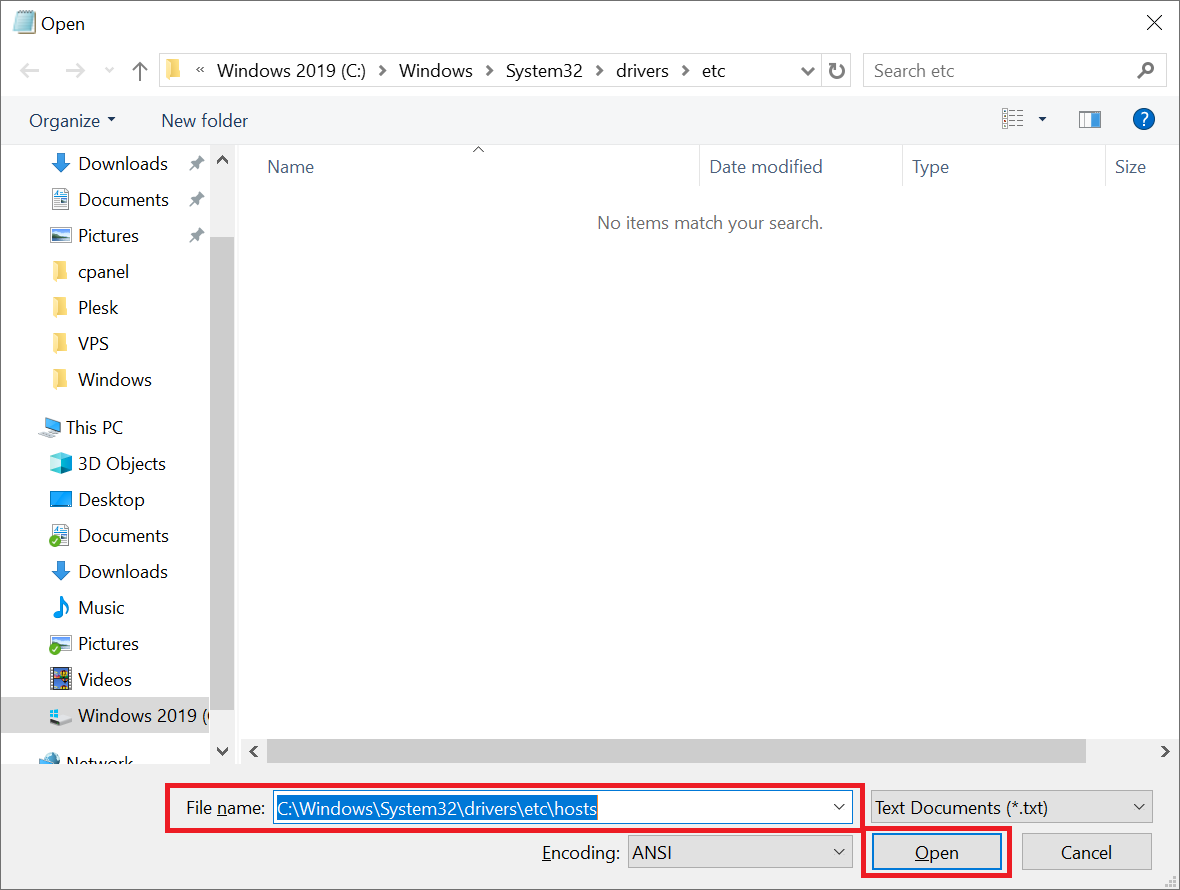
Iin Notepad click on 'File' > 'Open'.

Step 4
At the bottom behind 'File name' paste the line 'C:\Windows\System32\drivers\etc\hosts' and click on 'Enter'.

Step 5
At the bottom of the opened file, add the following lines:
2a01:7c8:7c8::1337 github.com
2a01:7c8:7c8::1337 api.github.com
2a01:7c8:7c8::1337 codeload.github.com
 2a01:7c8:7c8::1337 objects.githubusercontent.com
2a01:7c8:7c8::1337 raw.githubusercontent.com
The entire file may look something like this now:
# Copyright (c) 1993-2009 Microsoft Corp.
#
# This is a sample HOSTS file used by Microsoft TCP/IP for Windows.
#
# This file contains the mappings of IP addresses to host names. Each
# entry should be kept on an individual line. The IP address should
# be placed in the first column followed by the corresponding host name.
# The IP address and the host name should be separated by at least one
# space.
#
# Additionally, comments (such as these) may be inserted on individual
# lines or following the machine name denoted by a '#' symbol.
#
# For example:
#
#      102.54.94.97     rhino.acme.com          # source server
#       38.25.63.10     x.acme.com              # x client host

# localhost name resolution is handled within DNS itself.
#	127.0.0.1       localhost
#	::1             localhost

2a01:7c8:7c8::1337 github.com
2a01:7c8:7c8::1337 api.github.com
2a01:7c8:7c8::1337 codeload.github.com
2a01:7c8:7c8::1337 objects.githubusercontent.com
2a01:7c8:7c8::1337 raw.githubusercontent.com
Save your changes (ctrl + s) and close the file. That's it! You can now use Github using a VPS via IPv6.
This concludes our tutorial about using TransIP's Github IPv6 proxy.
Should you have any questions left regarding this article, do not hesitate to contact our support department. You can reach them via the ‘Contact Us’ button at the bottom of this page.


