This article explains how to configure your email address at TransIP on your iPhone and iPad.
Haven't created an email address yet? Get started right away with our Web Hosting and Email Only services. Read the article 'Creating a new email address' for more information.
To use email with our Web Hosting and Email Only services, your domain name needs to use the correct DNS records.
If your domain name uses the TransIP settings, we will automatically take care of the DNS for you. If you want to configure the DNS yourself, make sure to add the MX, TXT and CNAME records for your Web Hosting or Email Only service.
- The article 'The DNS settings of my Web Hosting' shows you which DNS records you need to add.
- The article 'Entering DNS records and nameservers via the control panel' shows you how to add these DNS records.
This article was created using iOS version 13.0. We'll be describing how to configure your email address at TransIP on an iPhone. The steps for the configuration on an iPad are exactly the same.
Configuring your email address on your iPhone and iPad
Open the Mail app on your iPhone or iPad to start the configuration of your email address. This app is installed on every iPhone and iPad.
- If you've added an email address in Mail before, you will need to manually add an account. Head over to Step 1.
- If you haven't added an email address in the Mail app yet, you will be asked to create a new email account. In that case, head over to Step 3.
Step 1
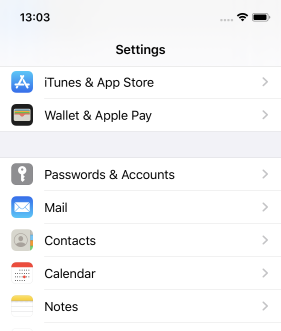
Open 'Settings' on your iPhone or iPad and tap 'Passwords and accounts'.
Step 2
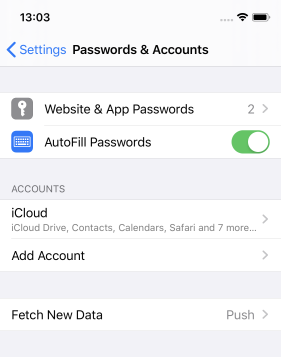
Tap 'Add account'.
Step 3
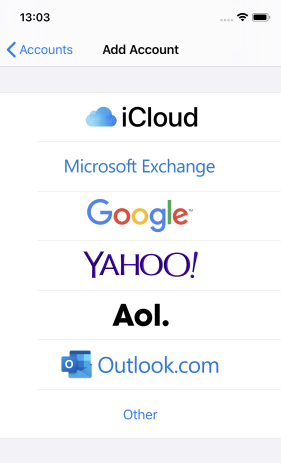
You will see an overview of possible email accounts to set up. Because you're configuring your own email address, tap 'Other'.
Step 4
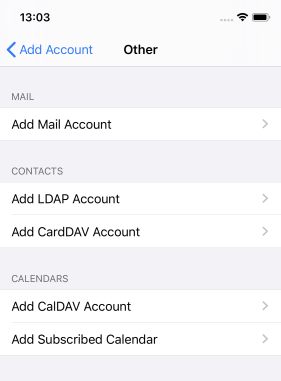
Tap 'Add Mail Account'.
Skip this step if you've started the configuration of your email address using the Mail app.
Step 5
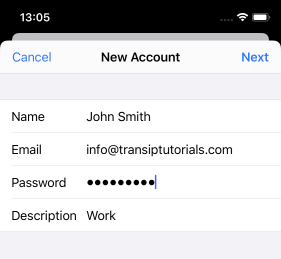
Enter the general settings of your email address in the next screen.
- Name: Enter the name you want to send and receive e-mails with.
- E-mail: Enter your email address.
- Password: Enter the password of your email address.
- Description: Enter the name of the email account. This helps distinguishing different (email) accounts.
Can't remember your password? Use the steps in the article 'Changing the password of your email address' to set a new one.
Step 6
In the next screen you will be able to choose between configuring an IMAP and a POP3 account. In our example we'll show you how to configure an IMAP account.
Choose 'IMAP' at the top.
You will find that the settings from step 5 are already entered.
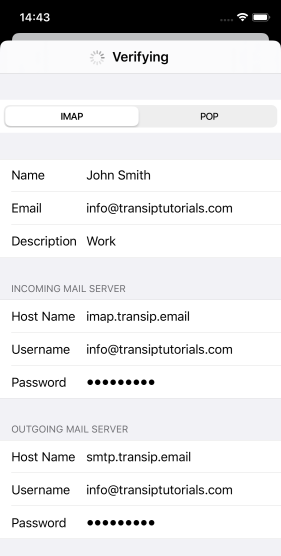
Fill out the remaining fields with the information below.
Incoming mail server
- Host Name: Enter imap.transip.email
- Username: Enter your email address.
- Password: Enter the password of your email address.
Outgoing mail server
- Host Name: Enter smtp.transip.email
- Username: Enter your email address.
- Password: Enter the password of your email address.
Additional settings such as the ports or SSL settings can be found in the article 'The email settings at TransIP'.
Attention: Depending on your iOS version, you may find that entering the username and password for the 'Outgoing mail server' is marked as optional.
Make sure you enter the username (the email address) and password either way. If you leave this set to optional, your email address will not be configured correctly for sending emails.
After all the settings are entered, tap 'Next'.
Step 7
When the app has verified your email credentials, you can choose which apps you want to use your email address with.
Tap 'Save' to complete the configuration of your email address.
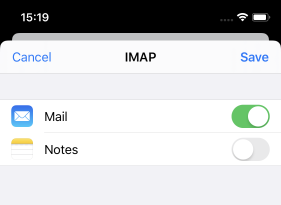
You can now use your email address in the Mail app on your iPhone or iPad!
In this article we explained how to configure your email address at TransIP on your iPhone and iPad.
If you have any questions regarding this article, please contact our support team. You can reach them using the 'Contact us' button below or via the 'Contact' button inside your control panel.


