


Transport Layer Security (TLS) is the successor to SSL and is used to secure communications on a computer network (e.g. the internet). For example, in order to secure the connection from your computer to a website or mail server. Nowadays, when people talk about SSL, they always mean TLS.
Various TLS versions have been released over the years, of which TLS 1.0 and TLS 1.1 have already reached a so-called 'End of Life' status since June 2018. This means that these versions will no longer be updated and their use is potentially unsafe.
For backwards compatibility, we have supported TLS 1.0 and TLS 1.1 on the VPS mail service until the end of 2021. However, for security reasons, we decided that as of the end of april 2022, we will no longer support these older TLS versions. Should you be unable to update your TLS version, we recommend disabling the VPS mail service and to instead mail from your VPS itself directly.
When using the VPS mail service, it is therefore important to ensure that you use TLS 1.2 or newer. Mail software is generally smart in its TLS usage and will automatically use the newest available version, meaning that if you support TLS 1.2 or newer, disabling 1.0 and 1.1 is optional (but recommended for security reasons).
In this tutorial we will show you how to check whether you are using TLS 1.2 or not and if so, how to disable TLS 1.0 or 1.1 on your mail server.
- Regardless of which operating system or mail server you use, it is important that they are up-to-date. Therefore, first check if there are any updates available and install them if any. Most software is set up in such a way that it automatically uses the last available TLS version.
- The steps in this guide are intended to get you started, but individual steps may vary with legacy installations. We offer no guarantees for operating systems and software versions that have reached an End of Life status.
- DirectAdmin and cPanel automatically use the most up-to-date TLS version. If your server is up to date, then no further actions are required.
Check if you're already using TLS 1.2 or newer in Linux
First things first! Are you actually using TLS 1.0 or TLS 1.1? There is a command in Linux that allows you to easily check this:
openssl s_client -connect 123.123.123.123:465
- Replace 123.123.123.123 with the IP address van je mailserver (of de hostname).
- You can change the port, for example to 587 (SMTP), 993 (IMAPS) or 995 (POP3S). In practise, usually these ports will all report the same, latest supported TLS version
- In regards of the VPS mailservice, it's only necessary to check port 465 or 587 (depending on your setup)
The command above will only show the latest supported TLS version. To check if you're supporting TLS 1.0 and/or TLS1.1 use the following commands as well:
openssl s_client -tls1 -connect 123.123.123.123:465
openssl s_client -tls1_1 -connect 123.123.123.123:465
When using these commands, you're shown a bunch of information, but all you need to look for is the following bit:
---
read R BLOCK
---
Post-Handshake New Session Ticket arrived:
SSL-Session:
    Protocol  : TLSv1.3
    Cipher    : TLS_AES_256_GCM_SHA384
Do you see Protocol : TLSv1.2 or Protocol : TLSv1.3 here? Congratulations! Your server already makes use of a safe TLS version.
Do you see Protocol : TLSv1.0 or Protocol : TLSv1.1? First, update your VPS completely using the commands below, restart your VPS and use the command above again to check if you now do see TLSv1.2 or TLSv1.3. If not, continue with the paragraphs below.
Ubuntu / Debian:
apt -y update && apt -y upgradeCentOS/AlmaLinux:
yum -y updateUsing TLS 1.2+ for Plesk installations
Plesk allows you to easily modify the TLS versions used (Plesk installations from 2019 already use TLS 1.2). In this tutorial we will show you how to disable TLS 1.0 and 1.1 in Plesk.
Disable TLS 1.0 and 1.1 in Dovecot
Regardless of whether you use Postfix or Exim to send mail, if you also want to be able to receive mail, you need Dovecot on a Linux distro. Fortunately, this means that the configuration is (almost) the same for different operating systems and, as a bonus, it is also quite simple to put together.
The easiest solution is simply to keep Dovecot (and your entire server) up to date. In the most recent versions of Dovecot, TLS 1.0 and 1.1 are disabled. Even with slightly less recent versions, the most recent TLS version is automatically used.
If you still want to manually disable TLS 1.0 and 1.1, adjust the configuration as follows:
Step 1
Open Dovecot's SSL configuration, most commonly the required file is:
nano /etc/dovecot/conf.d/10-ssl.conf
Step 2
Add the line below to the file.
ssl_min_protocol = TLSv1.2Dovecot versions older than 2.3 require another option instead:
ssl_protocols = TLSv1.2
Save the changes and close the file (ctrl + x > y > enter). Finally, reboot your VPS.
Disabling TLS 1.0 and 1.1 in Postfix
Postfix supports TLS 1.2 from version 2.6 and TLS 1.3 from version 3.4 and newer. You can check the version you are using with the command:
postconf -d | grep mail_version
If your installation is up-to-date enough you can set a minimum requirement of TLS 1.2 as follows:
Step 1
Open Postfix' configuration, in nearly all cases the file will be:
nano /etc/postfix/main.conf
Step 2
Add the lines below to the bottom of the opened file:
smtpd_tls_mandatory_protocols = !SSLv2, !SSLv3, !TLSv1, !TLSv1.1
smtpd_tls_protocols = !SSLv2, !SSLv3, !TLSv1, !TLSv1.1
smtp_tls_mandatory_protocols = !SSLv2, !SSLv3, !TLSv1, !TLSv1.1
smtp_tls_protocols = !SSLv2, !SSLv3, !TLSv1, !TLSv1.1
Save the changes and close the file (ctrl + x > y > enter). Finally, reboot your VPS.
Disabling TLS 1.0 and 1.1 in Exim
Step 1
Open Exim's configuration, depending on your operating system the file name may vary a little. The most common ones are:
Ubuntu / Debian:
nano /etc/exim4/exim4.conf.templateCentOS / AlmaLinux / Rocky Linux
nano /etc/exim/exim.conf
Step 2
Add the following line to the file immediately above the line which reads 'auth_advertise_hosts = ${if eq{$tls_cipher}{}{}{*}}'. auth_advertise_hosts usually is located in the first code block upon opening the file.
tls_require_ciphers = SECURE192:!VERS-SSL3.0:!VERS-TLS1.0:!VERS-TLS1.1:!VERS-DTLS0.9:!VERS-DTLS1.0
Depending on your setup, your server may support a different cipher set. Should you no longer be able to connect to Exim after these steps, then you can also try the following settings:
tls_require_ciphers = SUITEB192:!VERS-SSL3.0:!VERS-TLS1.0:!VERS-TLS1.1:+VERS-TLS1.2:-ARCFOUR-128
Save the changes and close the file (ctrl + x > y > enter). Finally, reboot your VPS.
Disabling TLS 1.0 and 1.1 for Exchange Server
It's important to first check whether or not you actually support TLS 1.0 and/or TLS 1.1 as your server may already be up-to-date bent. This can easily be done by checking the Windows registry:
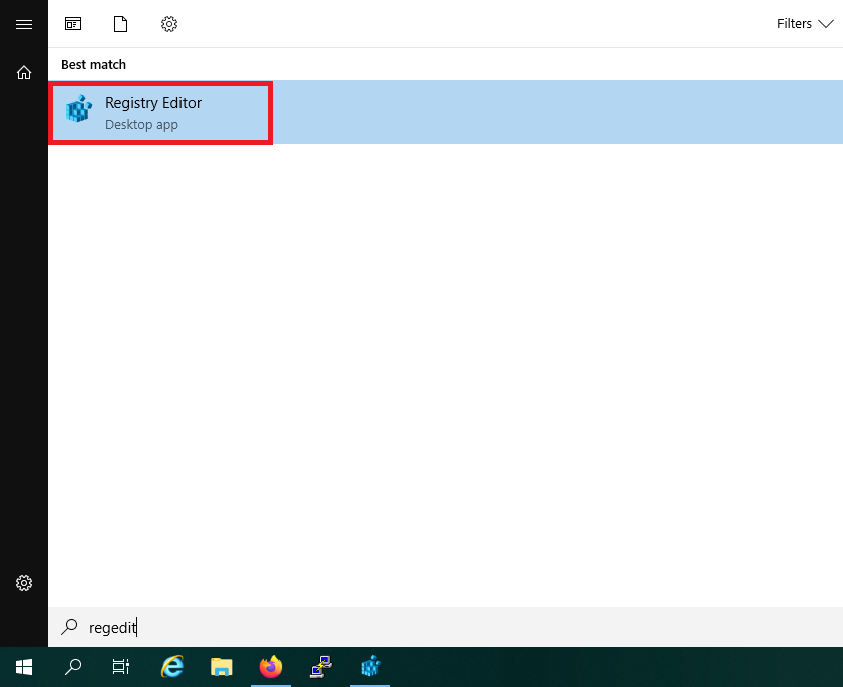
Step 1
Click on the Windows Start button, type 'regedit' and click on 'Registry Editor' in the search results.
Step 2
In the top of the Registry Editor, enter the line 'HKEY_LOCAL_MACHINE\SYSTEM\CurrentControlSet\Control\SecurityProviders\SCHANNEL\Protocols\', or click the folder structure on the left until you reach this specific folder.
Do you not see additional folders for TLS 1.0 and 1.1 but only TLS 1.2? Then you already don't use TLS 1.0 and 1.1 and are finished with this tutorial.
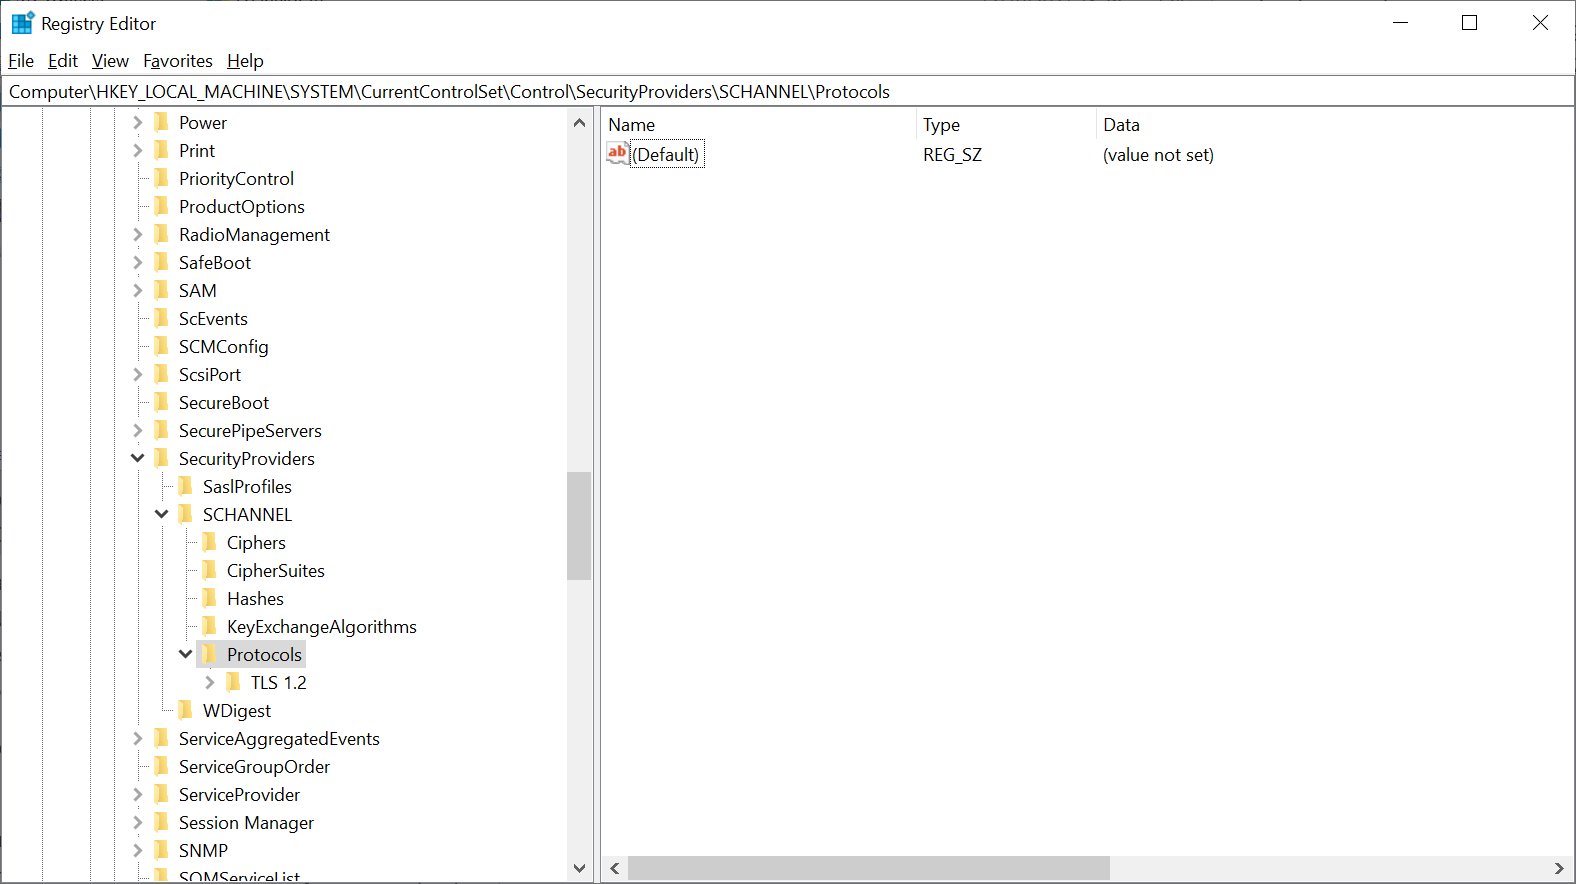
If you do however use TLS 1.0 and/or TLS1.1 additional steps are required:
Stap 1
Before actually disabling TLS 1.0 and 1.1, it's important that your Exchange server is actually ready for disabling TLS 1.0 and 1.1 and the exclusive use of TLS 1.2. For this, first follow the steps outlined in Microsoft's manual's below:
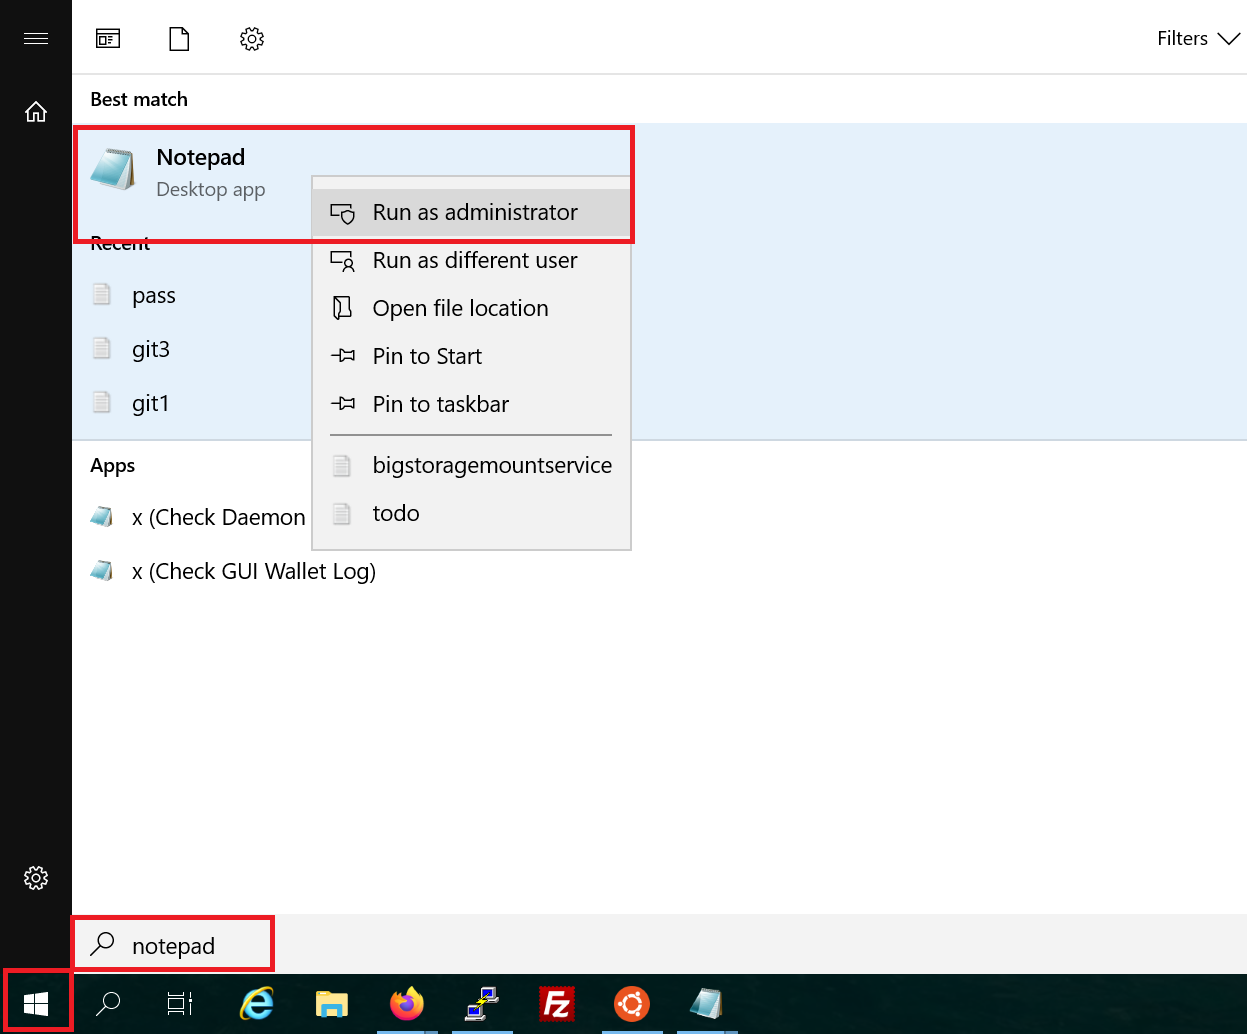
Step 2
Click the Windows Start button and type 'Notepad'. In the results, click with your right mouse button and select 'Run as Administrator'.
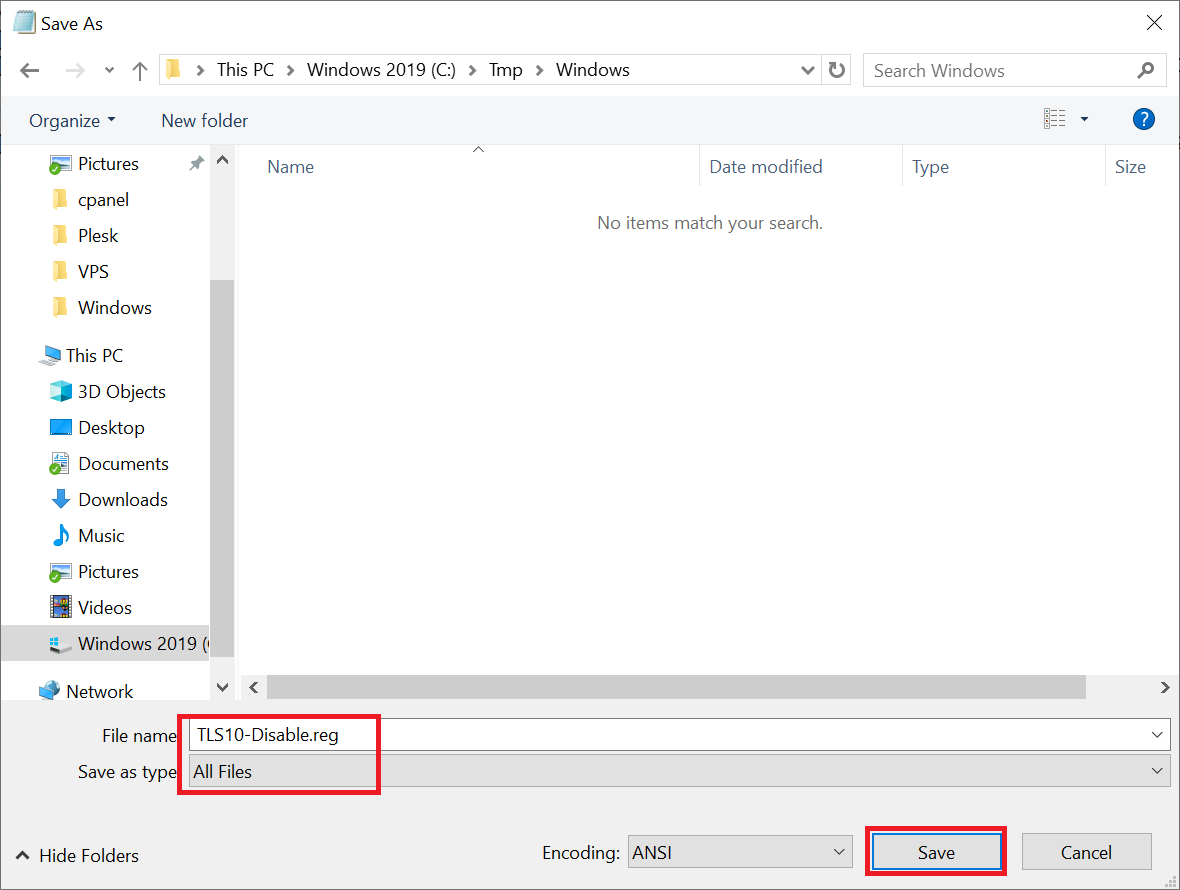
Stap 3
Add the text below:
Windows Registry Editor Version 5.00
[HKEY_LOCAL_MACHINE\SYSTEM\CurrentControlSet\Control\SecurityProviders\SCHANNEL\Protocols\TLS 1.0]
[HKEY_LOCAL_MACHINE\SYSTEM\CurrentControlSet\Control\SecurityProviders\SCHANNEL\Protocols\TLS 1.0\Client]
"DisabledByDefault"=dword:00000001
"Enabled"=dword:00000000
[HKEY_LOCAL_MACHINE\SYSTEM\CurrentControlSet\Control\SecurityProviders\SCHANNEL\Protocols\TLS 1.0\Server]
"DisabledByDefault"=dword:00000001
"Enabled"=dword:00000000
Save the file using the name and extension 'TLS10-Disable.reg' (Behind 'Save as type' select the option 'All files').
Step 4
Double click on the file you just created and click 'Yes' to accept its content being added to your registry.
Step 5
Repeat step 4 - 6 but this time, give the file the name TLS11-Disable.reg and the contents below:
Windows Registry Editor Version 5.00
[HKEY_LOCAL_MACHINE\SYSTEM\CurrentControlSet\Control\SecurityProviders\SCHANNEL\Protocols\TLS 1.1]
[HKEY_LOCAL_MACHINE\SYSTEM\CurrentControlSet\Control\SecurityProviders\SCHANNEL\Protocols\TLS 1.1\Client]
"DisabledByDefault"=dword:00000001
"Enabled"=dword:00000000
[HKEY_LOCAL_MACHINE\SYSTEM\CurrentControlSet\Control\SecurityProviders\SCHANNEL\Protocols\TLS 1.1\Server]
"DisabledByDefault"=dword:00000001
"Enabled"=dword:00000000
You have now finished disabling TLS 1.0 and 1.1 on your Exchange Server.
This concludes our tutorial on disabling TLS 1.0 and 1.1 on various mailservers.
Should you have any questions left regarding this article, do not hesitate to contact our support department. You can reach them via the ‘Contact Us’ button at the bottom of this page.