


Plesk Co-op is a modified version of Plesk aimed at working online together with colleagues. Plesk Co-op contains a complete mail server with i.a. e-mail, calendar, chat and cloud storage functionality. Plesk Co-op makes working together online as easy as possible, regardless of whether you do this in an office or remotely online.
In this tutorial we take a look at using Plesk Co-op for the first time. How do you configure your DNS-records for example, or create an email address and configure it in your software?
- Plesk Co-op uses our VPS mailservice.
- You can add any number of domains. You're only limited by the amount of users your license allows.
- Plesk Co-op updates itself automatically.
- Before following this tutorial, configure the reverse DNS for your VPS using the syntax mail.example.com.
What type of VPS do I need?
When ordering Plesk Co-op you choose a type of VPS and an amount of users. Each user is equals to an email address, Seafile and Mattermost account. You can upgrade and downgrade the number of Plesk Co-op users at any time. As such, we recommend starting with a lower number of users and scaling up as required.
For your VPS choice, we recommend an X4: Plesk Co-op requires at least 4GB of RAM. When you create more and more users over time, the hardware usage will increase. Since you can only upgrade a VPS and not downgrade it, we recommend starting smaller and scaling up as required by the number of users.
Configuring your DNS
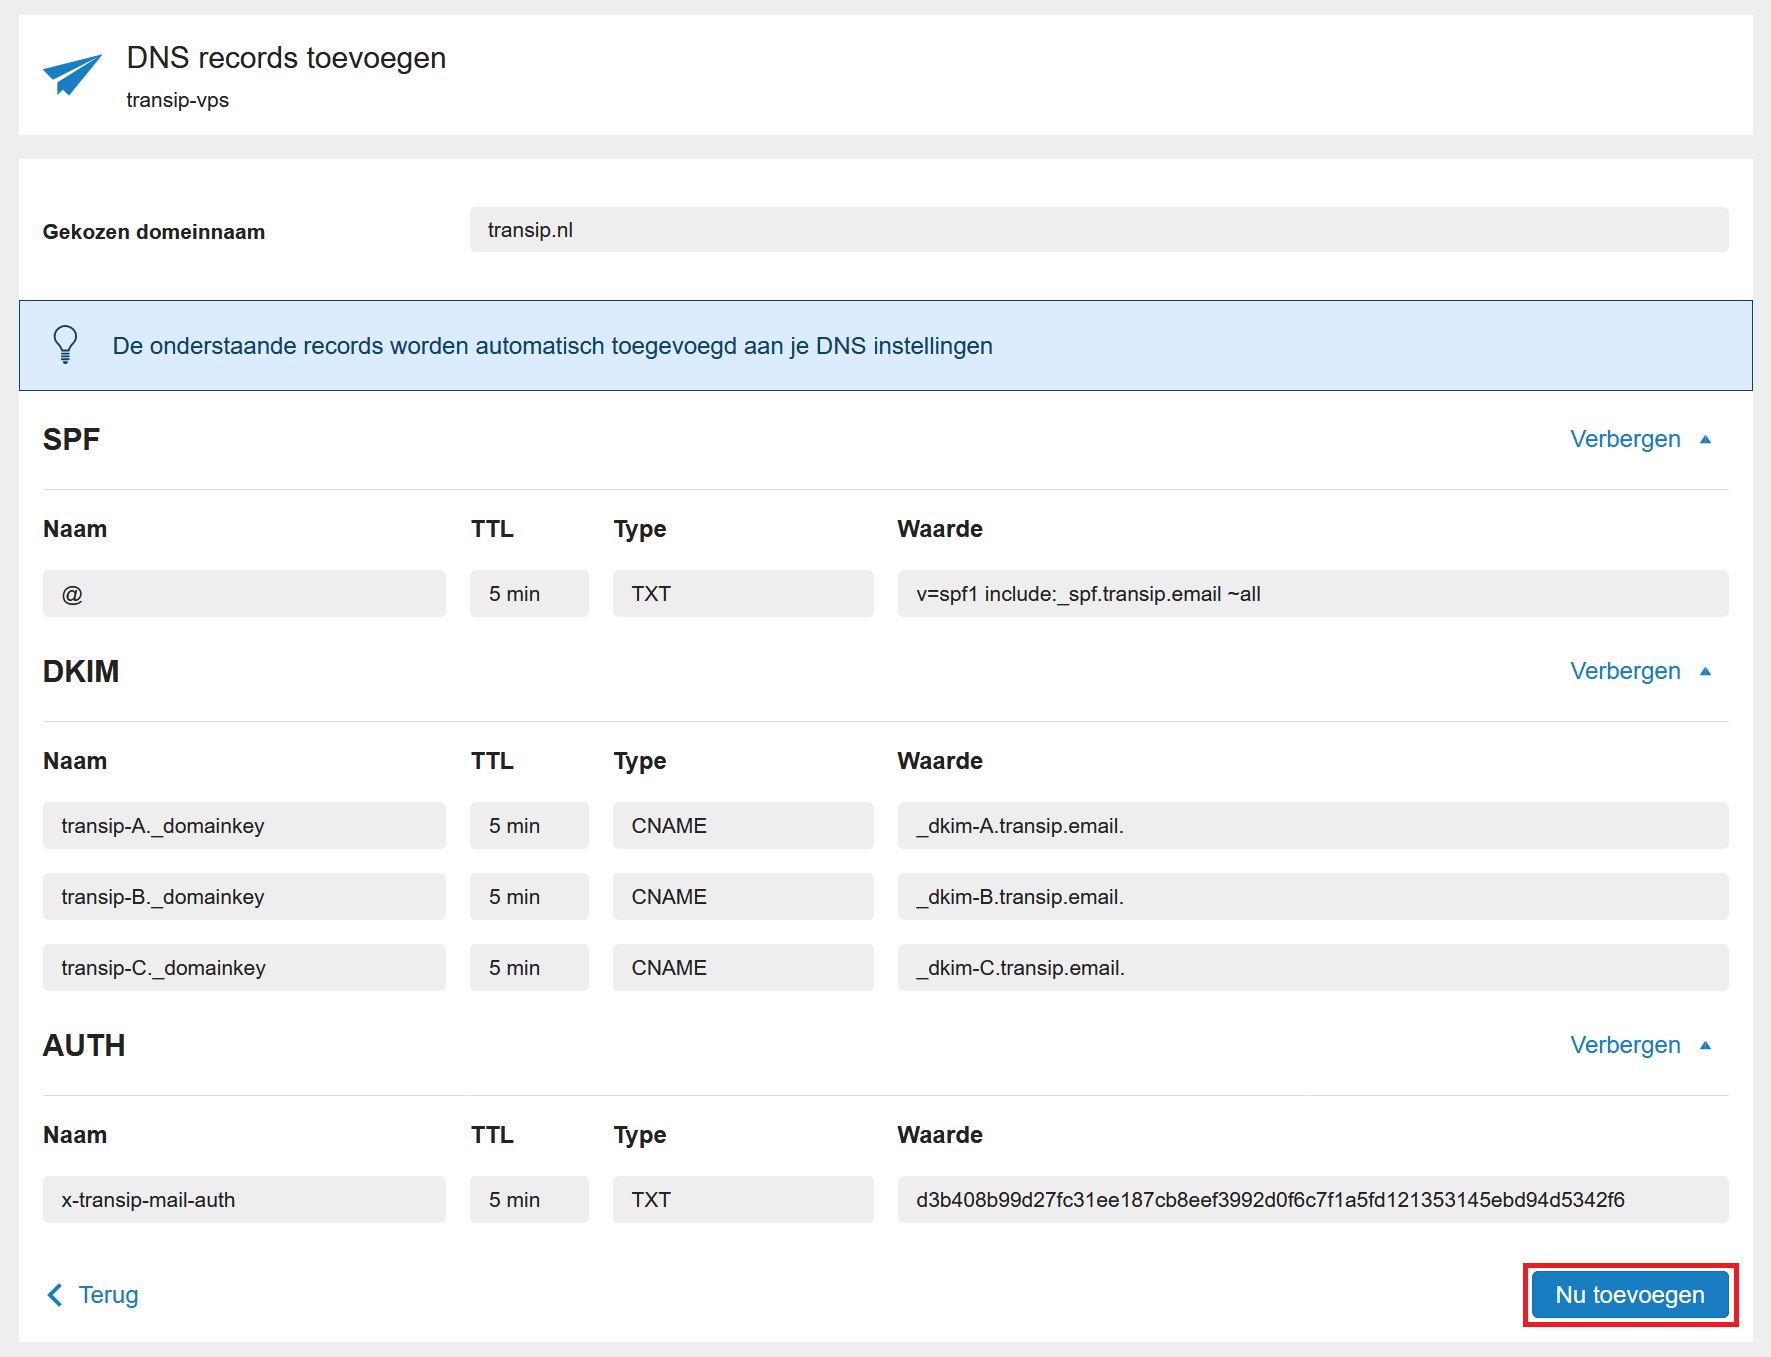
For the correct functioning of your email, it is important that the DNS records of your domain point to your VPS. This is a two part process:
- Link your domain to your VPS as explained in this tutorial. As a minimum, add the following DNS records (see the screenshot below for an example):
- An A- and AAAA record for the root of your domain (@)
- CNAME records with a value of @ for the subdomains: mail, server, webmail and www.
- Add the DNS records required for the VPS mailservice in a few clicks using the steps below
- Is your domain not listed in your TransIP account? Then use this tutorial and follow the steps for adding the DN records for the VPS mailservice.
- Would you like to manage your mail yourself and not use our mail service? Then disable the VPS mailservice and using this tutorial.
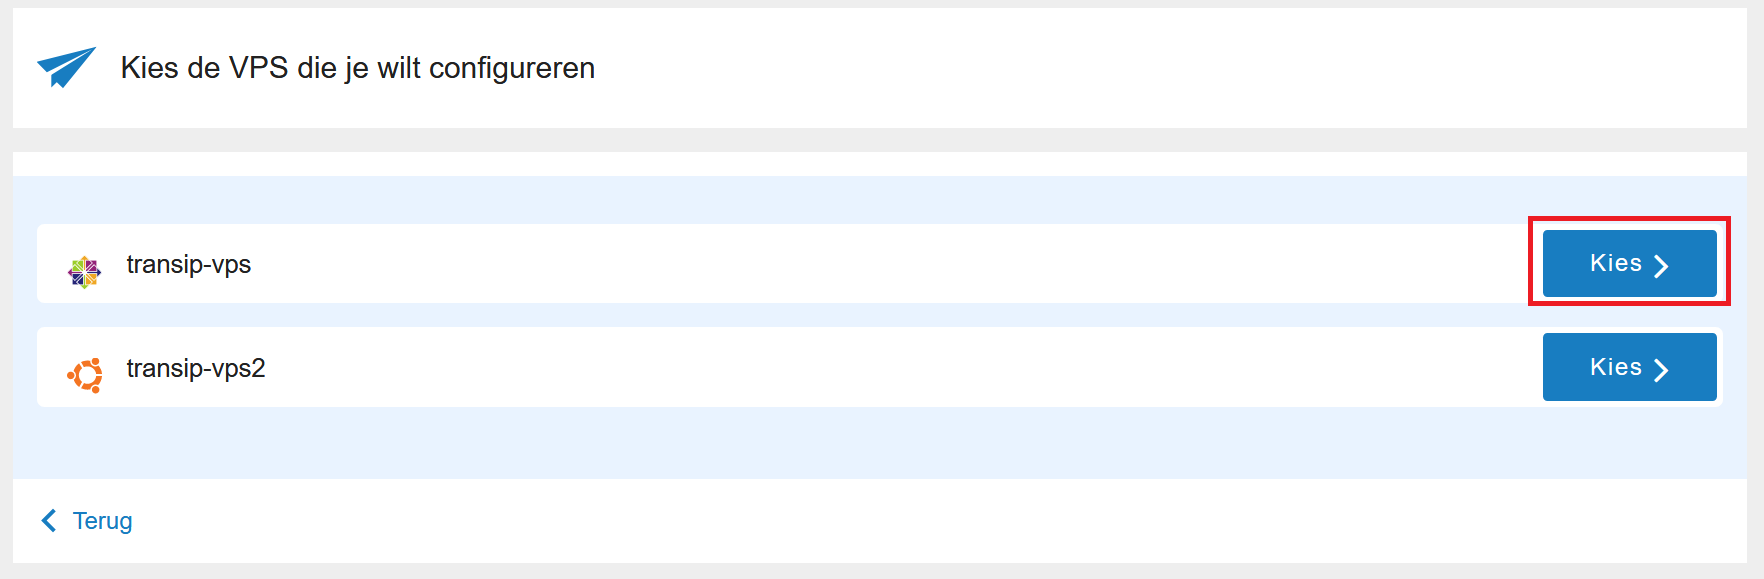
Step 1
Open the mailservice wizard via the configure button below:

Step 2
Click on 'Choose' behind the name of your VPS.
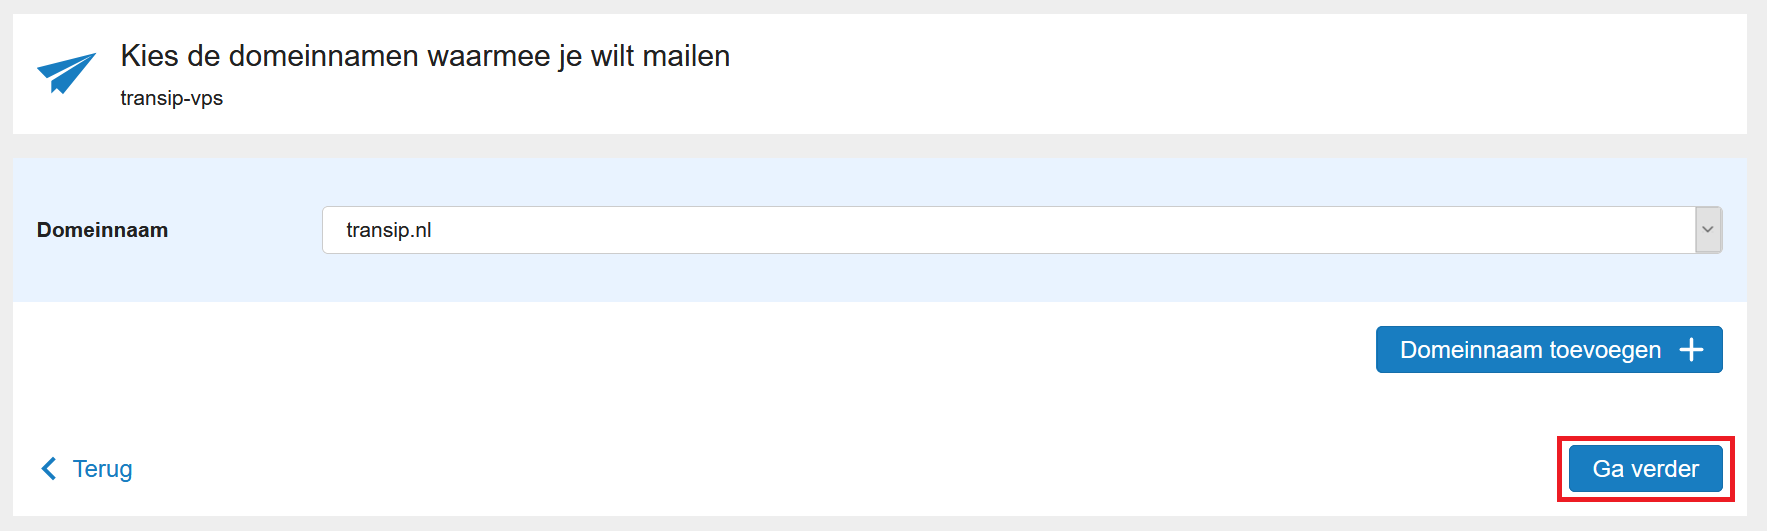
Step 3
Select the name of your domain and click 'Next'.
Step 4
Click on 'Add now' to automatically add the DNS records to your domain. In most cases the changes will have taken affect within 5 minutes.
Logging in for the first time
After installing Plesk Co-op you will receive an email with the password for the root user. You use this password to log in (for the first time) to Plesk and to switch to the root user in SSH. Keep the password safe, because your passwords are not accessible to us and will not be stored by us.
The e-mail also contains the web address of Plesk. This address is the IP of your VPS with the addition: 8443, for example 123.123.123.123:8443. When you log in to Plesk for the first time, there are a few steps involved in the initial setup:
Step 1
Go to the Plesk login page (e.g. 123.123.123.123:8443). You will see a notification similar to the screenshot below (depending on the browser and operating system you are using).
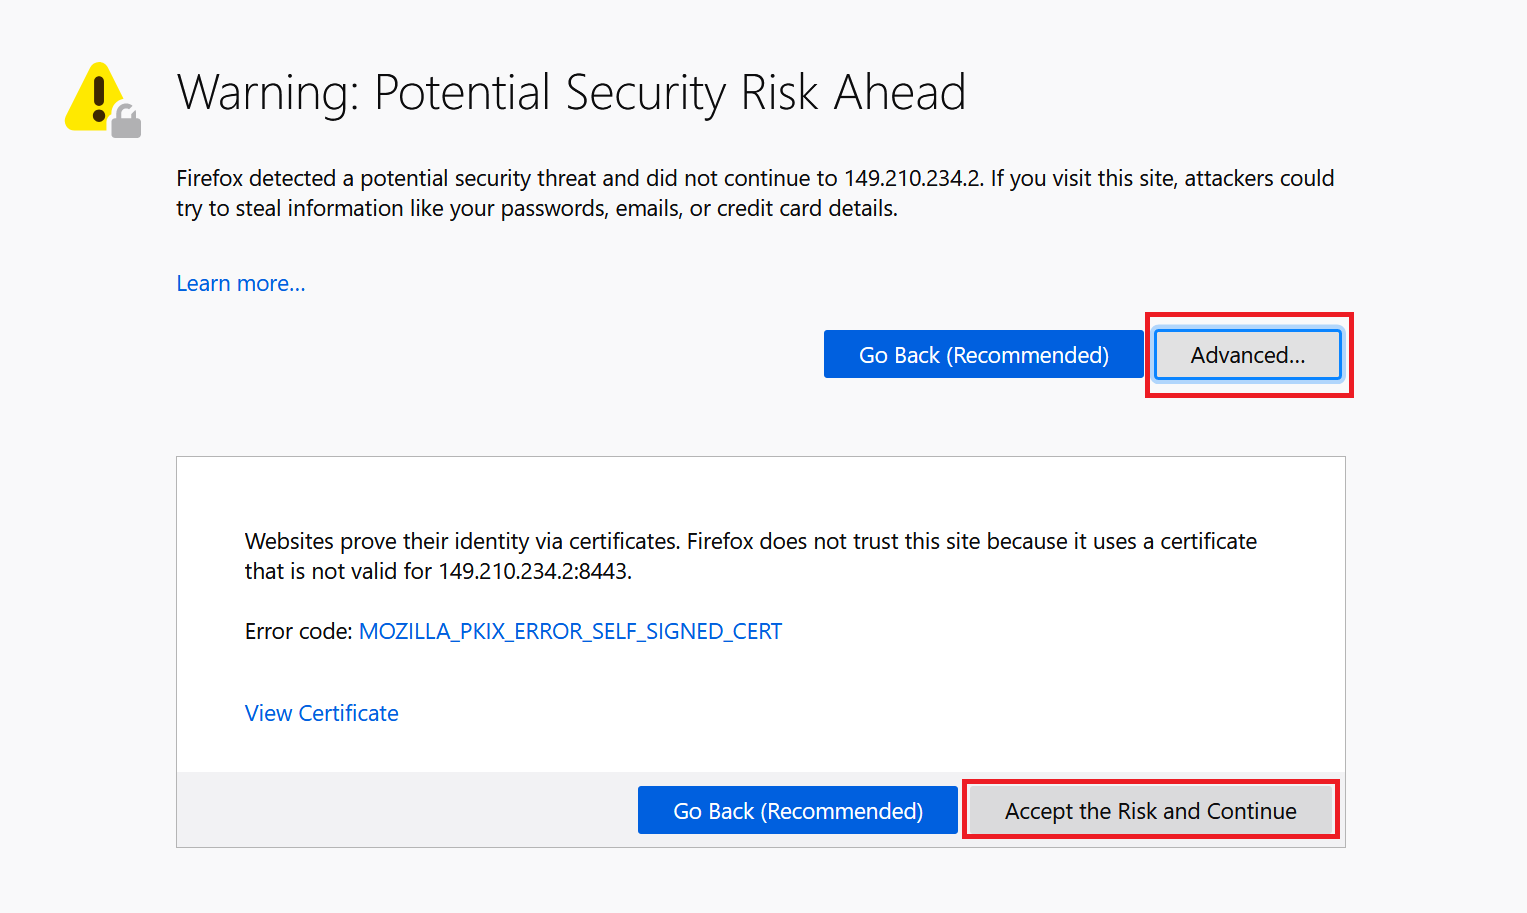
This message indicates that Plesk Co-op is using a self-signed certificate. A self-signed certificate is not trusted by your browser because it is not issued by a known certificate issuer. You will no longer see the message after you have configured an SSL certificate later in this guide and used your hostname to log in (e.g. via server.example.nl:8443).
Click on 'Advanced' and then 'Continue to 123.123.123.123 (unsafe)' to continue.
Log in to Plesk Co-op with your root username and password that you received by email. You can see an example in the screenshot below.

Step 2
You're now greeted by the screen below. Here, click on 'Add domain' to add a domain to Plesk Co-op.

Step 3
Fill in the fields as in the screenshot below (but with your own information). Then, click on 'Ok' to add your domain.
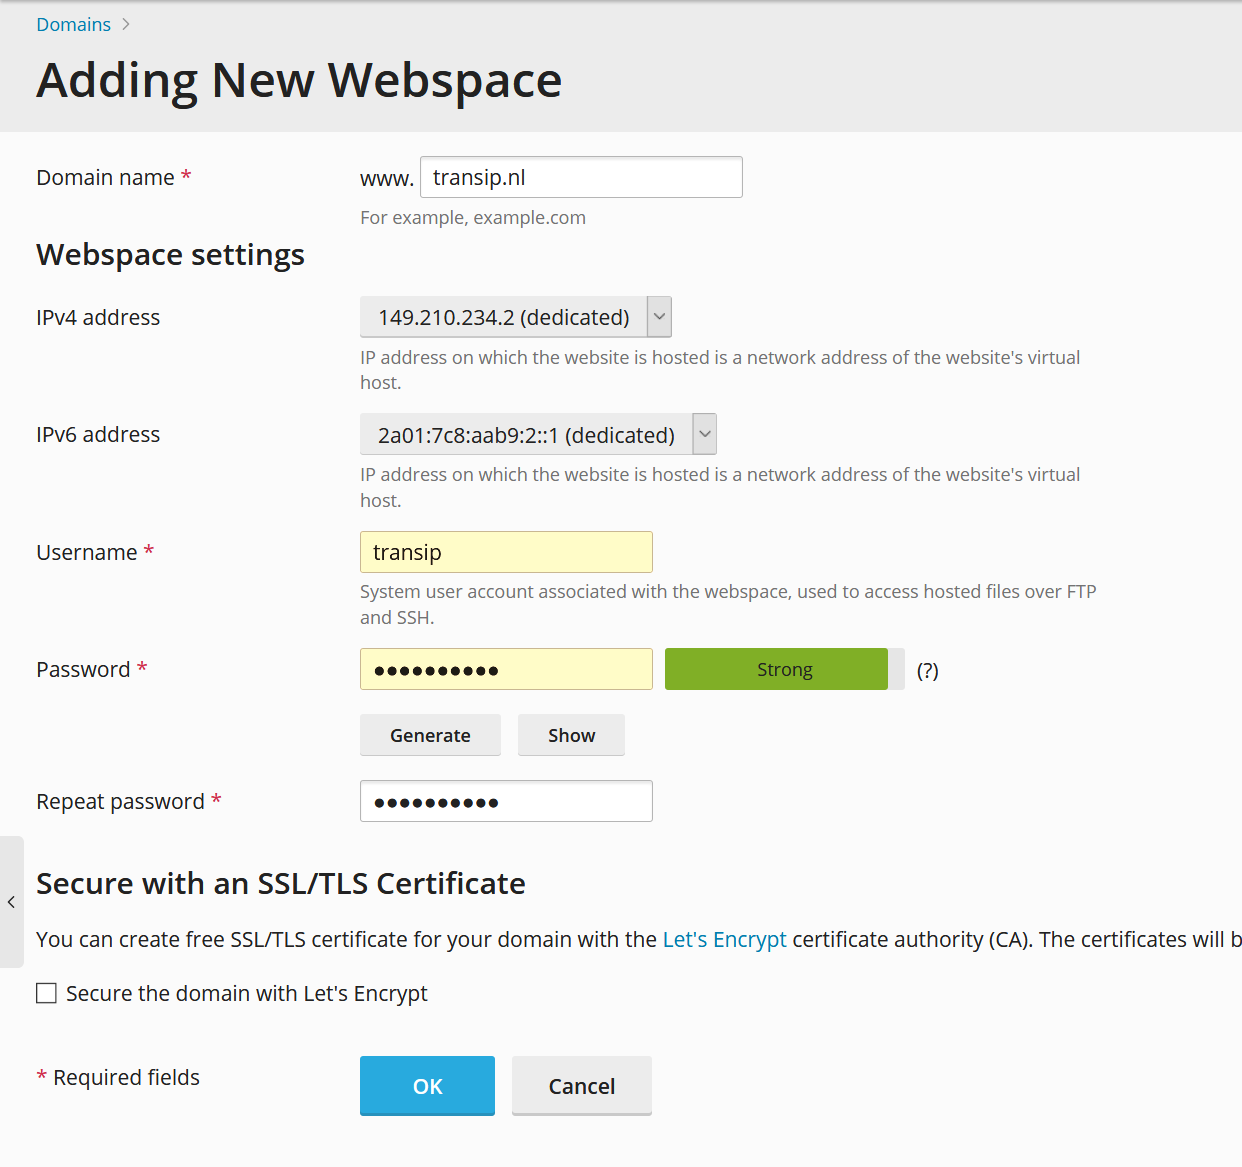
-
Secure the domain with Let's Encrypt: Automatically generate and renew a Let's Encrypt certificate for your domain. This requires additional DNS configuration. We recommend unchecking this and following the steps later in this tutorial for adding a Let's Encrypt certificate.
- Use a unique name as 'Username' (not admin for example).
- The 'Username' and 'Password' provided here are also used for FTP and SSH. Make sure to use a strong password and store it safely.
Changing your hostname
Your VPS comes with a temporary hostname. In order to be able to use functions such as 'Updates', it is advisable to use your own hostname, for example server.example.nl. You set your hostname in Plesk as follows:
Step 1
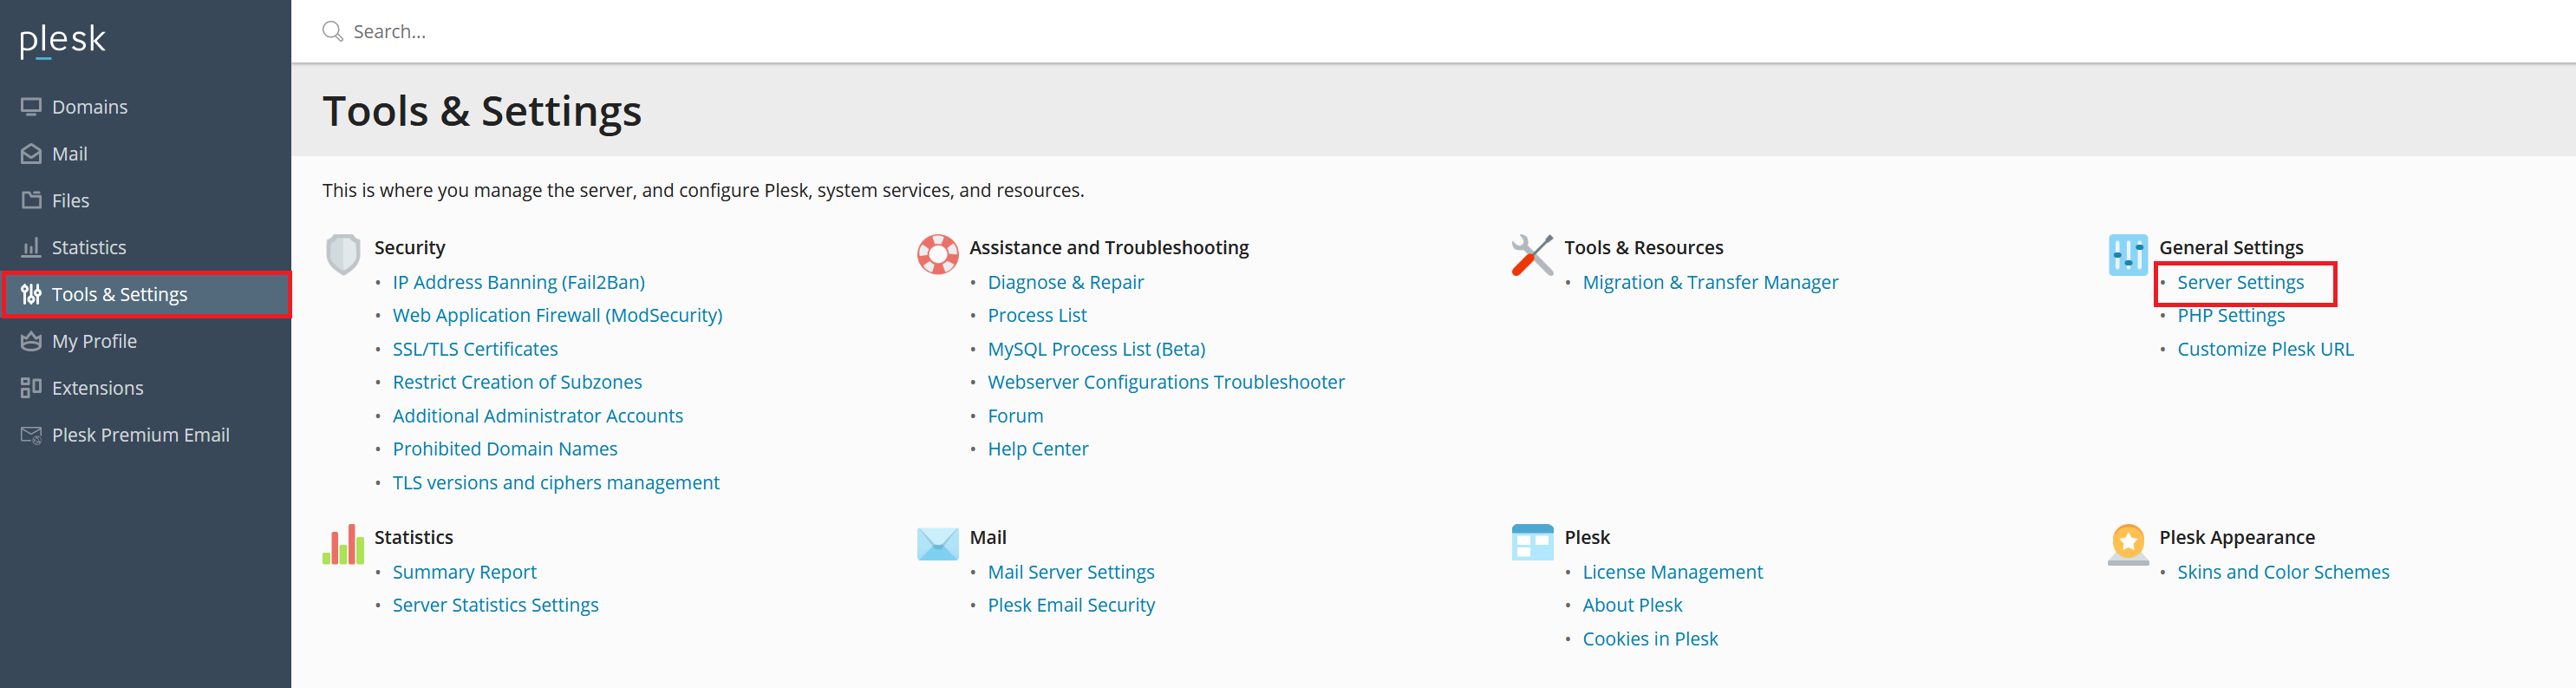
Log in to Plesk and click on 'Tools & Settings' in the left menu.
Step 2
Click on 'Server Settings' under 'General Settings' (at the top right).
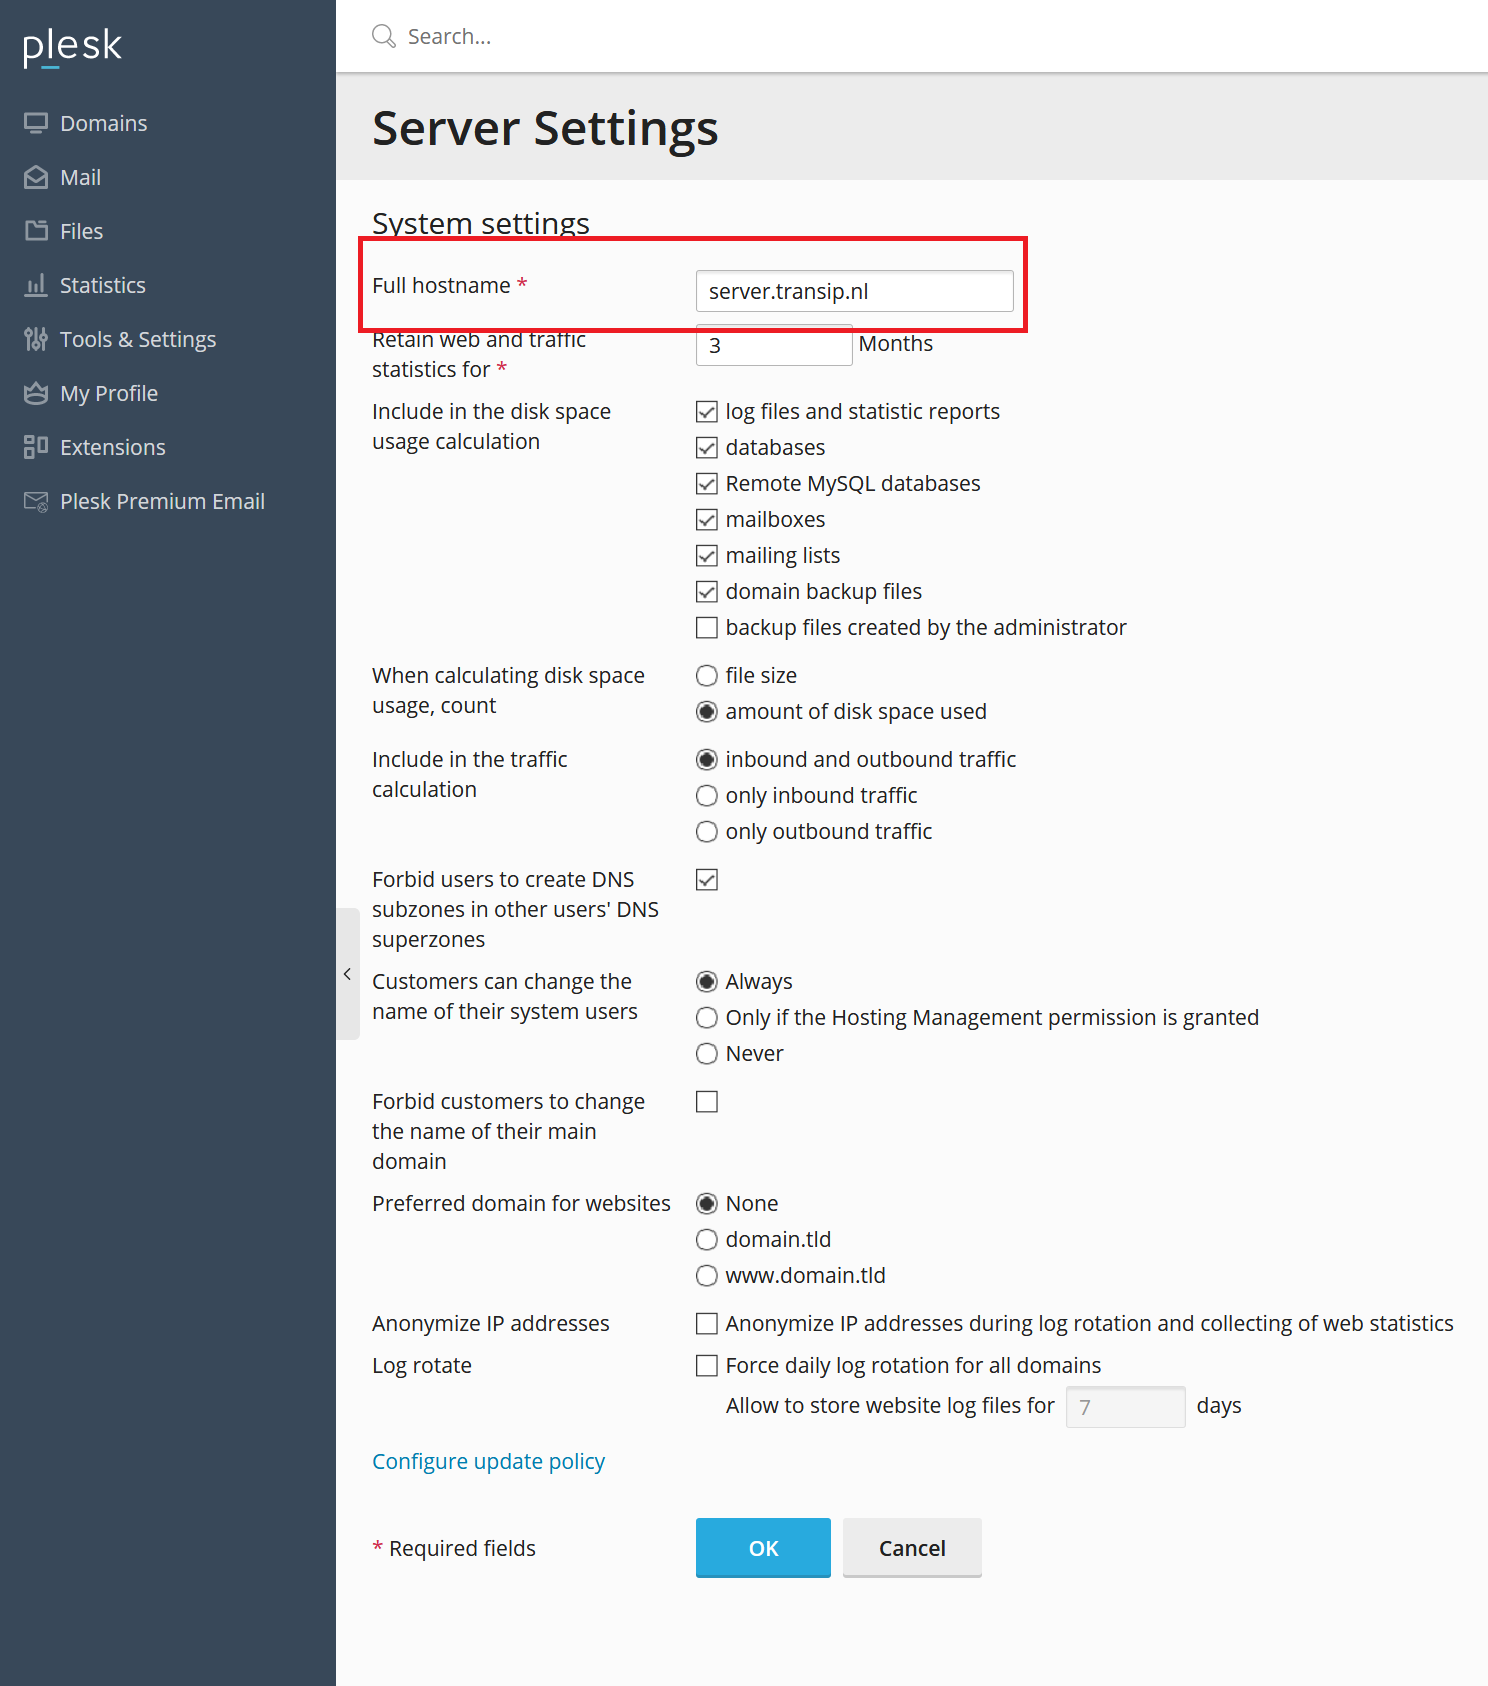
Step 3
Change your hostname behind the line that reads 'Full hostname' and click 'OK'. We recommend using a syntax such as server.yourdomain.com.
Securing your VPS
Plesk Co-op comes with several security features, such as Fail2Ban and the free version of Plesk E-mail Security. Additionally, you can take the following security precautions:
-
Changing your SSH port or using SSH keys: we strongly recommend this, as many brute force attacks are aimed at SSH.
- ClamAV anti-virus: Automatically or manually scan your VPS for virusses. Please note that the ClamAV daemon makes intensive use of your VPS' hardware and an upgrade to a larger VPS might be required.
SSL
Plesk Co-op comes with a 'self-signed' certificate. As a result, you will see a warning page when logging in to Plesk, Mattermost and Seafile. To prevent this warning from showing, it is desirable to replace this certificate.
We recommend using a Let's Encrypt certificate to secure your server. In this tutorial we explain how to add it. Follow the steps for 'Securing your hostname with Let's Encrypt' and 'Securing your website with Let's Encrypt', choosing a wildcard certificate for the latter (step 3). The procedure is otherwise the same as with a regular Plesk installation.
An additional advantage is that this also provides your mail server with a Let's Encrypt certificate.
Creating email adresses
Step 1
Log in tp Plesk Co-op. You'll automatically arrive at the page that manages your mail addresses (after having added a domain to your installation).
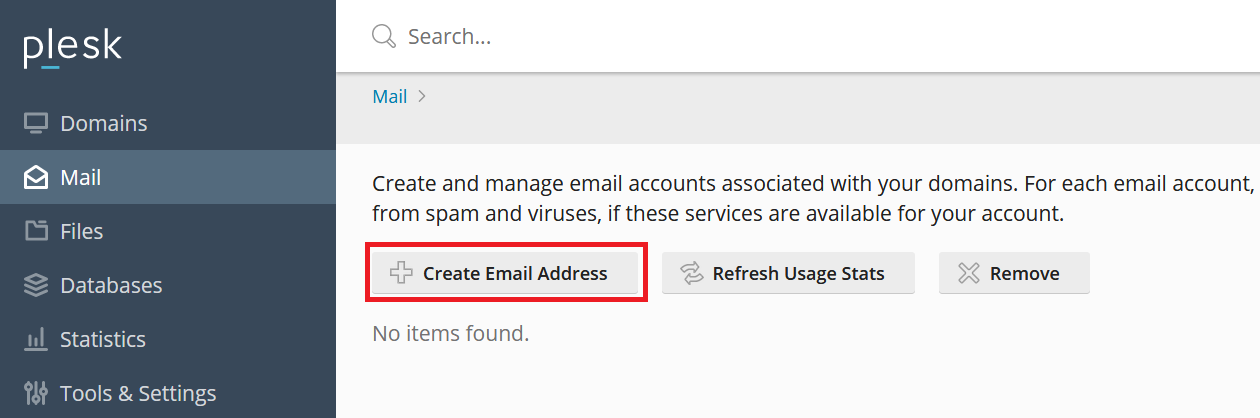
Step 2
Click on 'Create Email Address'.
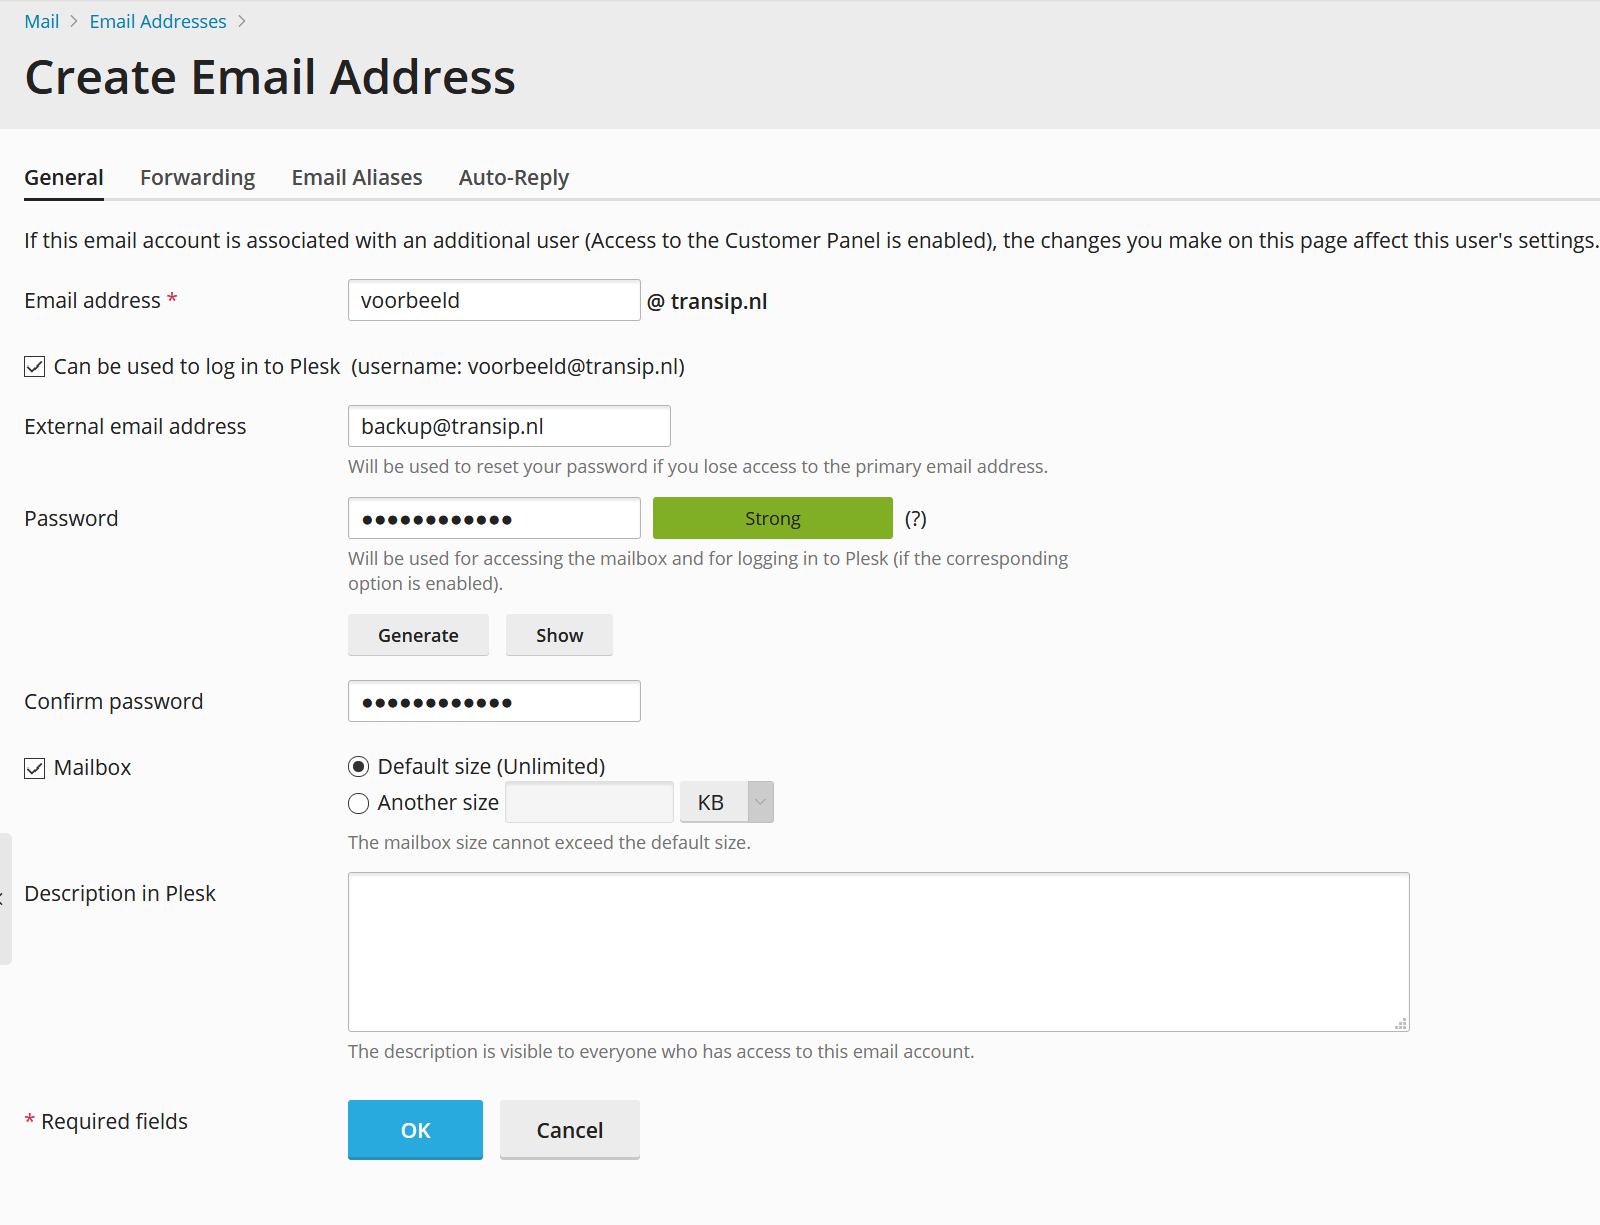
Step 3
Provide a name for the mail address, a back up address (for password resets) and a strong password. Optionally, disable the option 'Can be used to log into Plesk' so the mail address' owner can only log in to the webmail, Seafile and Mattermost and not in to Plesk.
Click on 'OK' once all required information has been filled to create the mail address.
Configuring your email address
Plesk Co-op comes with an autoconfig feature. This means that setting up your e-mail address is made as simple as possible and necessary server data is automatically retrieved where possible.
Depending on your mail app, you use the following information:
Mobile mail apps / Outlook:
- name: The name that recipients see when they receive email from you; for example 'Jan Jansen'.
- email address: your email address, for example transip@transip.nl
- password: the password associated with the email address
Depending on your mail application, additional information may be required. In that case, use the following data:
- Account type: Advanced > Exchange Activesync
- email address: your email address, for example transip@transip.nl
- password: the password associated with the email address
- Username: your email address, for example transip@transip.nl
- Domain: the domain after the @ at your e-mail address, for example transip.nl
- Server: the subdomain you use to send and receive mail. If you follow this manual it is the subdomain 'mail', for example mail.transip.nl
- Server requires an encrypted (SSL) connection: enable this option.
- Account name: your e-mail address, for example transip@transip.nl;
Using the webmail
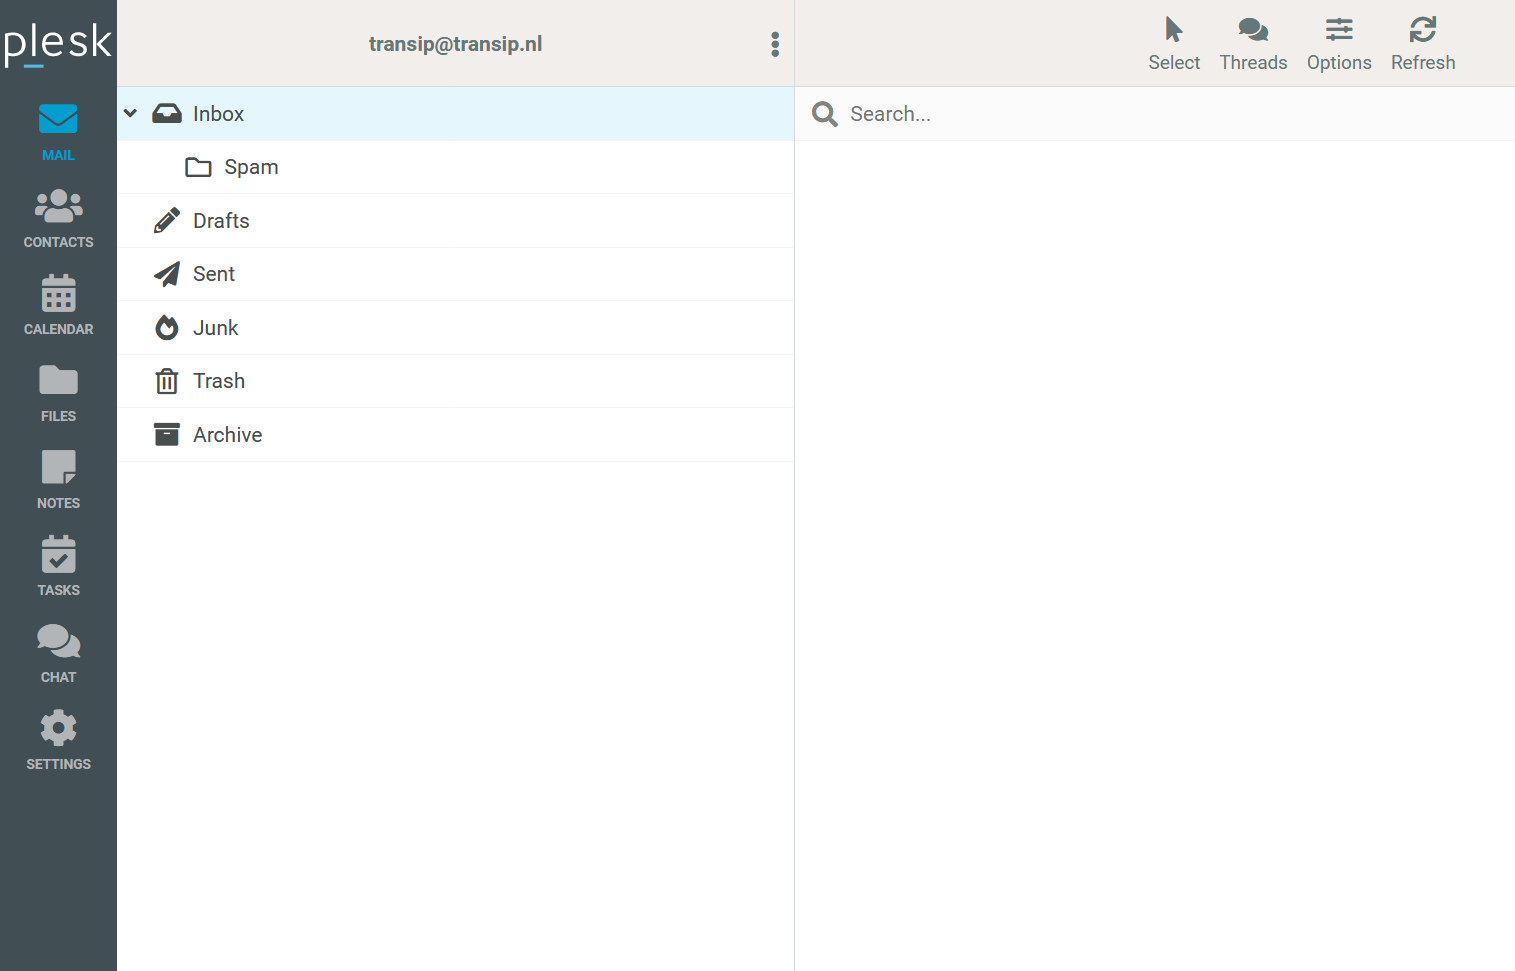
Plesk Co-op comes with an advanced webmail client which can be reached through the subdomain 'webmail', e.g. webmail.yourdomain.com. Below an example of the webmail interface is shown. The left hand menu is comprised of the following options respectively:
- Mail: For sending and receiving email.
- Contacts: Managing contacts so you can more easily mail people whom you frequently send mails to
- Calendar: A kalender which allows you to plan appointments and meetings. This calendar is synchronized cross-platform/app.
- Files: Cloudhosting via Seafile. It is even possible to use the Seafile mobile app to sync pictures from your phone to your Plesk Co-op server. Please be mindful of keeping work and private pictures seperate.
- Notes: A digitaal notepad to create notes.
- Tasks: Plan an activity and track its progress. Tasks are completed by flipping a switch.
- Chat: Easily stay in touch with your colleagues using the chat integration of Mattermost.
- Settings: Adjust the webinterface settings as desired. Your settings only apply to your own email address.
Seafile
Seafile is a cloud storage solution for the uploading, sharing and synchronizing of files. Seafile is integrated in the webmail (see the previous paragraph), but is also available separately. You can visit the Seafile webinterface using the subdirectory /seafile, for example https://www.example.com/seafile

Besides the webinterface mobile apps are also available for iOS and Android. This allows you to synchronize pictures on your phone diretly to your Plesk Co-op server.
Mattermost
Mattermost is a flexible, open source messaging platform (chat) which is aimed at secure communication and colleboration. Mattermost is integrated into the webmail interface just like Seafile, but also available separately. Mattermost is hosted in the subdirectory /mattermost, e.g. https://www.example.com/mattermost.
Like Seafile, Mattermost also comes with mobile apps for iOS and Android. This way, you can keep in touch with your colleagues, even as you're travelling.
Additional options
Plesk Co-op provides a solid online team environment to work together wtih smaller or larger groups of people. You might however be looking for more functionality to shape your online team environment. In order to expand your online team environment the following options are available:
- Using Big Storage with Plesk Co-op: host your Seafile, Mattermost and/or mail data on Big Storage
- Setting up a Teamspeak server (a voip server to talk with others online)
- Setting up a Jitsi server (for video conferencing)
For the last two we recommend using a separate VPS. This way you rule out a single point of failure. If for whatever reason your VPS with Plesk Co-op becomes temporarely unavailable, this would not necessarily affect your VOIP and/or video conferencing server.
This concludes our tutorial for getting started with Plesk Co-op.
Should you have any questions left regarding this article, do not hesitate to contact our support department. You can reach them via the ‘Contact Us’ button at the bottom of this page.