


Many devices do not support Direct Play functionality when playing media files from your Plex server. In such cases, Plex will transcode files during playback, in other words: convert to a format which the device (e.g. a TV) can handle.
On this page, under 'Specific Model Differences', you will find an overview of TVs with DirectPlay support for Full-HD files. Does your TV support H.264 and H.265 MKV content according to this page? Then, no transcoding is required for MKV files and your CPU is not loaded at all.
Do you prefer not having to transcode media at all during playback and is your TV not in the list of supported models above? Then, you can achieve this by either using MP4 files or optimizing your media in advance (i.e. converting to MP4) or connecting a (hardware) media player with Plex Direct Play support to your TV, such as a Roku player. In this article, we show you how to:
- Automatically optimizes media files for Plex, so you don't have to transcode the entire video and audio stream live.
- Manually optimize media files.
4k Direct Play is fully supported in 2016 or newer Tizen-based Samsung TVs, VIZIO TVs and TiVo Roamio & Bolt (6 Series) TVs. Plex is working on this and more and more devices will be able to support Direct Play with 4k MKV files in the future.
The impact of transcoding MKV files live
The impact of MKV files which you play on devices that do not support Direct Play on your CPU load is as follows:
- Are there x265 MKV files on your VPS? Then, Plex will transcode the files as a whole (video and audio) during playback. This process is CPU intensive: if one person watches an x265 MKV stream in 1080p from your Plex server, this already taxes two full CPU cores of your VPS.
- Are there x264 MKV files on your server? Plex will then only transcode the audio during streaming. This will require no more than 10-20% of a single CPU core.
Automatically optimize media files
Optimizing your media is actually a pre-transcode; media is converted to an mp4 format which your TV (or another device) can handle. If you use the optimized version, your CPU is no longer taxed while watching media, only your network is. In case of an X4, for example, this means the difference between a maximum of one simultaneous user or many simultaneous users.
- The steps in this section are based on X265 HEVC and / or X264 .MKV files.
- Per 1-1.5GB of traffic jams, the transcoding takes approximately one hour. It is advisable to first optimize your media before using your Plex server from multiple devices at the same time.
- Subtitles are not automatically copied. You can, for example, download subtitles on Subscene.
Step 1
Connect to your VPS via SSH or the VPS console in your control panel.
Step 2
There is a bug in Plex at the time of writing in which not all variables are correctly configured for certain command-line commands (this is especially relevant if you want to scan your media library via command-line, for example). You solve this with the commands:
export LD_LIBRARY_PATH=/usr/lib/plexmediaserver:/usr/lib/plexmediaserver/lib
export PLEX_MEDIA_SERVER_- /usr/lib/plexmediaserver is set by default and preserves backward compatibility, /usr/lib/plexmediaserver/lib is where the library is actually located.
Step 3
Create a shell script; the location and name do not matter, as long as you use the same for the next steps in this article, for example:
nano /usr/local/bin/plex.sh
Step 4
Add the code below to the file, making the following adjustments:
- Adjust the value of the plex folder variable (/mnt/bigstorage/plex-media) to the folder on your VPS in which the .mkv files are located.
- The script has been set to delete the original file. If you would like to test the MP4 file before deleting the file, remove rm -f "$ file", or replace it with, for example, mv "$ file" /tmp/ to place the file in the /tmp folder. The /tmp folder is automatically emptied after every reboot of your server (you can also adjust when /tmp is emptied).
#!/bin/bash
plexfolder=/mnt/bigstorage/plex-media/

# Counts the amount of .MKV files
i=$(find "$plexfolder" -name *.mkv -printf '.' | wc -c)

# Retrieves the names of each MKV file and its parent folder.
# The files are then transcoded, and the original removed.
for i in $(seq 1 1 $i)
do
   file=$(find "$plexfolder" -name *.mkv | head -n 1)
   filename=$(find "$plexfolder" -name *.mkv -printf "%f\n" | head -n 1 | grep -oP '.*(?=[.])')
   folder=$(find "$plexfolder" -name *.mkv -printf '%h\n' | head -n 1)
   output="$folder/$filename.mp4"
   ffmpeg -i "$file" -vcodec libx264 -crf 19 -maxrate 3M -bufsize 6M -x264opts cabac=0:8x8dct=1:bframes=0:subme=0:me_range=4:rc_lookahead=10:me=dia:no_chroma_me:8x8dct=0:partitions=none -map 0:0 -sn -acodec libfdk_aac -strict -2 -cutoff 15000 -ac 2 -ab 217k -map 0:1 -map 0:2 "$output"
   rm -f "$file"
done
Step 5
The script does not yet have export rights. You adjust this with the command:
chmod 755 /usr/local/bin/plex.shThis gives all users read and execute rights and full rights to the user with whom you create the file.
Step 6
Run the script once and wait until it is done. Keep in mind that if you have 100GB of media, for example, this can easily take 3-4 days. If you use an X4 and want to be able to use your VPS in the meantime, it is advisable to temporarily add one or two extra CPU cores to your VPS.
/usr/local/bin/plex.sh
Step 7
To further completely automate the process, create a cronjob to run the script again every day. To do this, create a log file, a lock file (see the explanation in step 9) and the cron job with:
touch /tmp/plex_transcode.lock
touch /var/log/plex_transcode.log
crontab -u plex -e
Step 8
There is no crontab for the user Plex yet, so, this is newly created.Press 'i' to start the insert mode and paste the following lines:
/user/local/bin/plex.sh
plex_transcode.log
Press 'esc' > :wq! consecutively to save the changes and close crontab.
Optimize media manually
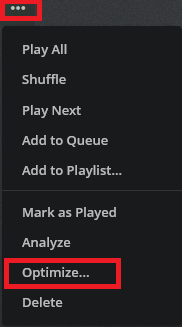
Do you prefer to manually optimize your media files? In the Plex web interface, go to the relevant folder or file that you want to optimize and click the colon at the bottom right of the thumbnail and select 'optimize'.
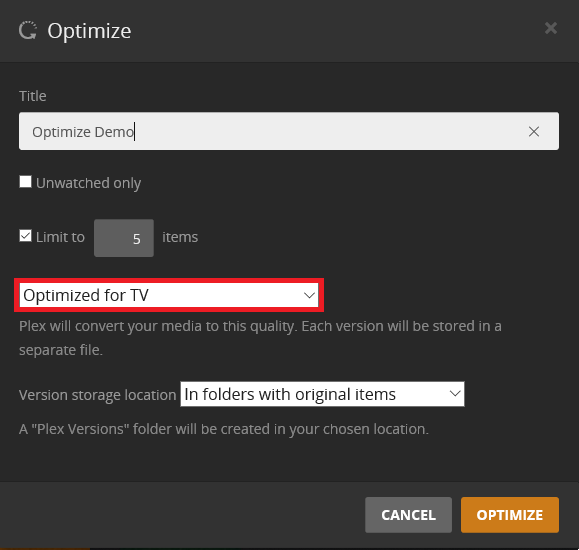
You will see a screen with some options. For example, choose whether you want to optimize files for a TV, or for a mobile, how many files you want to optimize at one time, and then click 'optimize' at the bottom right.
After manually optimizing the media, the original file is not automatically deleted. In fact: if you delete the original file, Plex also removes the optimized version. To prevent this, using command-line, move the new file to a folder to which Plex does not have write permission, then delete the original file, and then restore the new file.
Should you have any questions left regarding this article, do not hesitate to contact our support department. You can reach them via the ‘Contact Us’ button at the bottom of this page.