


In this article, we explain the installation and configuration of an Nginx web server in Ubuntu.
Nginx is a web server and a reverse proxy server focused on low memory usage and high performance. If you are hosting a dynamic website on your VPS (e.g., WordPress), you will also need MariaDB (or a similar alternative like MySQL).
In this article, we cover the following four parts:
- Installing Nginx
- Opening the HTTP-HTTPS ports with the UFW firewall
- Setting up Nginx server block
- Installing and configuring PHP
Installing Nginx
Step 1
Before installing Nginx, check if the server package list on your VPS is up-to-date and update it if necessary.
sudo apt -y update && sudo apt -y upgrade
Step 2
Next, install Nginx with the command:
sudo apt -y install nginx
Step 3
After installation, start Nginx with the command:
sudo systemctl start nginxYou can check the status with the command:
sudo systemctl status nginxWhen Nginx is working correctly, the output looks like this:

If you want to check the installed version of Nginx, use the command:
sudo dpkg -1 nginx
Opening the HTTP and HTTPS ports with the UFW firewall
The HTTP and HTTPS ports of your VPS are closed by default. You can open these ports with the following steps:
Step 1
Ubuntu uses UFW as the default firewall. If you haven't enabled UFW and logging yet, do this first with the commands:
sudo ufw enable
ufw logging on
Step 2
Then open the HTTP and HTTPS ports with the commands:
sudo ufw allow 'nginx full'You can check if the rule is added correctly with the command:
ufw status numbered
Step 3
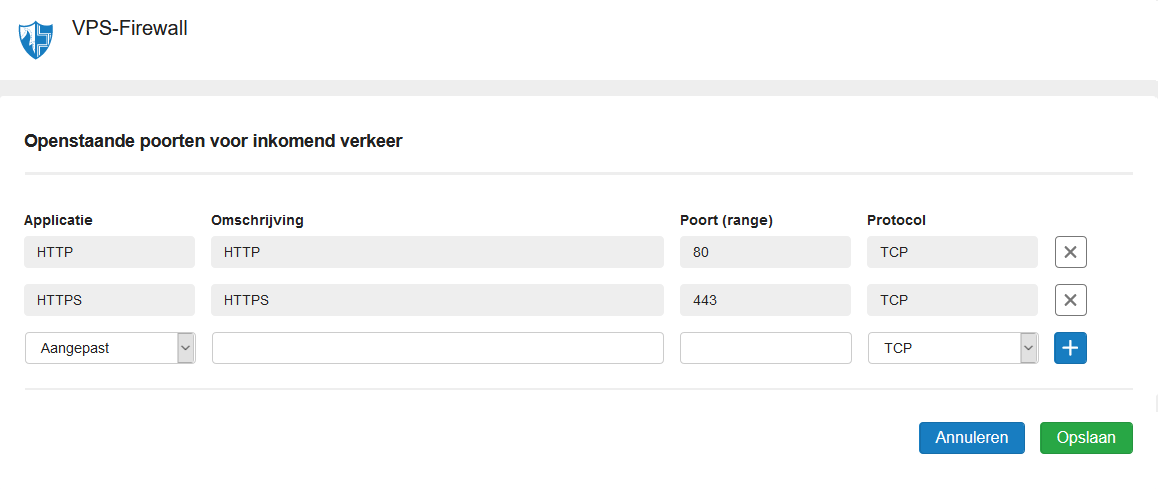
If you are using the VPS firewall in the control panel, also open the HTTP and HTTPS ports in your control panel.
Setting up Nginx server block
Nginx uses server blocks. These are similar to Apache's virtual hosts and allow you to host more than one website at the same time.
Step 1
First, create a directory for your domain.
sudo mkdir -p /var/www/example.com/html
Step 2
The root user becomes the owner of this directory by using sudo. Change the owner of the html folder to yourself with the command:
sudo chown $USER:$USER /var/www/example.com/html
Step 3
Adjust the permissions for the directory so that the owner has full access and the group and other users can read and execute files in the directory.
sudo chmod -R 755 /var/www/example.com
Step 4
To test your Nginx server, create a test file in the html directory. You can also upload your own website instead, for example via SFTP. Note that if you upload a dynamic website, a database server must also be installed on your VPS.
sudo nano /var/www/example.com/html/index.htmlGive the file the following content, or use your own HTML code:
<!DOCTYPE html>

<html>

    <head>

        <title>Example</title>

    </head>

    <body>

        <p>Hello world! </p>

    </body>

</html>
Save the changes and close nano (ctrl + x > y > enter).
Step 5
To display the contents of index.html, create a server block for Nginx:
sudo nano /etc/nginx/sites-available/example.com
Step 6
Paste the following configuration in the opened file.
server {
        listen 80 default_server;
        listen [::]:80 default_server;
        root /var/www/EXAMPLE.COM/html;
        index index.php index.html index.htm index.nginx-debian.html;
        server_name EXAMPLE.COM WWW.EXAMPLE.COM;
        location / {
                try_files $uri $uri/ =404;
        }
        location ~ .php$ {
        include snippets/fastcgi-php.conf;
        fastcgi_pass unix:/var/run/php/php-fpm.sock;
        }
}
Step 7
You can now directly test your web server by going to http://example.com in a browser, replacing example.com with your hostname (check with the command 'hostname'), or the IP address of your VPS. You will then see the default test page.
Installing and configuring PHP
Nginx does not come with PHP by default. To use PHP, you need to install it separately. Below we show how to install and configure PHP and then adjust the Nginx configuration to use PHP.
Step 1
Add the repository containing the latest PHP versions (only for Ubuntu):
add-apt-repository ppa:ondrej/php
apt -y update
Step 2
Now install PHP:
apt install php8.3 php8.3-fpm php8.3-cli php8.3-{bz2,curl,mbstring,intl}
a2enconf php8.3-fpm
Step 3
Now open the PHP configuration file:
sudo nano /etc/php/8.3/fpm/php.ini
The location of your PHP configuration file may not be the same, for example, if you are using a different PHP version. Check the directory in that case, for example with:
find /etc/php/* | grep php.ini
Step 4
Adjust the following items as desired in the PHP configuration file. Tip: use Ctrl + W to search the file.
max_execution_time = 300
memory_limit = 256M
post_max_size = 32M
upload_max_filesize = 32M
max_input_time = 300
Save your changes and close nano with ctrl + x > y > enter.
Step 5
Now open the default server block of your website:
sudo nano /etc/nginx/sites-available/default
Step 6
Adjust the file so that the uncommented text looks like this:
server {
        listen 80 default_server;
        listen [::]:80 default_server;

        root /var/www/html;
        index index.php index.html index.htm index.nginx-debian.html;

        server_name localhost;

        location / {
                include snippets/fastcgi-php.conf;
        fastcgi_pass unix:/var/run/php/php9.3-fpm.sock;
        try_files $uri $uri/ =404;
        }
}
Are you using a different version of PHP? Then adjust 8.3 to the version you are using. Save your changes here and close nano with ctrl + x > y > enter.
Step 7
Now open the server block for your website:
sudo nano /etc/nginx/sites-available/example.com
Step 8
Paste the following content into the file:
server {
listen 80;
listen [::]:80;

root /var/www/EXAMPLE.COM/html;
index index.php index.html index.htm index.nginx-debian.html;

server_name EXAMPLE.COM WWW.EXAMPLE.COM;

location ~ \.php$ {
      try_files $uri =404;
      fastcgi_split_path_info ^(.+\.php)(/.+)$;
      fastcgi_pass unix:/run/php/php-fpm.sock;
      fastcgi_index index.php;
      fastcgi_param SCRIPT_FILENAME $document_root$fastcgi_script_name;
          include fastcgi_params;
      }

}
Save your changes again and close nano with ctrl + x > y > enter.
Step 9
Nginx uses the folders sites-available and sites-enabled. The first contains the websites you host on your server. The sites-enabled folder contains a symbolic link (a sort of shortcut) to the sites-available folder. This makes the website actually available to people who visit it.
Create a symbolic link from the sites-available to the sites-enabled folder with the command:
ln -s /etc/nginx/sites-available/example.com /etc/nginx/sites-enabled/example.com
Step 10
Check for any errors in your configuration with the command:
sudo nginx -t
When Nginx is working correctly, the output looks like this:
nginx: the configuration file /etc/nginx/nginx.conf syntax is ok
nginx: configuration file /etc/nginx/nginx.conf test is successful
Are you getting the message 'directive is duplicate in /etc/nginx/sites-enabled/default:53'? Then remove this symbolic link with:
rm /etc/nginx/sites-enabled/defaultFinally, restart the Nginx and PHP services:
service nginx restart
service php8.3-fpm restart
You are now done with the PHP installation.
Step 11 - optional
Create a PHP test file to test your Nginx server:
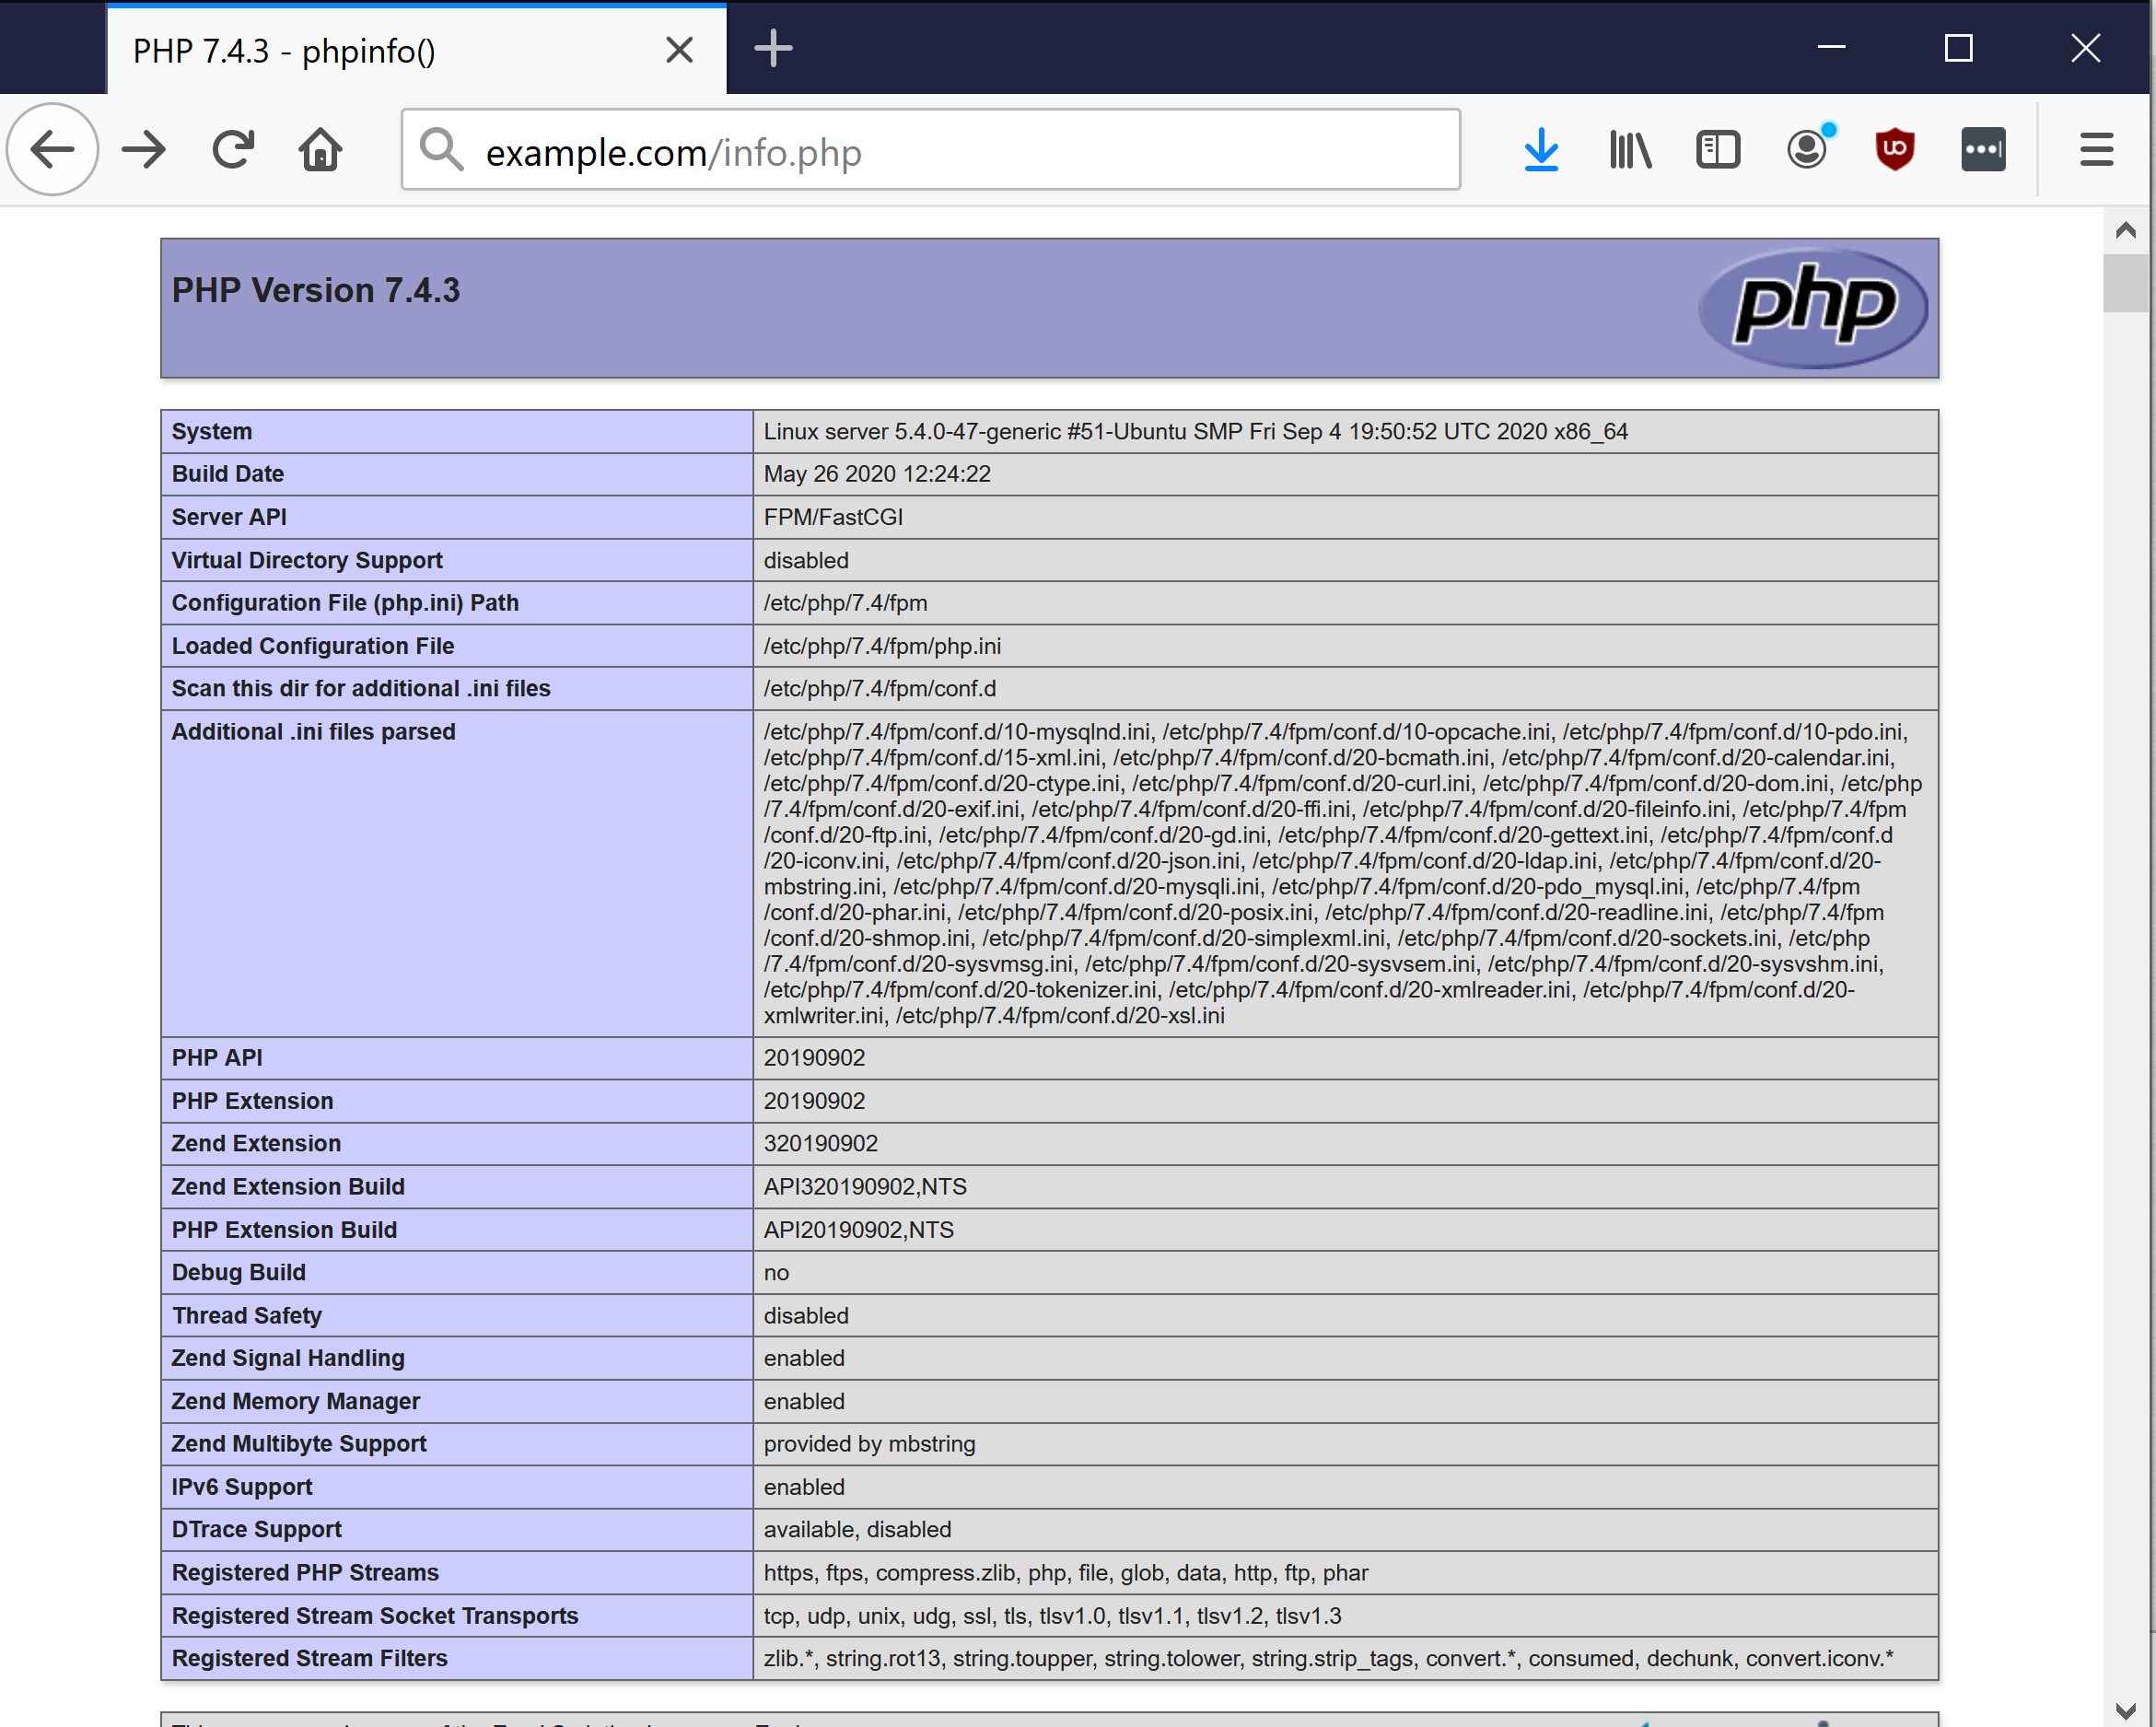
sudo nano /var/www/html/info.phpPlace this in the file as temporary content.
<?php
phpinfo();
?>
Open your browser and navigate to your domain name or server IP with the addition /info.php, for example, http://example.com/info.php
This concludes our guide for installing Nginx and PHP in Ubuntu.