Helm is a package manager for Kubernetes. With Helm, you can easily search, share, and install software for Kubernetes. In this guide, we will show you how to install Helm package manager for Kubernetes on Linux, MacOS, and Windows.
Installing Helm on Linux/MacOS
MacOS Homebrew users can simply use the command 'brew install helm'.
Step 1
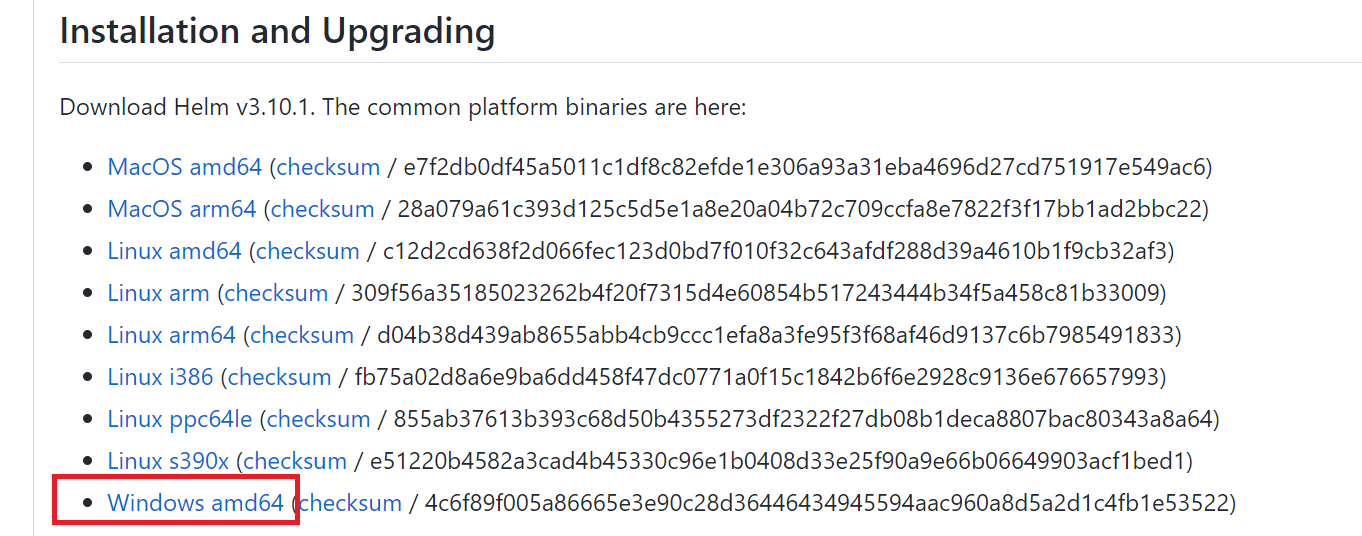
Go to Helm's official release page on the computer/server where you manage your Kubernetes cluster. Right-click on the appropriate download link and select 'Copy link'. For example, for a 64-bit Linux or MacOS system with an Intel or AMD processor, this would be Linux amd64 and MacOS amd64, respectively.
Step 2
Open a terminal and download Helm using the wget command in combination with the link copied in step 1, for example:
wget https://get.helm.sh/helm-v3.10.1-linux-amd64.tar.gz
Optionally, you can also download the corresponding checksum file, verify it, and then delete it with the following commands:
wget https://get.helm.sh/helm-v3.10.1-linux-amd64.tar.gz.sha256sum
sha256sum -c helm-v3.10.1-linux-amd64.tar.gz.sha256sum
rm helm-v3.10.1-linux-amd64.tar.gz.sha256sum
Step 3
Now extract the Helm installation and then delete the downloaded file with the commands below.
Tip: The easiest way to specify the file is to type 'tar -xvzf helm' first and then press the 'tab' key so that the file name is automatically completed.
tar -xvzf helm-v3.10.1-linux-amd64.tar.gz rm helm-v3.10.1-linux-amd64.tar.gz
The output looks like this:
username@COMPUTERNAME:~$ tar -xvzf helm-v3.10.1-linux-amd64.tar.gz
linux-amd64/
linux-amd64/helm
linux-amd64/LICENSE
linux-amd64/README.md
username@COMPUTERNAME:~$ rm helm-v3.10.1-linux-amd64.tar.gz
username@COMPUTERNAME:~$
Step 4
Move the helm folder to the /usr/local/bin directory:
sudo mv linux-amd64/helm /usr/local/bin
Step 5
Finally, remove the linux-amd64 directory and its contents:
rm -rf linux-amd64/
Check the installation and installed version with the command:
helm version
Depending on how you created/downloaded the file ~/.kube/config, you may receive an error message about file permissions. In that case, correct the permissions with the command:
chmod 600 ~/.kube/config
Step 4
Helm comes without any added repository and therefore cannot install anything. Therefore, add the Bitnami repo (the official repository is no longer supported):
helm repo add bitnami https://charts.bitnami.com/bitnami
helm repo update
Available Helm Charts and some alternative repositories can be found on Artifact Hub.
You have now completed the installation of Helm.
Installing Helm on Windows
Step 1
Go to Helm's official release page on the computer/server from where you manage your Kubernetes cluster, and download the Windows-amd64 file.

Step 2
Open the downloaded file and the included 'windows-amd64' folder. Extract the 'helm.exe' file into a directory of your choice, and then delete the downloaded file.
Step 3
Press the Windows Start icon + R on your keyboard simultaneously. The run window appears. Type the command 'sysdm.cpl' and press 'OK' or the enter key.

Click on the 'Advanced' tab > 'Environment Variables'.

You'll see a section labeled 'User variables for ...' and 'System variables'. Scroll down under 'User variables' to 'Path' and click 'Edit'.

Click 'New' and enter the directory where you extracted the helm.exe file in step 2. Finally, click 'OK' three times to close all open windows.

Check the installation and installed version from a command prompt (Windows Start button > cmd) with the command:
helm version
Step 4
Helm comes without a repository added, and therefore cannot install anything. So, add the Bitnami repo in advance (the official repository is no longer supported):
helm repo add bitnami https://charts.bitnami.com/bitnami
helm repo update
Available Helm Charts and a number of alternative repositories can be found on Artifact Hub.
You have now finished installing Helm!


