


This is the second part of our DirectAdmin Tutorial Series. If you're setting up a new VPS, we recommend starting with part 1 and not skipping any parts.
Automated bots continuously scan IP addresses for vulnerabilities. To prevent issues on your VPS, we recommend setting up security right after your VPS installation.
A large portion of attacking bots automatically scan IP addresses until they find a hit on SSH port 22 and then attempt to break into your VPS as 'root' using Brute Force attacks. For this reason, SSH access for the root user is disabled by default on our VPSs with DirectAdmin. You can read here how to create a user for SSH.
Given the large number of IPs used by bots, we cannot block them all in our firewall, nor do we get notified of attempts to breach your VPS.
Security Measures
To secure your VPS, we will go through the following steps:
- Change your SSH port
- Bruteforce protection using Fail2Ban and a configuration change in DirectAdmin
- Anti-virus/malware protection with ClamAV
- Optional: Restrict DirectAdmin access to specific IPs
- Optional: Restrict Administrator commands to specific IPs
- This is relatively complex material. If you're using the steps below to modify an existing (rather than a new) VPS, always make a snapshot of your VPS before performing any updates. This way, you always have a snapshot to revert to if an issue arises due to a change.
- As of May 11, 2022, our installations used the CSF firewall instead of FirewallD. At the end of August 2025 the CSF developers have however stopped developing and supporting the CSF firewall. As such, we recommend using only Firewalld.
CSF can be disabled by the 'admin' user in DirectAdmin. In the left hand menu click on ‘Extra Features’ > ‘ConfigServer Security & Firewall’ and click the button ‘Firewall disable’.
Via command-line you can use sudo or the root user to enable Firewalld using the command:
sudo systemctl enable firewalld --now
Change the SSH port
The root user does not have SSH access to your VPS by default. Therefore, we recommend changing your SSH port. This is a form of 'security through obscurity'; by changing your SSH port, you make your VPS invisible to most attacking bots. An additional benefit is that your log files remain more organized.
Step 1
Connect to your VPS via the VPS console in the TransIP control panel or via SSH.
Step 2
Install the software package that includes the tool to check used ports on your server:
sudo dnf -y install net-tools
Step 3
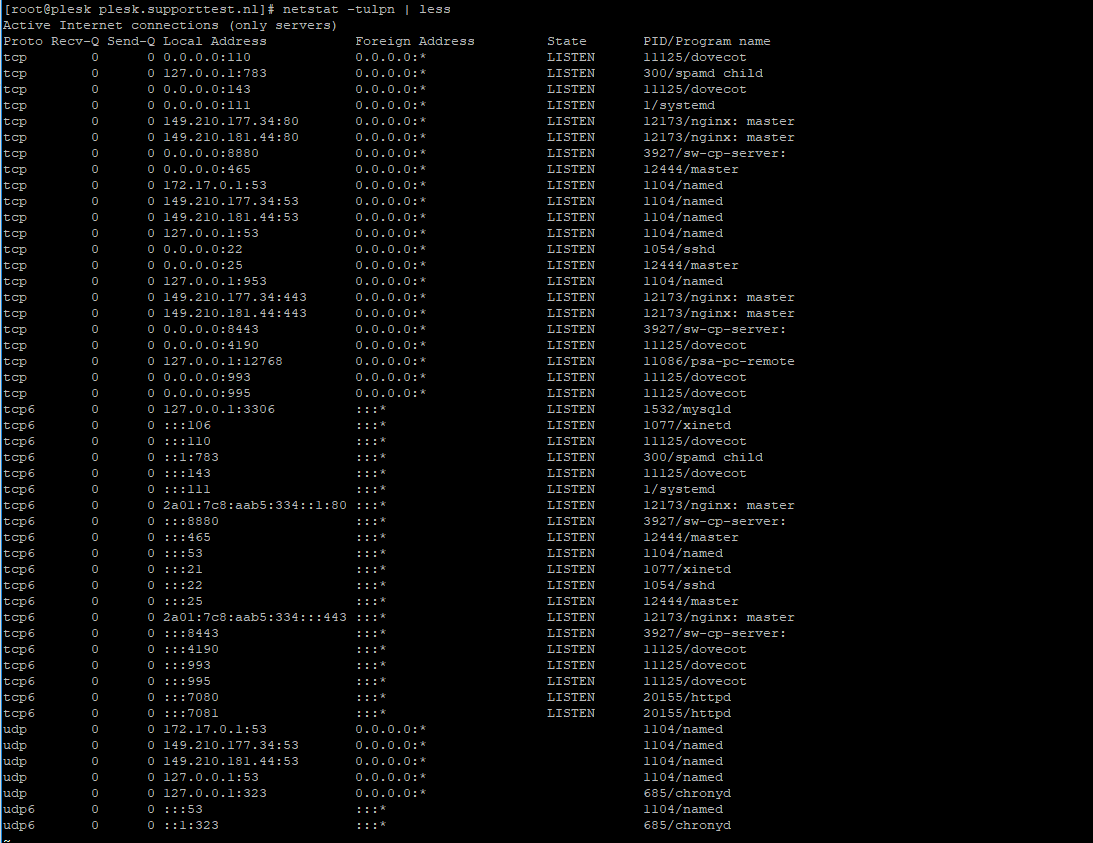
Check your used ports with the command below.
sudo netstat -tulpn | lessYou will see an overview like the screenshot below. In this overview, the port numbers are the numbers in the 'Local Address' row after the colon, for example, 110 is the port number in the first line.
Step 4
Choose a random port number between 0 and 65535 that is not shown in the overview (for example, 21543) and press 'q' to stop netstat.
Step 5
Open the SSH configuration file with the following command. You can also use vim for this.
sudo nano /etc/ssh/sshd_config
Step 6
The configuration file opens, and you will see the code below.
# If you want to change the port on a SELinux system, you have to tell
# SELinux about this change.
# semanage port -a -t ssh_port_t -p tcp #PORTNUMBER
#
#Port 22
#AddressFamily any
#ListenAddress 0.0.0.0
#ListenAddress ::
Uncomment or remove the # before '#Port 22' and change the number to the one you chose in step 2, for example:
Port 21543Save the file and close it by pressing ctrl+X > y > enter.
Step 7
Add the selected port to your firewall. For DirectAdmin installations from May 11, 2022, the CSF firewall is used, which is managed in the DirectAdmin web environment. Earlier installations, unless you have changed this yourself, use FirewallD via the command line.
CSF


Firewalld
Step 2
sudo firewall-cmd --permanent --zone=public --add-port=21543/tcp
sudo firewall-cmd --permanent --zone=public --remove-port=22/tcp
Step 3
Then reload/restart your firewall and SSH configuration with the following commands:
sudo firewall-cmd --reload
sudo systemctl restart sshd
If you are using the VPS firewall in the TransIP control panel, don't forget to add a manual rule in the firewall to open the chosen port and close port 22.
If you connect to your VPS from a Mac or Linux computer, remember to specify your port when setting up your SSH connection using -p <port number>, for example:
ssh -p 21543 username@123.123.123.123Replace username with the actual name of the SSH user and 123.123.123.123 with your VPS's IP address.
Bruteforce Protection
Bots automatically try to break in by performing brute force attacks on various fronts, such as SSH, Exim (outgoing mail server), and the DirectAdmin control panel. For the latter, DirectAdmin offers tools to protect against brute force, but not for SSH attacks, for example. Fail2Ban, however, provides good protection for this.
Fail2Ban
Fail2ban protects your VPS by banning IPs that attempt to abuse your VPS, for example, when they make too many incorrect password attempts or search for exploits, etc. We highly recommend using Fail2Ban.
The installation and configuration of Fail2ban are covered in our Fail2Ban guide.
Note: DirectAdmin will continue to report brute force attacks under 'Message System', but Fail2Ban will catch these.
DirectAdmin
In DirectAdmin, the default setting is that the IP address is blocked after several incorrect login attempts (on port 2222). These settings are quite lenient, so in this section, we'll explain how to set them a bit stricter.
Step 1
Log in to DirectAdmin as the 'admin' user and click in the tile menu (2) or left menu (1) on 'Administrator Settings' under ‘Server Manager’.

Step 2
On this page, you can adjust the settings related to DirectAdmin's built-in brute force protection. After making any changes, click ‘save’ at the bottom right. We recommend the following:
- Enable Automatic Lost Password Recovery: This setting is optional, and the safest option is to leave it unchanged.
- Blacklist IPs for excessive DA login attempts: Keep this option enabled. However, 20 incorrect login attempts or 100 unauthorized connections is quite lenient. We recommend setting this a bit stricter, for example, 5 and 25 or 10 and 50, respectively.
- Prevent 127.0.0.1 from being Blacklisted: You usually connect from your own IP address instead of 127.0.0.1, so you can leave this option disabled.
- Time before failed login count resets: 1200 seconds, or 20 minutes. This is a good default value, but you're free to adjust it. A modern trend is to attempt to break in with more IP addresses less frequently. Based on this, a higher value (e.g., 86400) is also a good option.
- Parse service logs for brute force attacks: We recommend leaving this option enabled but sending the notification after, for example, 20 failed attempts instead of 100 (for both options).
- Remove an IP from the BF blacklist after: This option appears twice. By default, a blocked IP address is allowed again after 60 days. This is quite a long term, and usually, half that time (43200) is more than enough.
- Reset count of IP/User failed attempts: The counter for failed login attempts resets after 24 hours. The default value is fine, but you're free to adjust it as needed.
- Clear failed login attempts from log: It is not uncommon to get questions about blocks long after 4 days (the default value). Therefore, we recommend adjusting the value to at least one (7) or two (14) weeks.
- Scan for WordPress attacks: A useful option that checks for incorrect login attempts on the admin page of WordPress websites hosted on your server. We recommend logging these attacks as well (All Logs).
- Difficult Password Enforcement: A password like hallo123 is not very secure. Therefore, we recommend enabling this option.
- Check domain owner for Subdomain creation: A user can only create a subdomain for domains they actually own. It is safest to leave this option enabled.

Step 3
Whitelist yourself so that you don't accidentally get banned if you forget your password. To do this, connect to your VPS via the VPS console in the TransIP control panel or via SSH and enter the following command:
sudo echo "123.123.123.123" >> /usr/local/directadmin/data/admin/ip_whitelistReplace 123.123.123.123 with your own IP address.
Anti-virus / malware protection with ClamAV
ClamAV is a free, open-source antivirus program for detecting trojans, viruses, and malware on your VPS.
In our ClamAV guide for CentOS 7, 8, and AlmaLinux 8, we show you how to install ClamAV, ensure ClamAV starts automatically, and scan your VPS daily.
Optional: Restrict DirectAdmin access to specific IPs
Port 2222 is the port you connect to log in to the DirectAdmin web interface. You can choose to allow only specific IPs to connect to port 2222 in your firewall. Note that in this case, you'll need to ask legitimate users for their IP addresses so you can whitelist them. This option is primarily suitable if you manage the DirectAdmin environment entirely yourself and do not want users to have options like creating their own email addresses.
Our VPSs with DirectAdmin use the CSF firewall by default from May 11, 2022, which is managed from the web interface. Earlier installations use 'firewalld' as the firewall and manage it via the command line.
CSF
Step 1
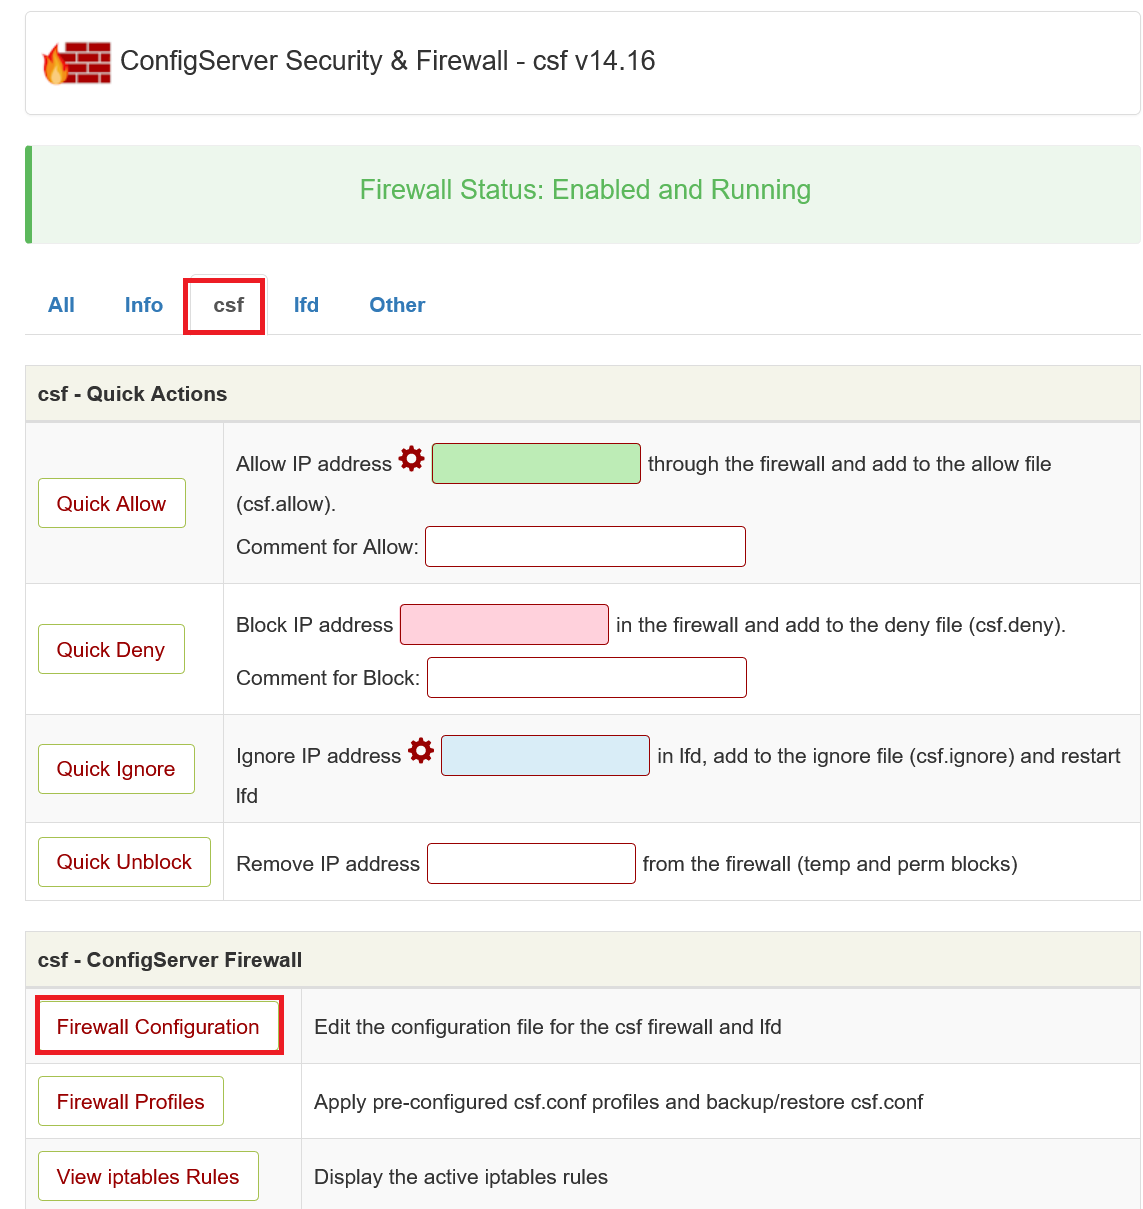
Log in to the DirectAdmin web interface with the user 'admin' and click on 'ConfigServer Security & Firewall'.
Step 2
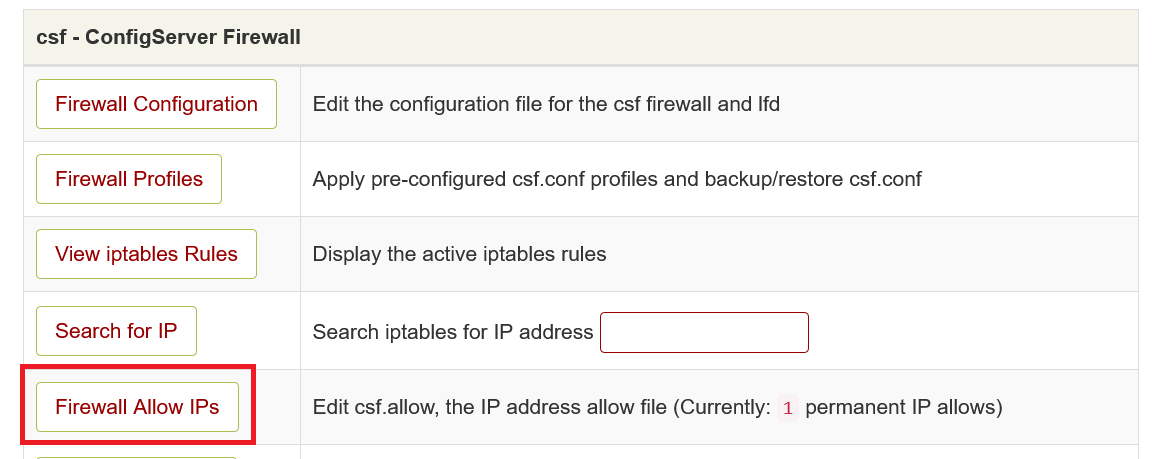
Click on 'CSF', or scroll down to 'csf - ConfigServer Firewall' and click on 'Firewall Allow IP's'.
Step 3
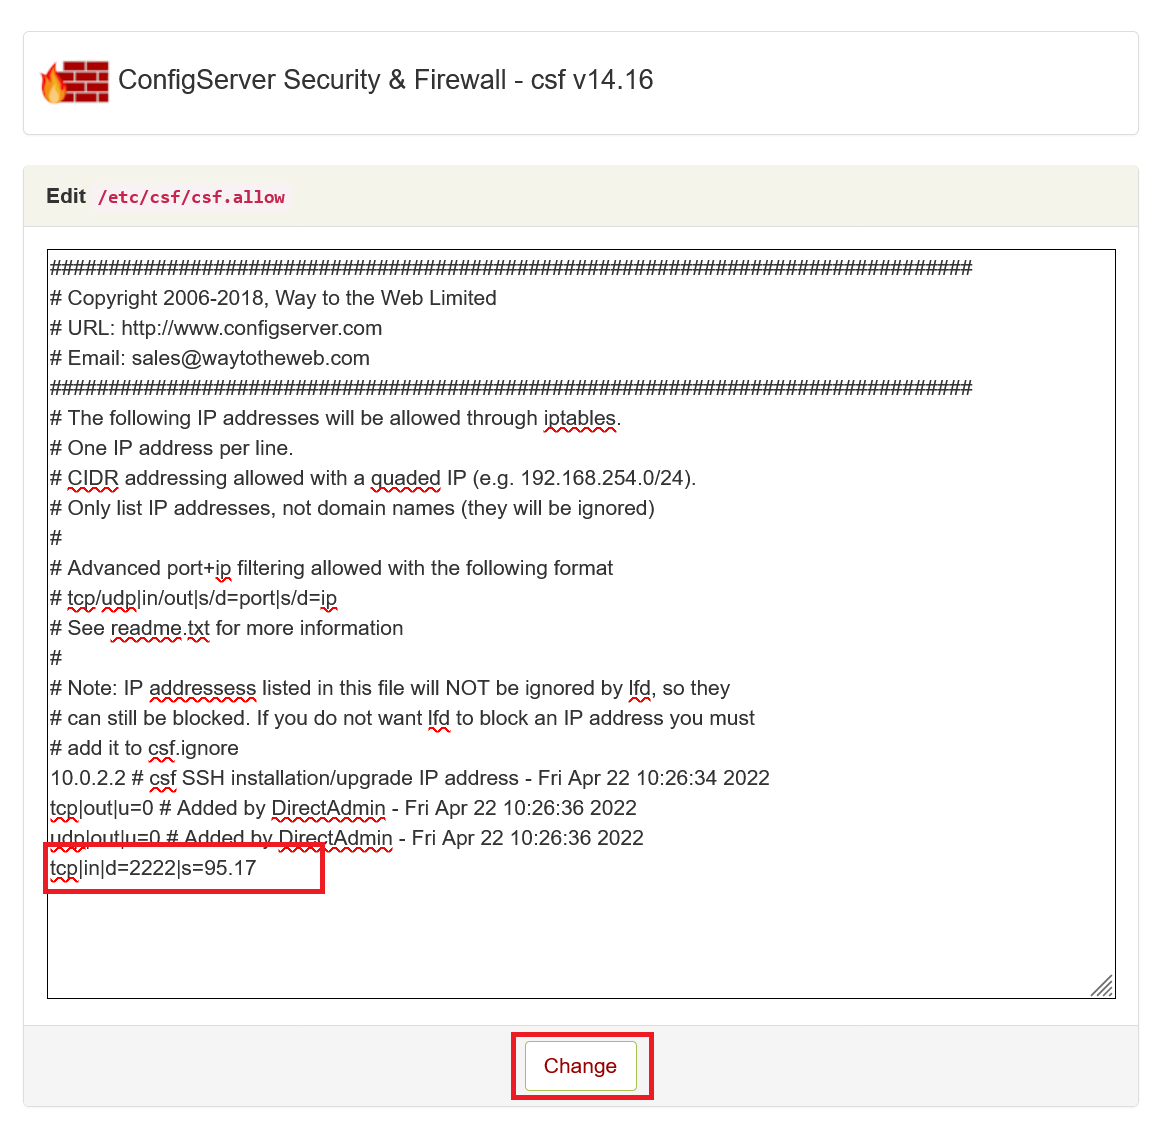
At the bottom of the overview, add the rule tcp|in|d=2222|s=123.123.123.123, replacing 123.123.123.123 with the public IP address of your internet connection (check it, for example, here) and click 'Change'.
Note: If you use a VPN, it may be configured not to show your VPN connection's IP address on the page mentioned above. In that case, it’s best to check your VPN client, as most show the public IP address.
Step 4
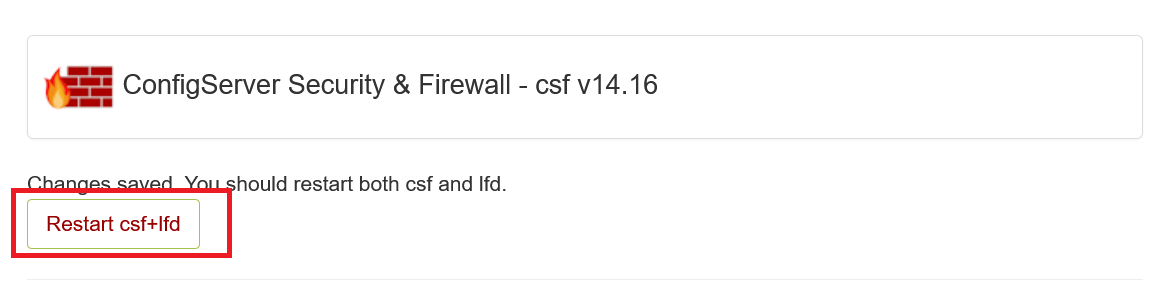
The changes will only take effect after restarting the CSF firewall and LFD (Login Failure Daemon). Click 'Restart CSF+LFD' to restart both.
Step 5
Click on 'CSF', or scroll down to 'csf - ConfigServer Firewall' and click on 'Firewall Configuration'.
Step 6
You will now see a page with many options. Scroll to 'TCP_IN' and remove port 2222:

Scroll down slightly further to 'TCP6_IN' and remove port 2222 there as well. Scroll to the bottom of the page and click 'Change'.
Step 7
The changes will only take effect after restarting the CSF firewall and LFD. Click 'Restart CSF+LFD' to restart both.
After restarting the firewall, click 'Return' at the bottom of the page.
Firewalld
sudo firewall-cmd --permanent --zone=public --remove-port=2222/tcpsudo firewall-cmd --permanent --zone=public --add-rich-rule=' rule family="ipv4" source address="1.2.3.4" port protocol="tcp" port="2222" accept'sudo firewall-cmd --reloadsudo nano /etc/firewalld/zones/public.xml-
- You will see the overview below.

Here you can undo the previous steps by removing the section from <rule to </rule> and re-adding the following line:
<port protocol="tcp" port="2222"/>-
Optional: IP Restriction for DirectAdmin Administrator Level Commands
In an earlier step, we explained how to allow only specific IPs to connect to DirectAdmin.
The number of people connecting to DirectAdmin at the administrator level is usually even smaller. Often, there are several people with access at the reseller and/or user level, but only one or a few DirectAdmin administrators.
By allowing only the administrator's IP to execute administrator commands in DirectAdmin, you prevent others from running administrator commands, for example, if your password were to leak and become known to someone with a user account.
Step 1
Connect to your VPS via the VPS console in your control panel or via SSH. Then, open/create /usr/local/directadmin/scripts/custom/all_pre.sh with the command:
sudo nano /usr/local/directadmin/scripts/custom/all_pre.sh
Step 2
Add the following code to this file.
#!/bin/sh
USERTYPE=`grep usertype= /usr/local/directadmin/data/users/${username}/user.conf | cut -d= -f2`
if [ "${USERTYPE}" = "admin" ]; then
   if [ "$caller_ip" = "1.2.3.4" ]; then
       exit 0;
   fi
   #repeat the check on the IP as many times as desired.
   echo "IP $caller_ip is not allowed to be logged in as an Admin";
   exit 1;
fi
exit 0;
Change 1.2.3.4 to the actual IP address you want to allow. Optionally, allow multiple IPs by adding the section below directly above '#repeat the check on the IP as many times as desired' and adjusting 1.2.3.4 to the desired IP.
if [ "$caller_ip" = "1.2.3.4" ]; then
    exit 0;
fi
Step 3
Finally, adjust the file permissions; otherwise, DirectAdmin won't have the necessary rights to use all_pre.sh, and you'll get an 'Access Denied' error.
sudo chmod 700 /usr/local/directadmin/scripts/custom/all_pre.sh
With the steps above, you have set up solid security for your VPS. Click here to continue to Part 3: Updating your VPS.
Should you have any questions based on this article, don't hesitate to contact our support department. You can reach them via the 'Contact Us' button at the bottom of this page.