You can easily install WordPress on your domain name by using a web hosting package. WordPress can be installed on your main domainname or a subdomain. This article explains how to get started with WordPress at TransIP.
Your domain name
In order to start building a WordPress website, you will first need a domain name. The domain name is the address which your visitors enter in their browser to visit your WordPress website.
Afterwards you choose one of our web hosting packages to install WordPress on. Click on one of the boxes below to get started right away!
My domain name is registered elsewhere
If you already own a domain name which is not registered with TransIP yet, you will need to transfer the domain name to TransIP first.
Follow the steps in the article 'Transferring my domain name to TransIP' and add a web hosting package during the transfer procedure.
Read the section 'Choose a web hosting package' for more information on the different web hosting packages, or visit our product page.
When you've transfered your domain name to TransIP and added a web hosting package to it, head over to the section 'Installing WordPress'.
I do not own a domain name
If you don't own a domain name yet, you can register one by visiting our homepage. Read the article 'Registering a domain name at TransIP' for a step by step guide.
Once you've registered a domain name, head over to the section 'Choose a web hosting package'.
Choose a web hosting package
In order to start with WordPress, you need to add a web hosting package to your domain name.
Already own a web hosting package for your domain name? Then head straight over to 'Installing WordPress'!
Use the following steps to order a web hosting package for your domain name.
Step 1
Visit our webhosting product page and pick one of the webhosting packages. The smallest package is a great choice to start a relatively small WordPress website. If you need more databases, email addresses or web space, you can always choose to upgrade your web hosting package at a later time.

Click 'Order' below your chosen option.
Step 2
Pick the domain name for which you want to order the webhosting package and complete the order.
Once your order is processed, your web hosting package will be active after a few minutes. Head over to 'Installing WordPress' to, you guessed it, start installing WordPress!
Installing WordPress
You can install WordPress the moment your web hosting package is active in your control panel.
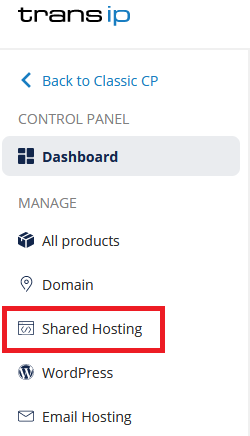
Log in to the control panel and click 'Shared Hosting' in the menu. Next, select your domain below 'Products'.

If that's not the case, wait a few minutes and refresh the page until the hosting package is visible.
Once your web hosting package is active, click 'Site' -> 'Install WordPress', or the the cog wheel next to 'Install WordPress' in the overview.

Step 1
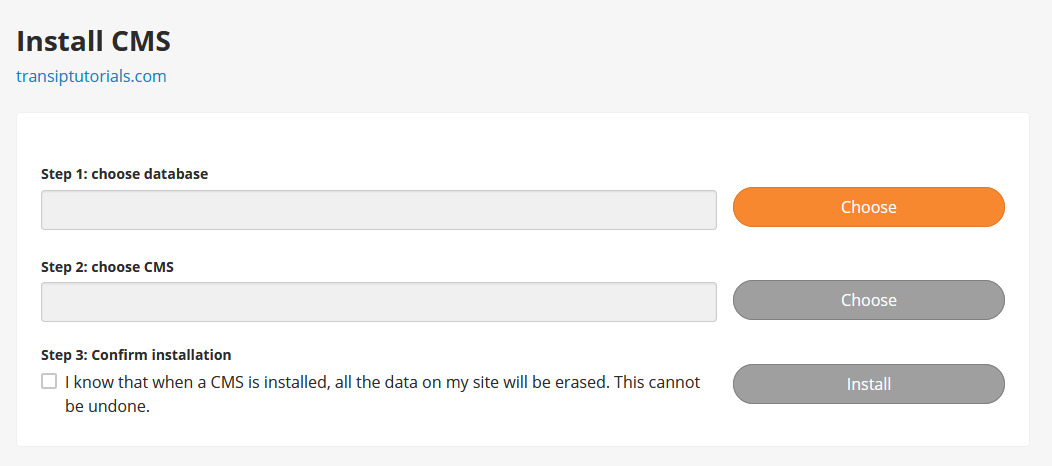
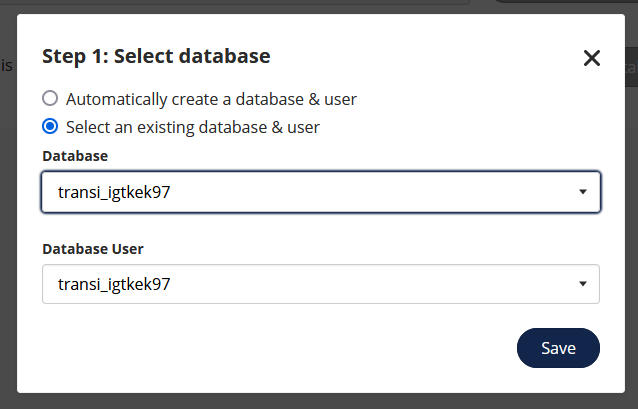
Click 'Choose' next to 'Step 1: choose database'.

A window will open with two options in which you can automatically create a new database or select an existing database.

If you have not created a database and database user beforehand, select the option 'Automatically create a database & user'.
If you want to install WordPress on an existing database, pick 'Select an existing database & user'. You can then select the database and database user.
If you have hit the limit of databases on your webhosting package, delete a database or select an existing database.
Step 2
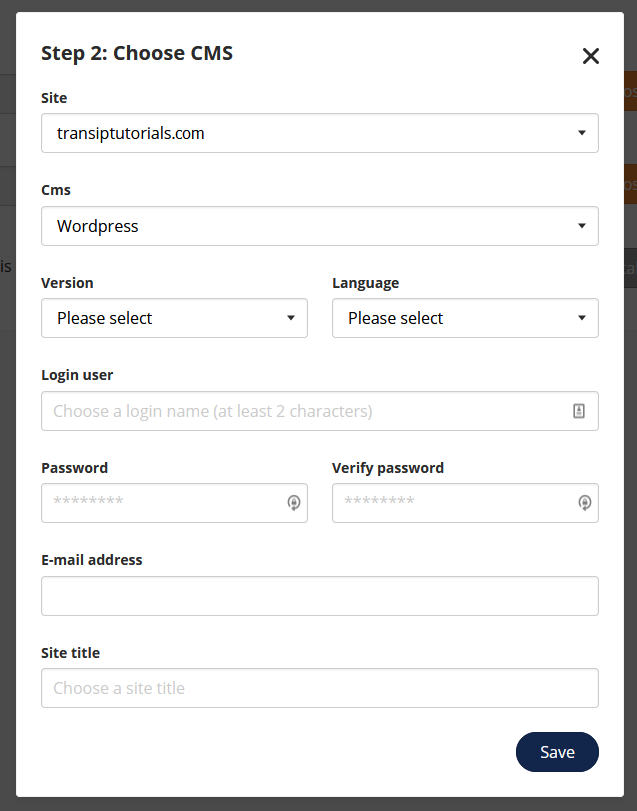
Click 'Choose' next to 'Step 2: choose CMS'. A window will open in which you can select WordPress as the CMS.
First, select the site on which you wish to install. You can then choose your WordPress version and the language of the WordPress dashboard. We recommend picking the latest version.
You can also create your login details for your WordPress website.

- Login User: This is the username for logging into your WordPress Dashboard.
- Password: This password is used for logging into your WordPress Dashboard.
- Your Email: Enter the email addres you wish to use for password recovery.
- Title: Enter the title of your WordPress website here.
Once you are ready, hit 'Save'.
Step 3
Tick the box below 'Step 3: Confirm installation' to be able to install WordPress.
If a website is currently installed on your root domain, it will be overwritten. If you want to save it, make sure you do that before you continue.

Once you are ready, press 'Install'.
Getting started with WordPress
After having installed WordPress, we will send you an email with more information about getting started with your WordPress website. This email is sent to the email address you've entered in 'My account' in your control panel.
You can use the Test URL to configure your WordPress website if your domain name is not yet available or if your domain name doesn't point to your web hosting package.
When logged in to WordPress, you will arrive in the WordPress Dashboard where you can manage your WordPress website from. In here you will be able to add pages and install plugins and themes to fully customize your WordPress website.
Take note that we do not offer direct support on creating WordPress websites. However, the forums of WordPress and the website of wpbeginner.com are filled with tutorials and information to get started!
In this article we explained how to install WordPress on a web hosting package and how to get started with building your WordPress website.


