


To download and upload files to and from your Windows Server, you can use an FTPS or SFTP server. The most important differences between FTPS and SFTP in Windows Server boil down to:
- FTPS: Uses IIS, listens on port 21 plus a passive port range, and requires a TLS/SSL certificate.
- SFTP: Runs over SSH on port 22. Convenient if you already use SSH or don’t want to install IIS.
Both are equally suited for setting transferring data from and to your Windows Server. The choice mainly depends on personal preference and the FTP client you use. In this guide, you’ll set up a secure file server in Windows Server 2022 or newer, step by step. For SFTP, see our SFTP tutorial for Windows Server.
Installing an FTPS server (IIS)
Step 1
Connect to your Windows Server via Remote Desktop, the VPS console (VPS) or the OpenStack console (OpenStack instance).
Step 2
Complete the IIS installation with an FTPS server via PowerShell or the ‘Add Roles and Features’ wizard. Both give the same result, but PowerShell is a little faster and you’ll also need PowerShell later in this guide.
Install IIS via PowerShell
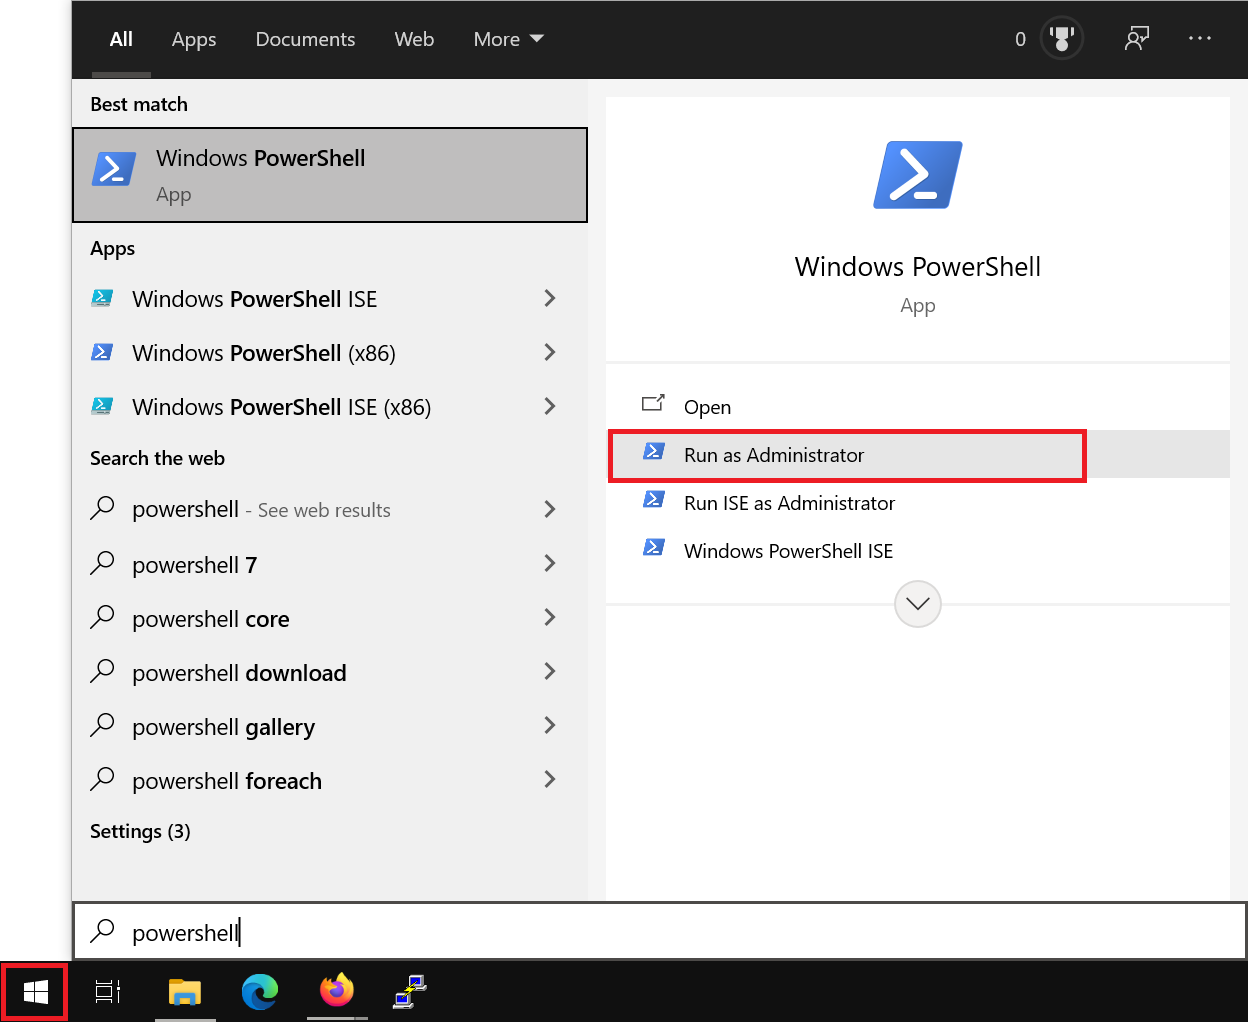
Step 1
Click the Windows Start button, type ‘PowerShell’ and click ‘Run as Administrator’.
Step 2
Run the following command to install IIS:
Install-WindowsFeature -name Web-Server -IncludeManagementToolsYou can install optional components at the same time by using a comma-separated list, for example:
Install-WindowsFeature -name Web-Server, Web-ASP -IncludeManagementToolsA complete overview of features you can install alongside IIS in this way can be found in the paragraph ‘Overview of IIS role services and PowerShell names’. The Web-Ftp-Server feature is a separate but related role service and is therefore not mentioned in that overview.
Install IIS via the ‘Add Roles and Features’ wizard
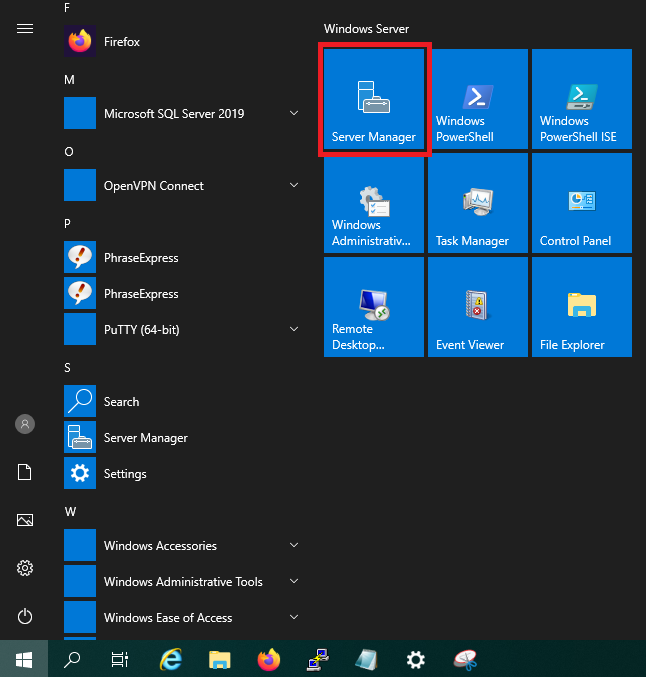
Step 1
Click the Windows Start button and then ‘Server Manager’.
Step 2
Then click ‘Add roles and features’.

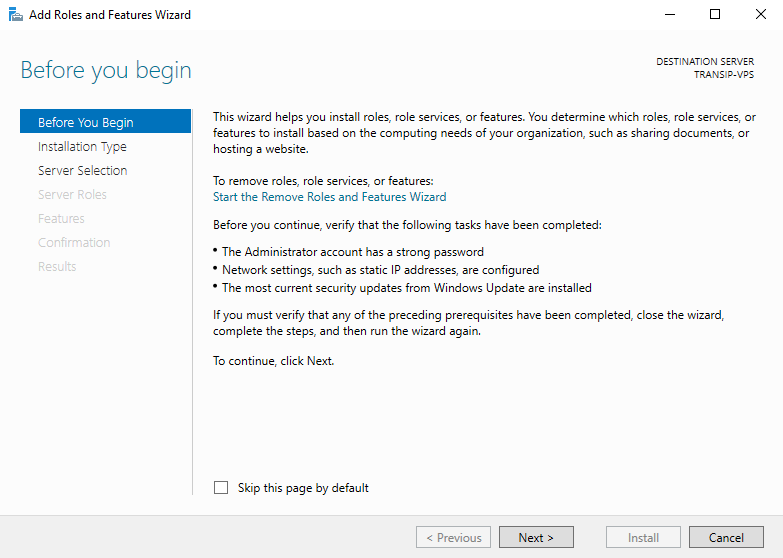
Step 3
You will now see the ‘Before You Begin’ page. You can choose not to see this page again when adding roles & features in future. Click ‘Next’ after reviewing the points under ‘before you continue’.
Step 4
Under ‘Installation Type’ you can choose between ‘Role-based or feature-based’ and ‘Remote Desktop Services installation’. Choose ‘Role-based or feature-based’ and proceed to the next step.
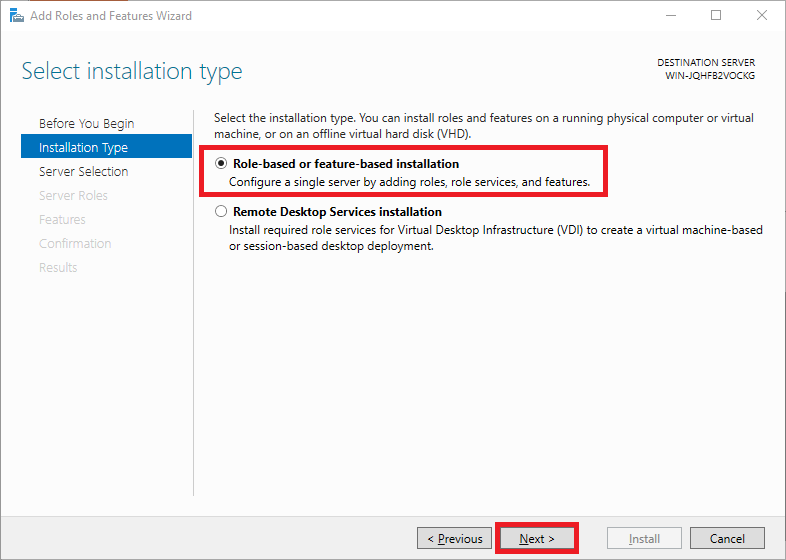
Roles add software aimed at specific tasks, such as hosting websites, to Windows Servers; features add extra functionality to that software.
Step 5
Next, choose which server you want to install on. By default, the server on which you’re running the installer will be selected. Click ‘Next’ to continue.
If you use a server pool to install and manage roles from a central server, you’ll see multiple servers here and can select the desired server.

Step 6
Select ‘Web Server (IIS)’ in the list of features.

You’ll immediately see a pop-up window asking whether you want to install the required features for IIS. Click ‘Add Features’ to accept this.

Step 7
Don’t make any changes in the ‘Features’ view and click ‘Next’.

Also skip the introduction page for the Web Server Role (IIS) installation.

In the ‘Role Services’ view, select FTP Server and click ‘Next’.

Step 8
Optionally tick ‘Restart the destination server automatically if required’ and click ‘Install’ to confirm your choices from the previous steps and install IIS.

Step 3 – optional
Optionally install an SSL certificate in IIS to secure your FTP connection; see our guide ‘Installing an SSL certificate in IIS’. This isn’t mandatory, but it is recommended for security reasons.
For testing purposes, you can also (optionally) create a self-signed certificate in PowerShell. Replace ftp.jouw-domein.tld with the (sub)domain you want to use for FTPS, and c:\Mycerts\ with the location where you want to save the certificate.
New-SelfSignedCertificate -DnsName "ftp.jouw-domein.tld" -CertStoreLocation c:\Mycerts\
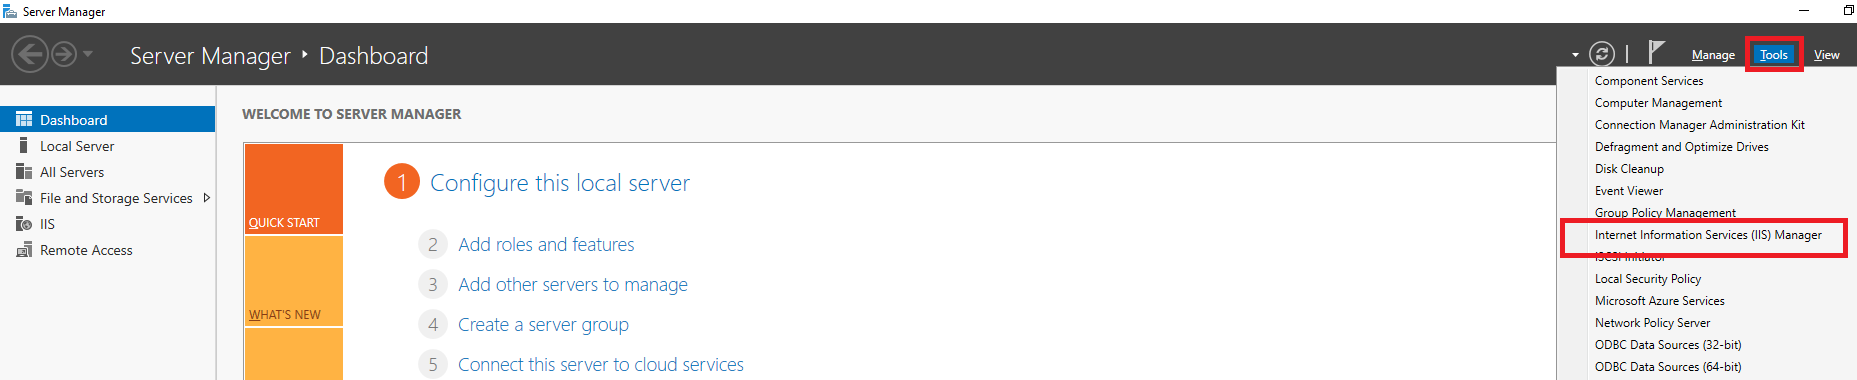
Step 4
Open IIS Manager: In Server Manager, click ‘Tools’ (top right) > ‘Internet Information Services (IIS) Manager’.
Step 5
Click ‘Connect to a server…’.

Step 6
Enter your server name in the window that opens and click ‘Next’. For example, use your server’s hostname or a (sub)domain that points to your server.

Step 7
The server you’ve just added is visible in IIS Manager in the left-hand menu. Right-click it and select ‘Add FTP Site’.

Step 8
The ‘Add FTP Site’ wizard then opens. On the first page, enter a name for the FTP site and the directory to which/from which files may be downloaded/uploaded, and click ‘Next’.
You can choose any name you like, but it’s helpful to use one that makes the purpose easy to recognise.

Then, on the next page, select:
- IP Address: The IP address you want to use to connect to the FTP server.
- Enable Virtual Host Names: Optionally enable a virtual host name: this makes it easier to remember which server you’re connecting to (for example, use an Active Directory domain name).
- SSL: Select, depending on your choice in step 3, ‘Require SSL’ (recommended) or one of the other options, and select the corresponding SSL certificate.
Finally, click ‘Next’ to continue.

Finally, set authentication and authorisation and click ‘Finish’. We recommend the following settings:
- Authentication: Select ‘Basic’ only. Anonymous authentication grants public access to your server without authentication.
- Allow access to: All users on your server/Active Directory, or specific users. The choice is entirely yours.
- Permissions: Read and/or Write depending on your use case. For downloads only, ‘Read’ is sufficient. Want to upload as well? Then also tick ‘Write’.

Step 9
Next, configure the FTP passive ports: passive ports are used to establish a data connection for file transfers when a client is behind a firewall.
In IIS Manager, click the server name you used in step 6 and double-click ‘FTP Firewall Support’.

Enter a passive port range under ‘Data Channel Port Range’, for example 50000–50100.
Do you use an external firewall, for example a pfSense server that handles public connections to your Windows Server? Then, under ‘External IP Address of Firewall’, enter the firewall’s public IP address. In all other cases, leave this field empty.
Finally, click ‘Apply’.

Step 10
Add both port 21 and the passive port range to Windows Firewall via PowerShell or via Windows Defender Firewall with Advanced Security.
Open FTP ports via PowerShell
Step 1
Click the Windows Start button, type ‘PowerShell’ and click ‘Run as Administrator’.
Step 2
Run the following commands to open port 21 and your passive port range (in this example 50000–50100) in your firewall:
New-NetFirewallRule -DisplayName "FTP (21/TCP)" -Direction Inbound -Protocol TCP -LocalPort 21 -Action Allow
New-NetFirewallRule -DisplayName "FTP Passive (50000-50100/TCP)" -Direction Inbound -Protocol TCP -LocalPort 50000-50100 -Action Allow
Open FTP ports via Windows Defender Firewall with Advanced Security
Follow the steps in this guide to open ports in Windows Firewall. Create two new rules (step 3) for TCP ports: the first rule for port 21 only, and the second rule for a port range (50000–50100; see step 5).
Step 11
Although you created an FTP site with SSL configuration, you must also adjust the FTP SSL configuration at the server level from steps 5 and 6. When you make a connection, it’s effectively forwarded from the server to the FTP site. It’s therefore important that both use the same SSL configuration (at least regarding whether SSL is required and the certificate in use).
In IIS Manager, select your server (not the FTP Site) and double-click ‘FTP SSL Settings’.

Adjust the configuration as desired and click ‘Apply’. For security reasons, we recommend using an SSL certificate and actually requiring SSL (Require) under ‘SSL Policy’.

All done! You can now connect to your FTP server using the settings in the next section.
Connect to your FTPS server
To connect to your FTP server, simply use the settings you configured in the previous section:
- Protocol: FTP – File Transfer Protocol (or FTPS if your FTP application lists it explicitly)
- Host: The IP address of your FTP server or a (sub)domain that points to it. This (sub)domain is the same one you set as the FTP Site and for which you selected the corresponding SSL certificate.
- Port: 21
- Encryption: The same as you chose in step 8 of the previous section. We recommend ‘Require explicit FTP over TLS’.
- Logon Type: Normal (definitely not Anonymous)
- User: A user account on your Windows Server that has access to your FTP Site (as configured in step 8 of the previous section).
- Password: The password for the user mentioned above.
In FileZilla this looks as follows under ‘File’ > ‘Site Manager…’ > ‘New site’:

That brings us to the end of our guide to setting up an FTPS server on a Windows Server. You can now safely use your Windows Server to download and upload files.