With a Windows Active Directory (AD) you manage who has access to certain resources within the domain of a Windows network, for example to shared folders or Remote Desktop servers. In this tutorial, we look at the basics of AD user and group management and cover the following topics:
- Installing the Active Directory Users and Computers (ADUC) tool
- Creating AD users
- Creating an AD group
- Adding AD users, an email address and administrator to a group
- Adding computers or servers to a group
- Deleting AD users or groups
- Granting/Removing a User or Group Access to a Shared Folder
Tip: We recommend working with groups as much as possible and not managing permissions per individual user. Suppose, for example, that you use a 'help desk' group and new help desk employees are added or someone leaves. You then only have to create an account for those employees and add it to the relevant groups or remove it from the groups and delete the relevant user account. This greatly simplifies the management of user accounts and their rights.
The steps in this tutorial require the Active Directory Domain Services role to be installed and a server designated as the Domain Controller. We walk you through this process in our Active Directory installation tutorial.
Installing the ADUC tool
Via the Active Directory Users and Computers (ADUC) tool you perform user and computer management within an AD. ADUC is installed on the Domain Controller by default, but as an administrator you will usually perform the managing of users and computers and Active Directory on a work computer or laptop and not from the Domain Controller directly.
You install the ADUC tool in Windows as follows:
Step 1
The installation varies by Windows version. First, check your version by clicking the Windows Start button, typing 'About' and selecting the top result.
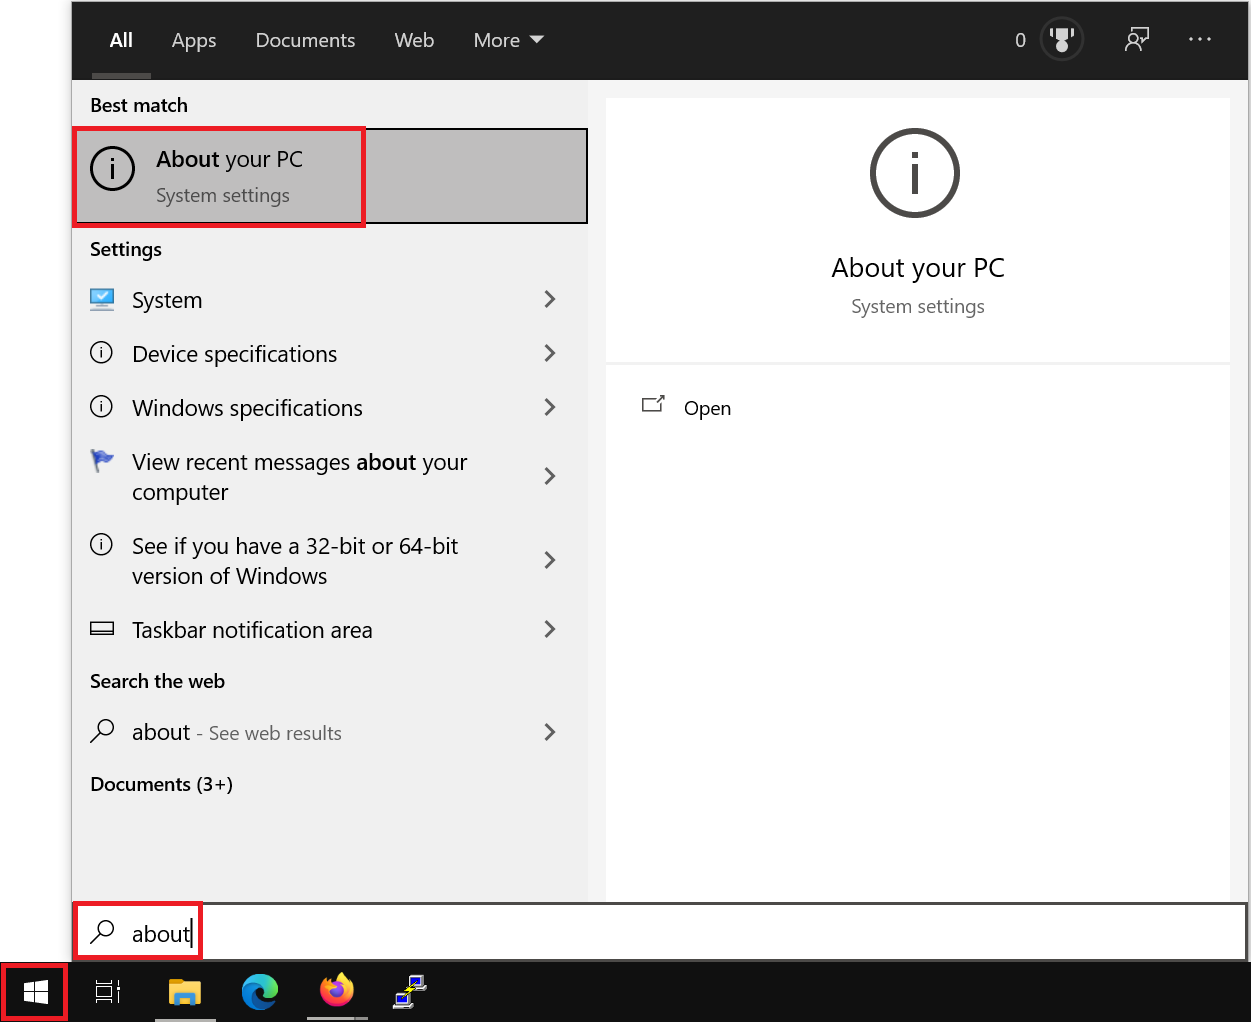
At the bottom under 'Windows specifications' you can see the installed version. Is this 2004 or newer? Then continue with step 2 - Windows 10 - 2004. Are you using an older version than 2004? Then update Windows first or go to step 2 - Windows 10 < 2004. Please note that from a security point of view it is always better to keep your Windows installation up to date.
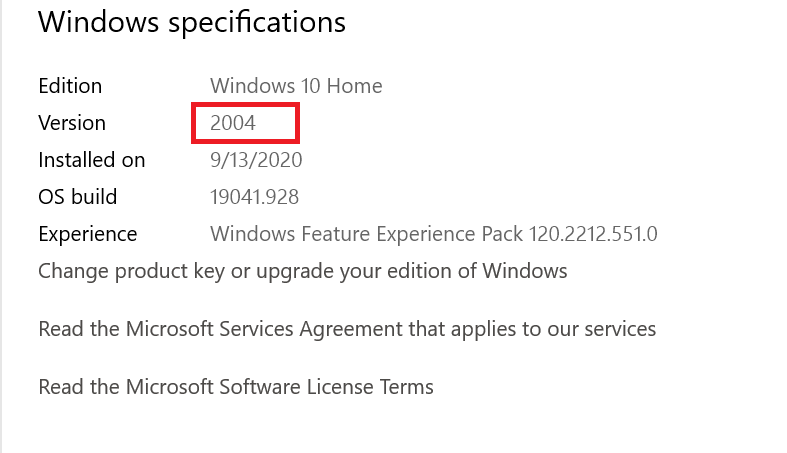
At the time of writing, ADUC can only be installed via Powershell in Windows 10 version 2004.
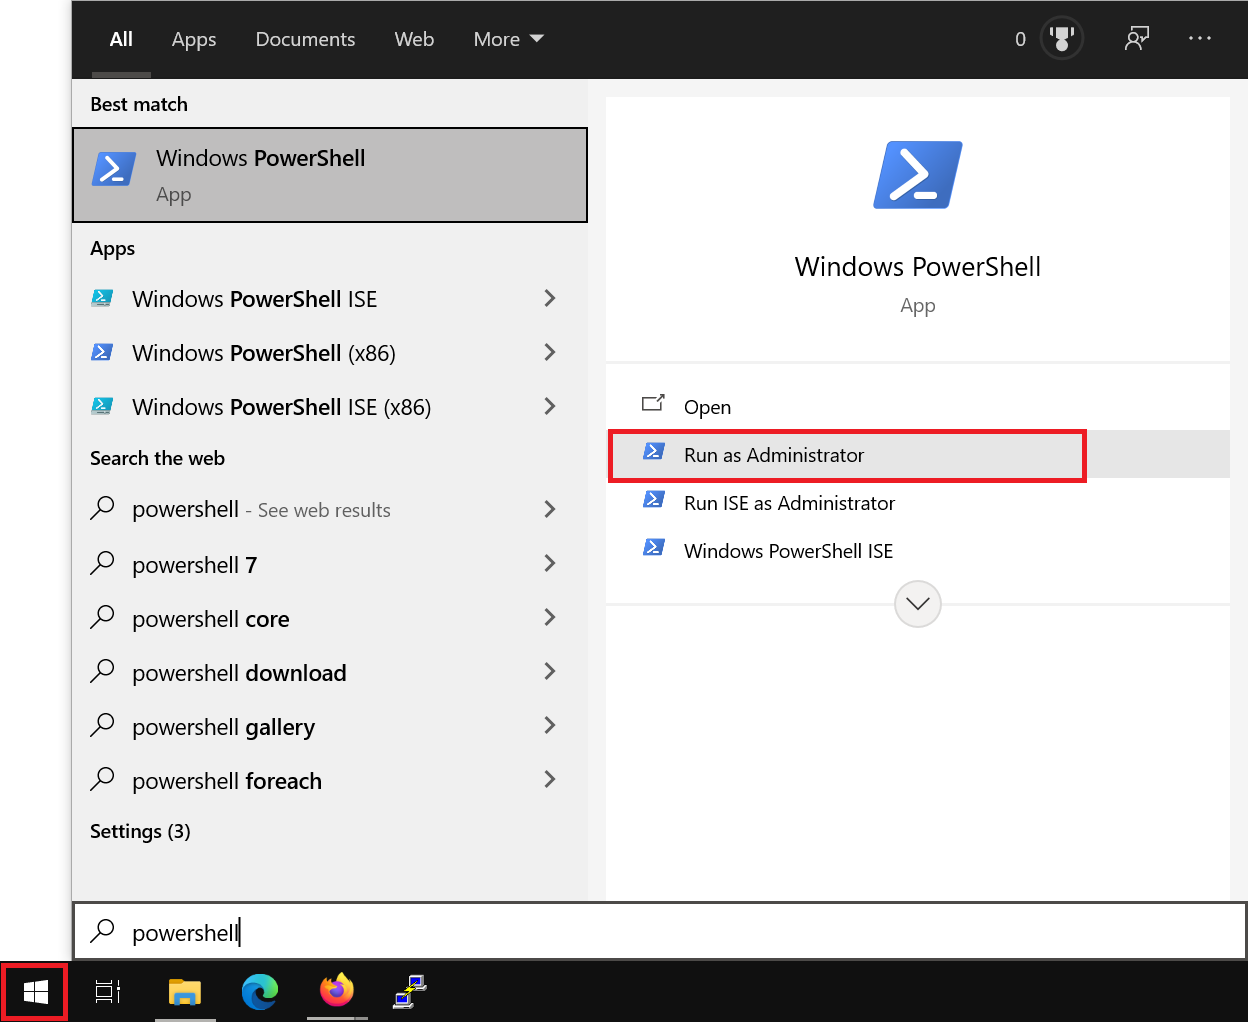
Click the Windows Start button, type 'Powershell' and click the 'Run as Administrator' option.
Step 3
Run the following command:
DISM /online /add-capability /capabilityname:Rsat.ActiveDirectory.DS-LDS.Tools~~~~0.0.1.0
Do you get an error message 'Windows 10 RSAT Install Error 0x800f0954.'? Then use the commands:
$currentWU = Get-ItemProperty -Path "HKLM:\SOFTWARE\Policies\Microsoft\Windows\WindowsUpdate\AU" -Name "UseWUServer" | select -ExpandProperty UseWUServer
Set-ItemProperty -Path "HKLM:\SOFTWARE\Policies\Microsoft\Windows\WindowsUpdate\AU" -Name "UseWUServer" -Value 0
Restart-Service wuauserv
Get-WindowsCapability -Name RSAT* -Online | Add-WindowsCapability –Online
Set-ItemProperty -Path "HKLM:\SOFTWARE\Policies\Microsoft\Windows\WindowsUpdate\AU" -Name "UseWUServer" -Value $currentWU
Restart-Service wuauserv
Step 2 Windows 10 < 2004
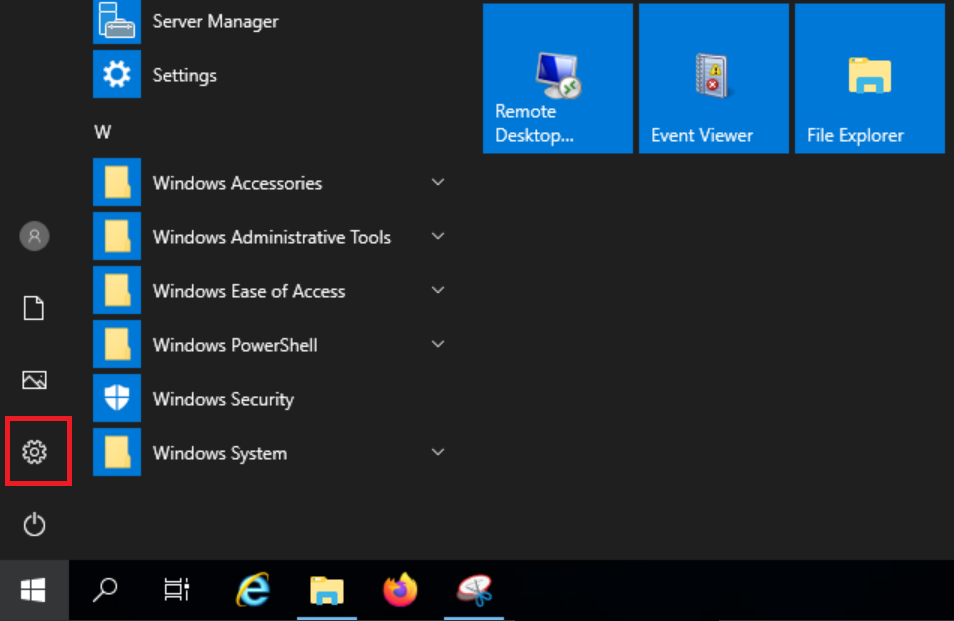
Click the Windows start button and then click the 'Settings' cogwheel.
Step 3
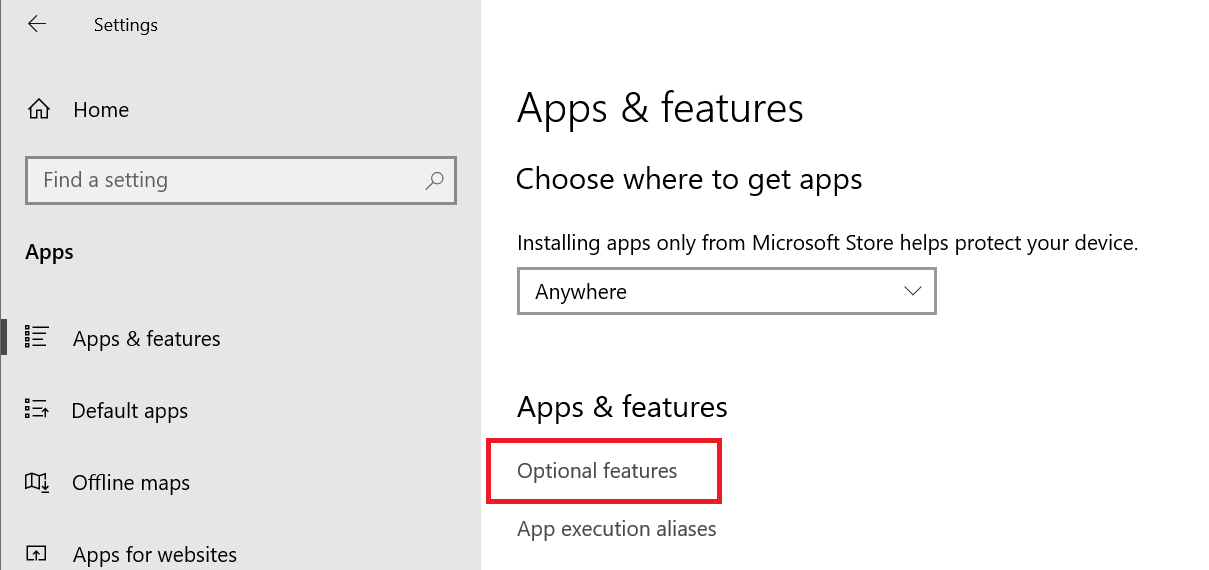
Click 'Apps' > 'Optional features'.
Step 4
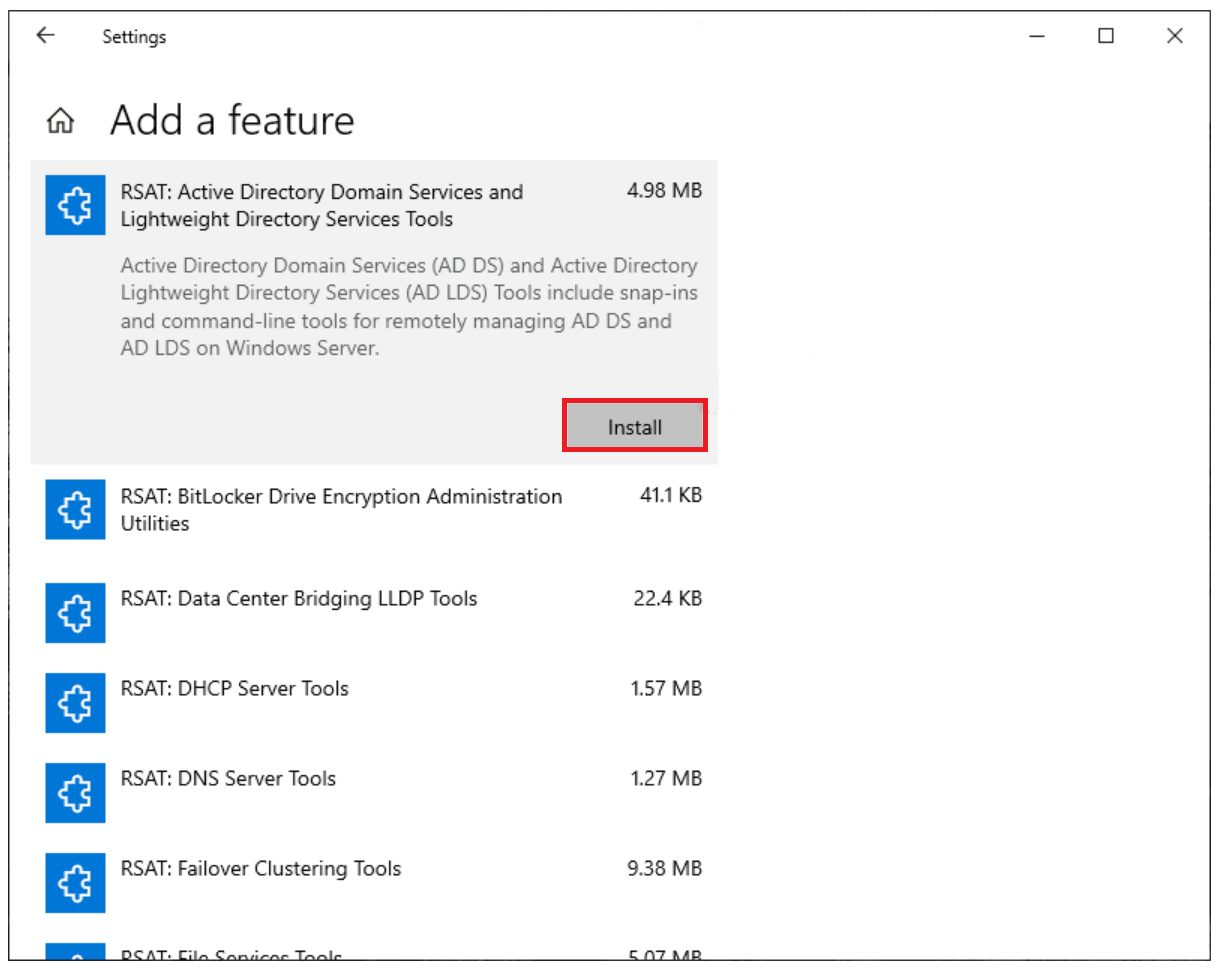
Click 'Add a feature' and at the option 'RSAT: Active Directory Domain Services and Lightweight Directory Tools' click 'Install'.
Creating AD users
Step 1
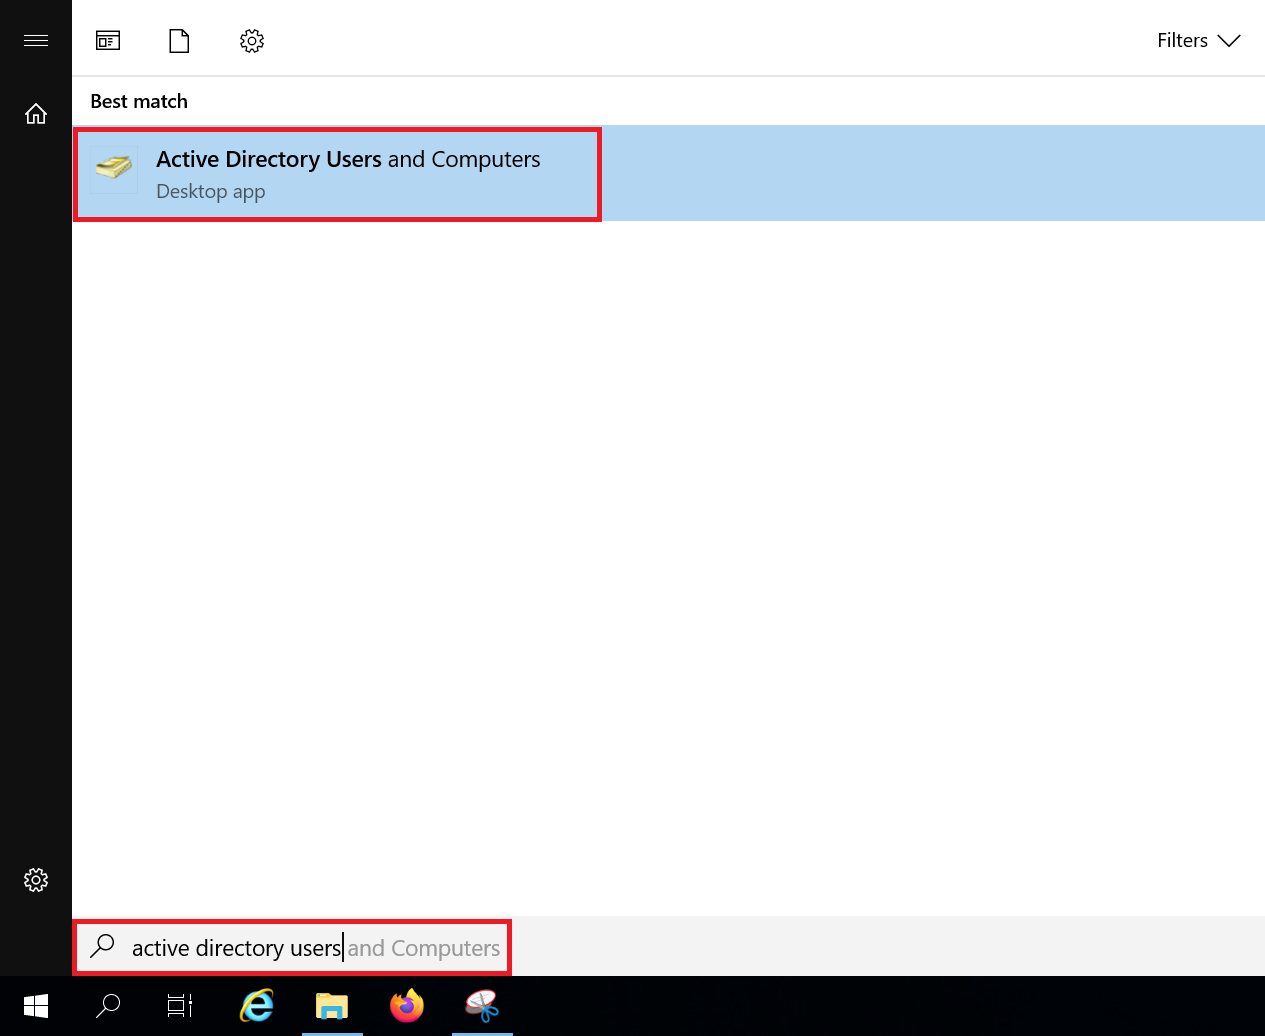
Click the Windows Start button, type 'Active Directory Users and Computers' and click the result.
Step 2
Click the name of your domain and then click 'Users'.
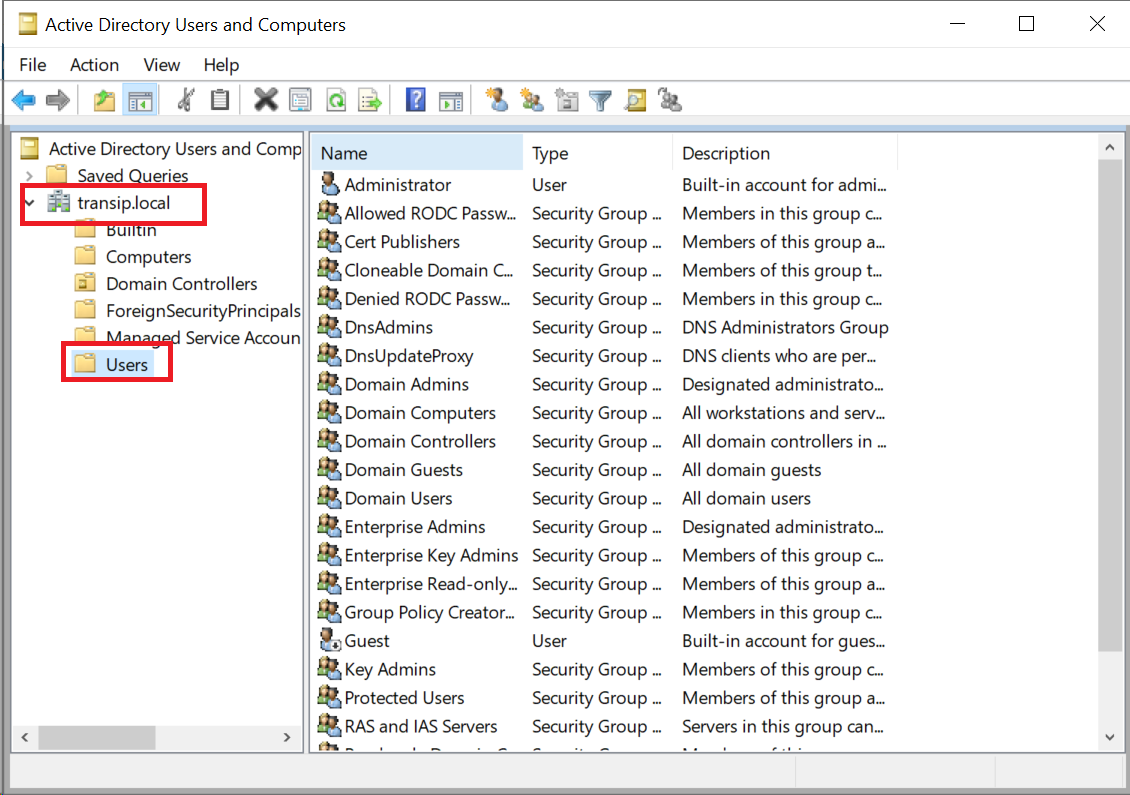
In this example, we added one domain within the AD. However, an AD can contain multiple domains. Such a collection of domains within one AD is called a forest.
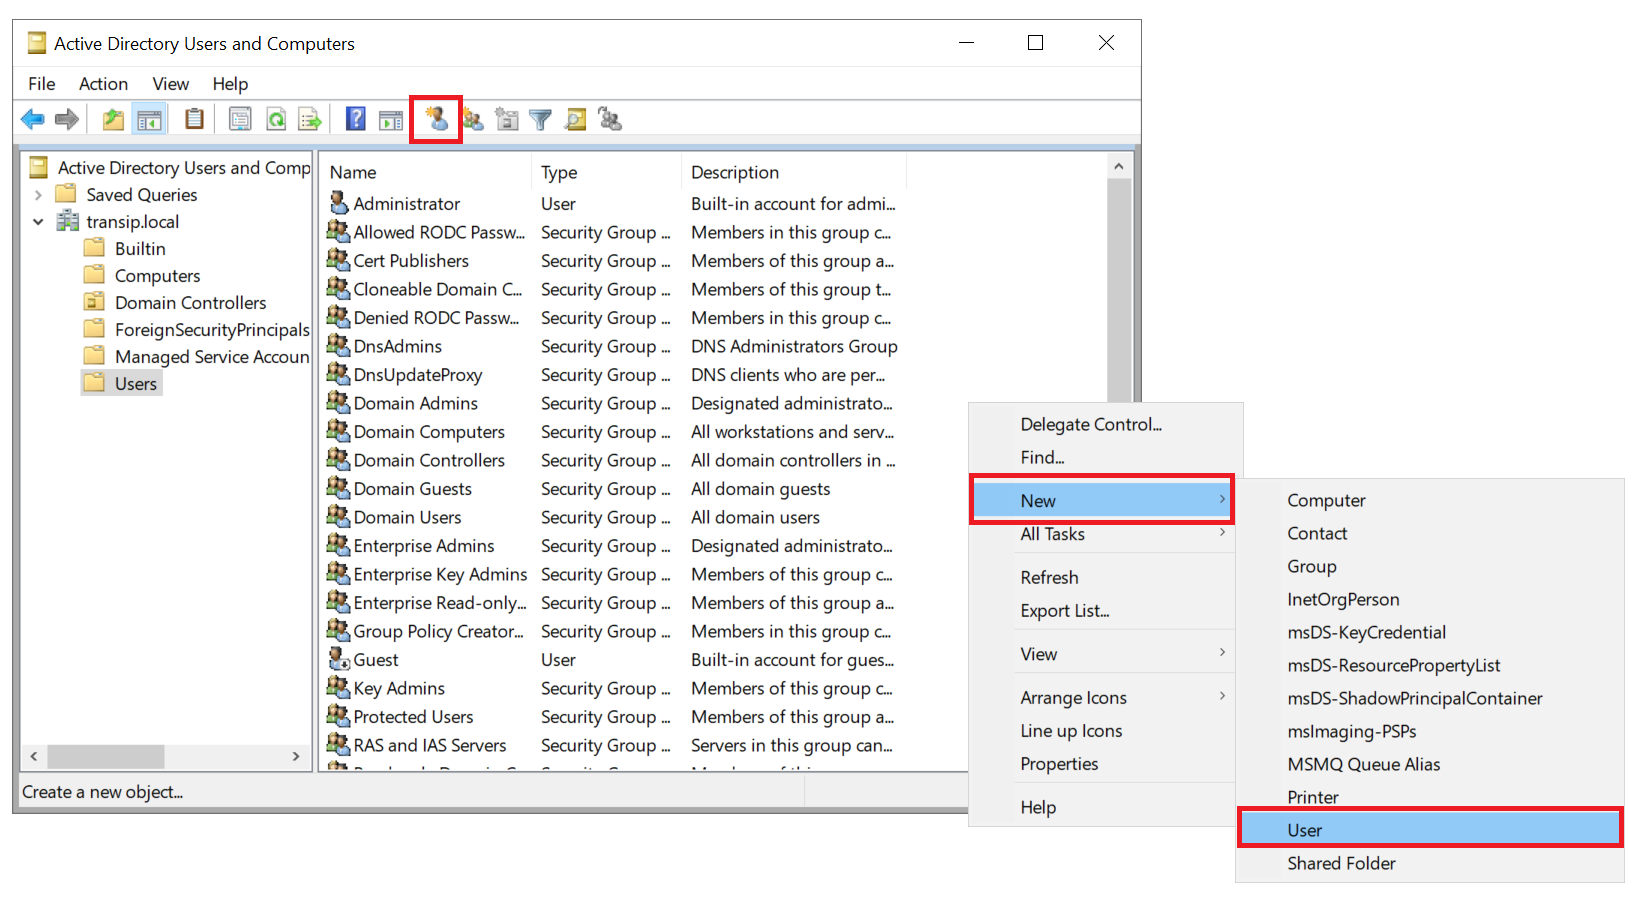
Step 3
In the list of users, right-click an empty spot and select 'New' > 'User’ or use the shortcut icon at the top of the window.
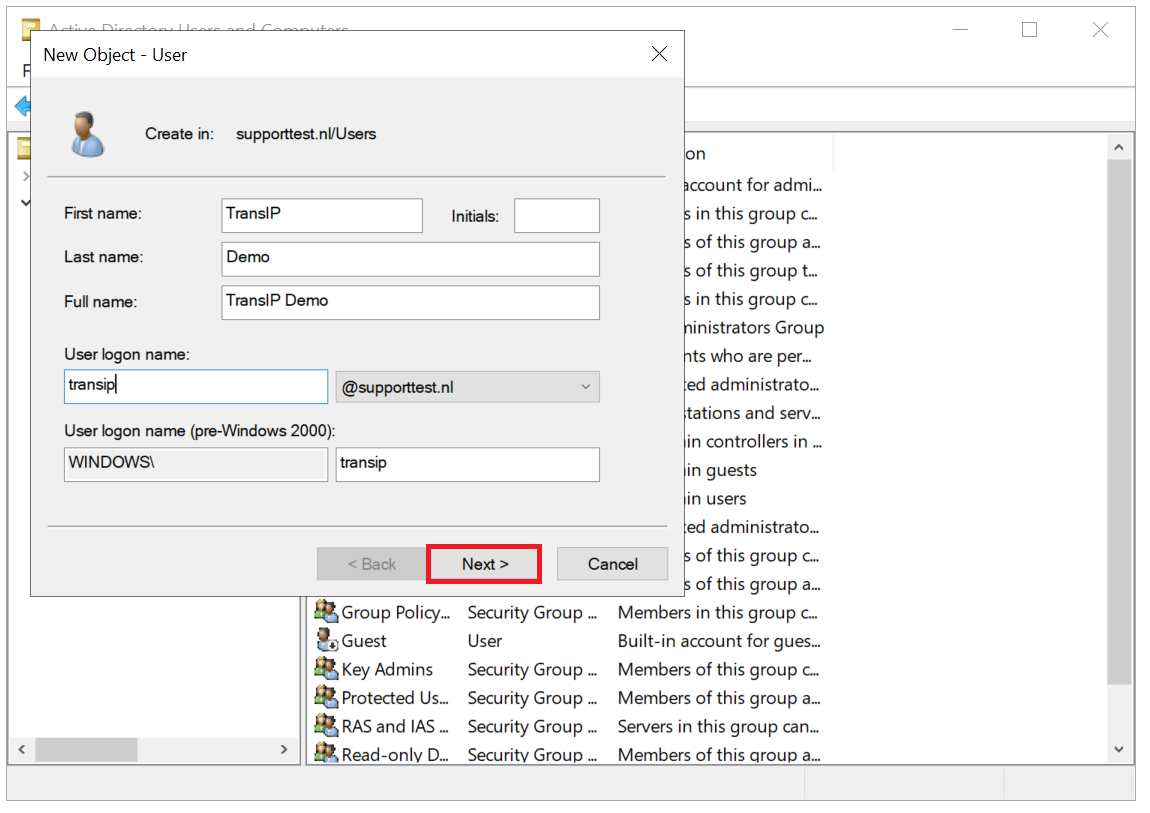
Step 4
Enter the user's first, last and username and click 'Next'.
Please note: Microsoft automatically assumes that the user also has/will receive an email address with the specified name. It is important that this email address is actually owned by this user and not by anyone else, regardless of whether or not this person will be using email.
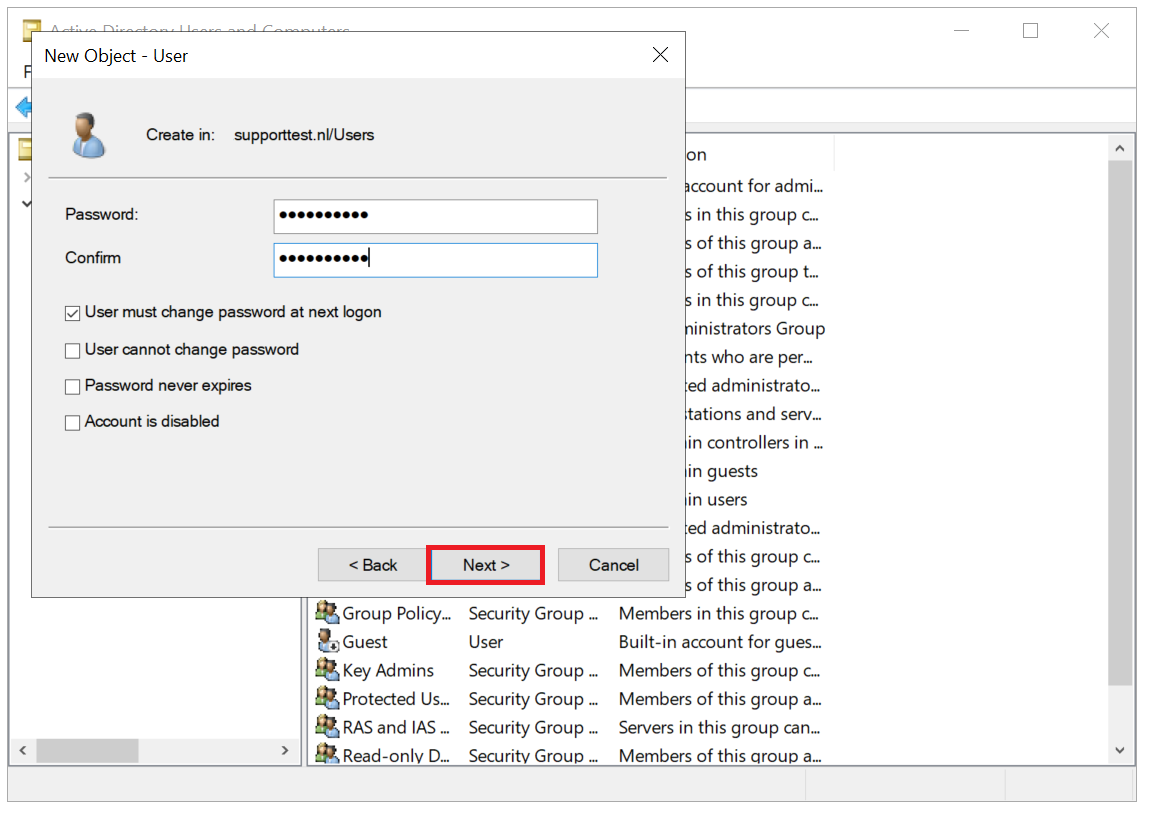
Step 5
Enter a password for the new user and click 'Next' again. It is best practice for security reasons to enter a temporary password and leave the option 'User must change password at next logon' checked.
Step 6
You will see a confirmation of the user you are creating. If the data is correct, click 'Finish' to actually create the user.

Creating AD groups
Groups make it easier to work with rights and permissions within an organization with a growing number of employees. The larger your company, the more unclear it is to assign individual rights to users within your Active Directory. A more convenient way to manage permissions in bulk is to work with groups.
For example, you can give a group access to a shared network folder and then make users a member of that group. Suppose you give that group rights to another network folder in the future, then all users within that group will have access to it.
Step 1
Click the Windows Start button, type 'Active Directory Users and Computers' and click the result.
Step 2
Click the name of your domain and then click 'Users'.
Please note: In this example we have added one domain within the AD. However, an AD can contain multiple domains. Such a collection of domains within one AD is called a forest.
Step 3
In the list of users, right-click an empty spot and select 'New' > 'Group’ or use the shortcut icon at the top of the window.
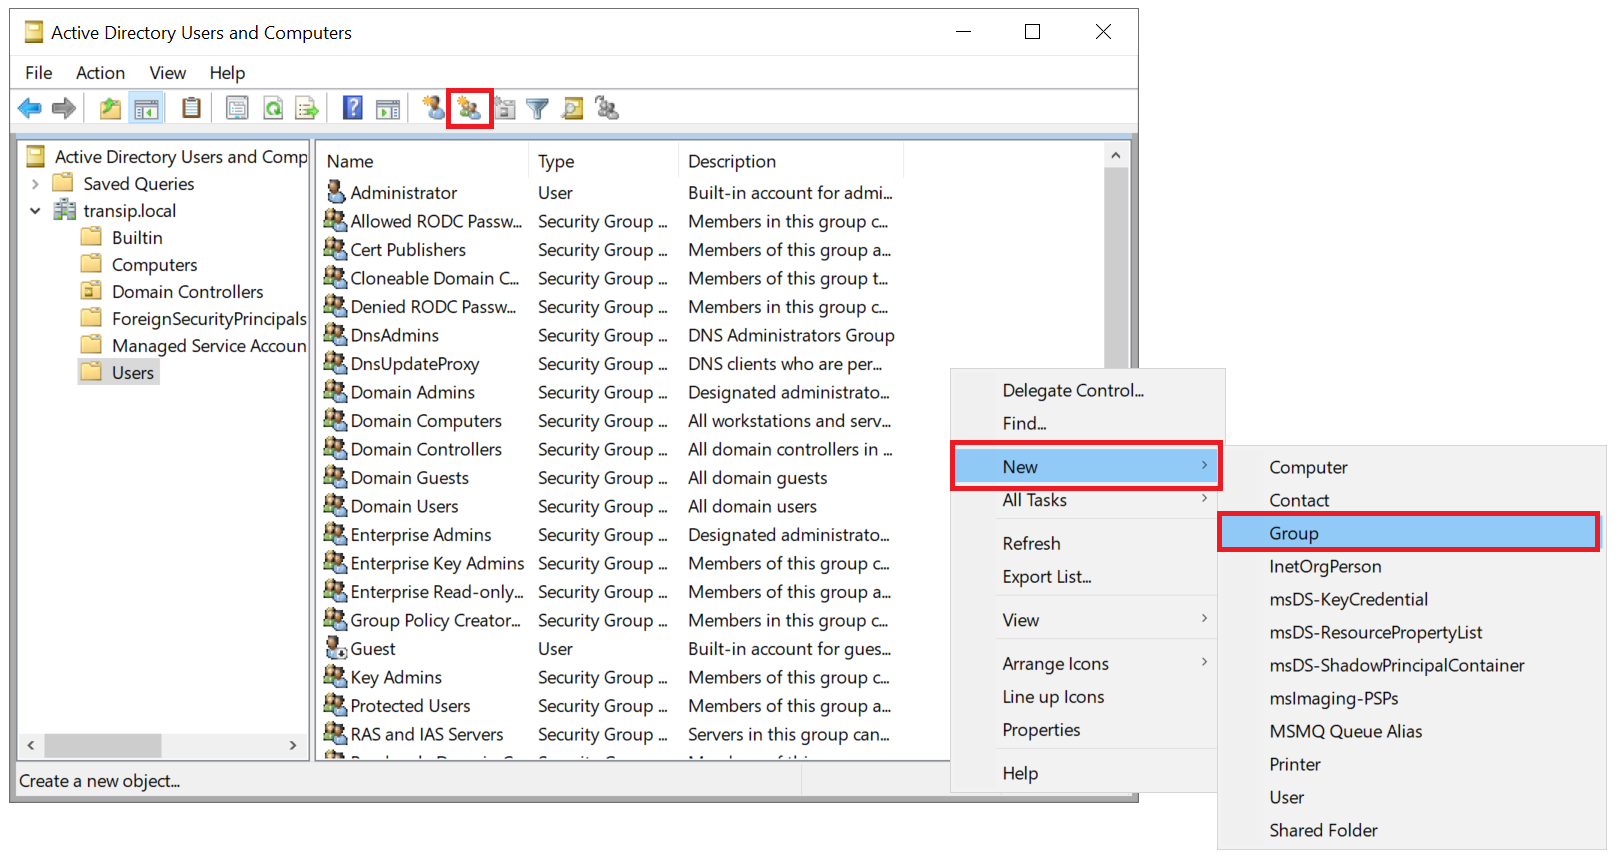
Step 4
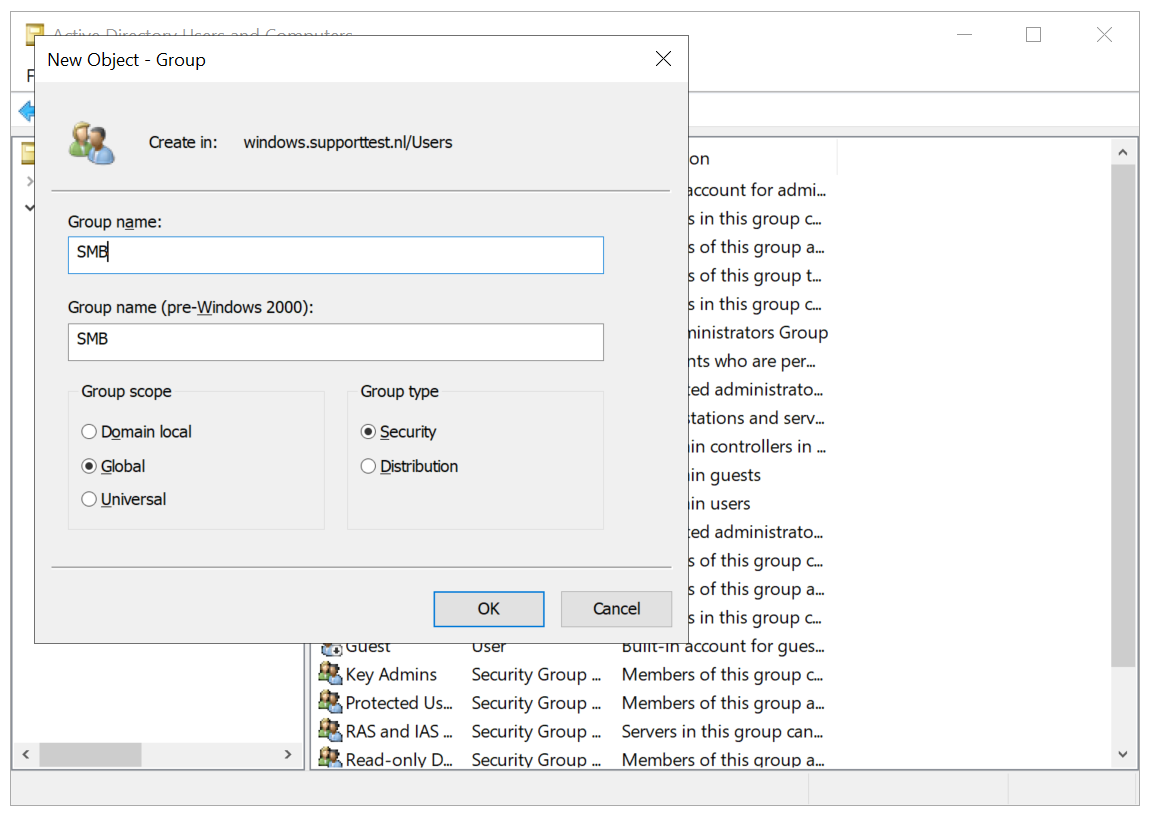
Give the group a name and click 'OK'. Optionally, you can also adjust the 'Scope' and the 'Type':
- The scope mainly relates to the rights within one or more domains in an AD. On this page from Microsoft, you will find an overview with more information about the different scopes.
- The 'group type' indicates what the group is for. Usually you will choose 'Security groups' here:
- Distribution groups: for creating mailing lists (in combination with an Exchange environment).
- Security groups: for granting permissions to shared resources, such as a network drive, or for granting rights to perform actions, for example administrative actions such as creating users.
Adding a user, administrator, and email address to a group
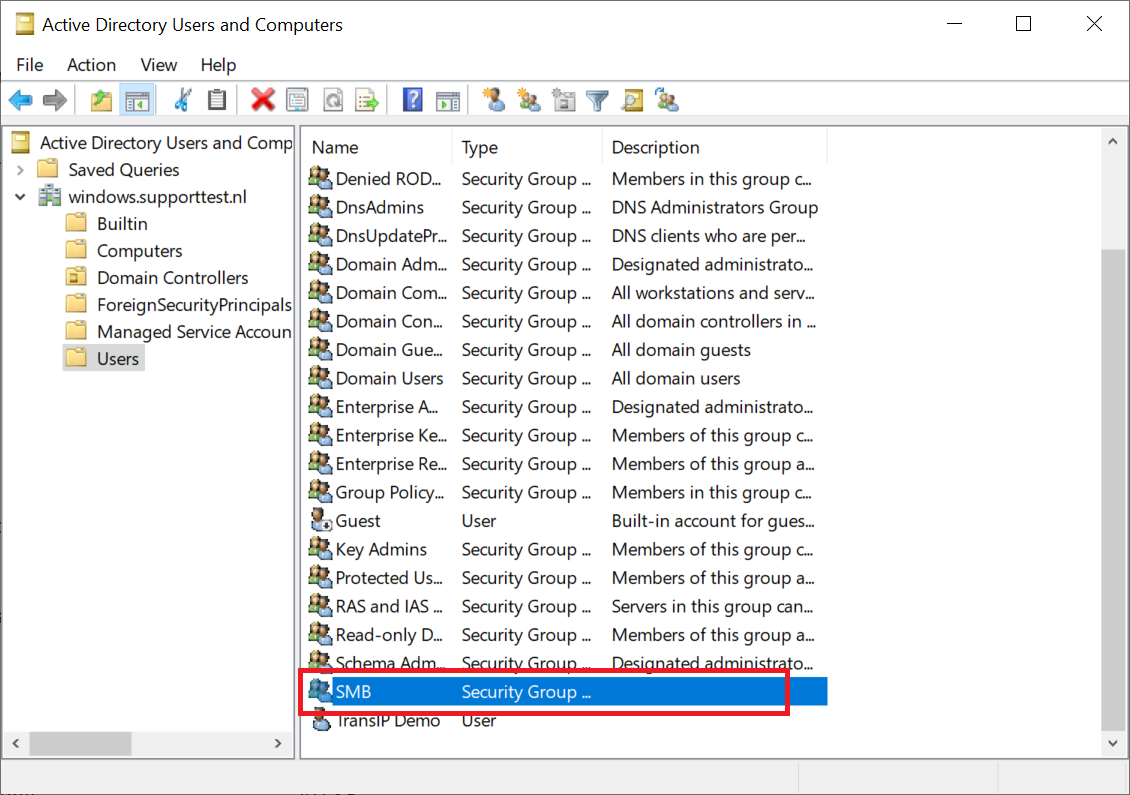
Adding users to an AD group is a simple operation after creating that group. Assuming you've gone through the previous section to create an AD group, add users like this:
Step 1
Double click the name of the group you want to add users to.
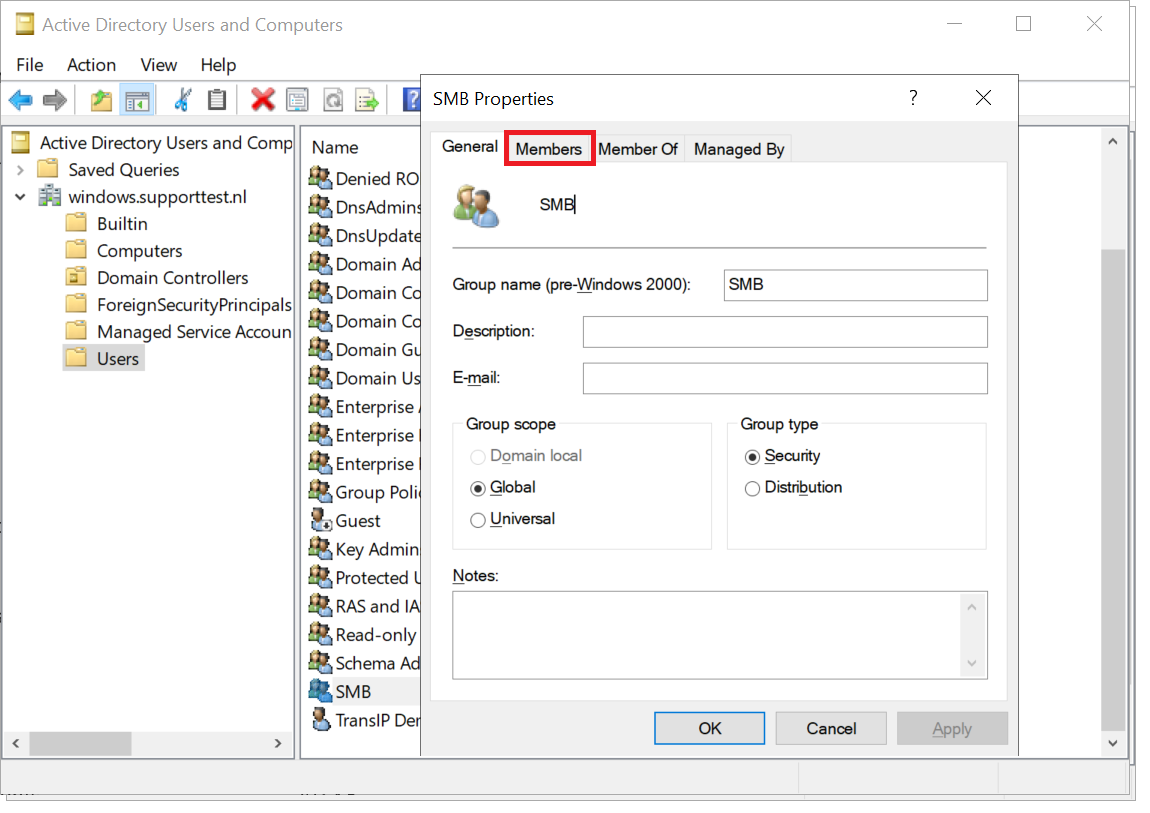
Step 2 - Add Email Address
The window that opens immediately gives you a number of handy options for making changes:
- Group name: Customize the name of the group if desired
- Group description: Give the group a description so that the purpose of the group is clearly visible
- Email: Give the group an email address. Members of the group can receive and send mail from this address (this of course requires that the email address exists and that there is a mail server that processes the mail for this).
- Scope: Adjusts the scope of the group, see the paragraph 'Creating an AD group'
- Type: Adjusts the type of group, see the section 'Creating an AD group'
If desired, make changes to this page and click 'Apply'. Then go to the 'Members' tab.
Step 3 - Add Users
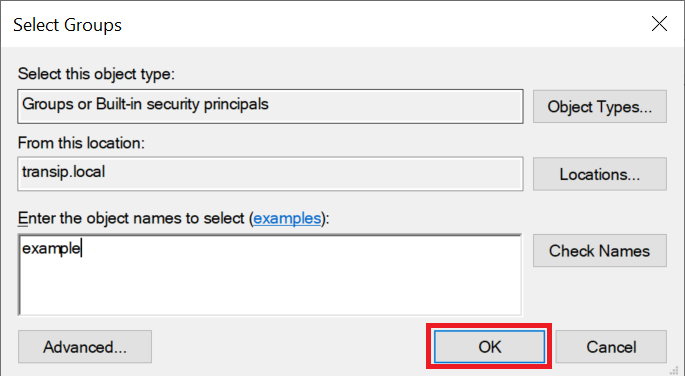
Click 'Add' to add a user. The easiest way to add users is to type in the name, or part of the name and then click 'Check Names'. Select the desired user from the search results and click 'OK' > 'Apply' to add them to the group.
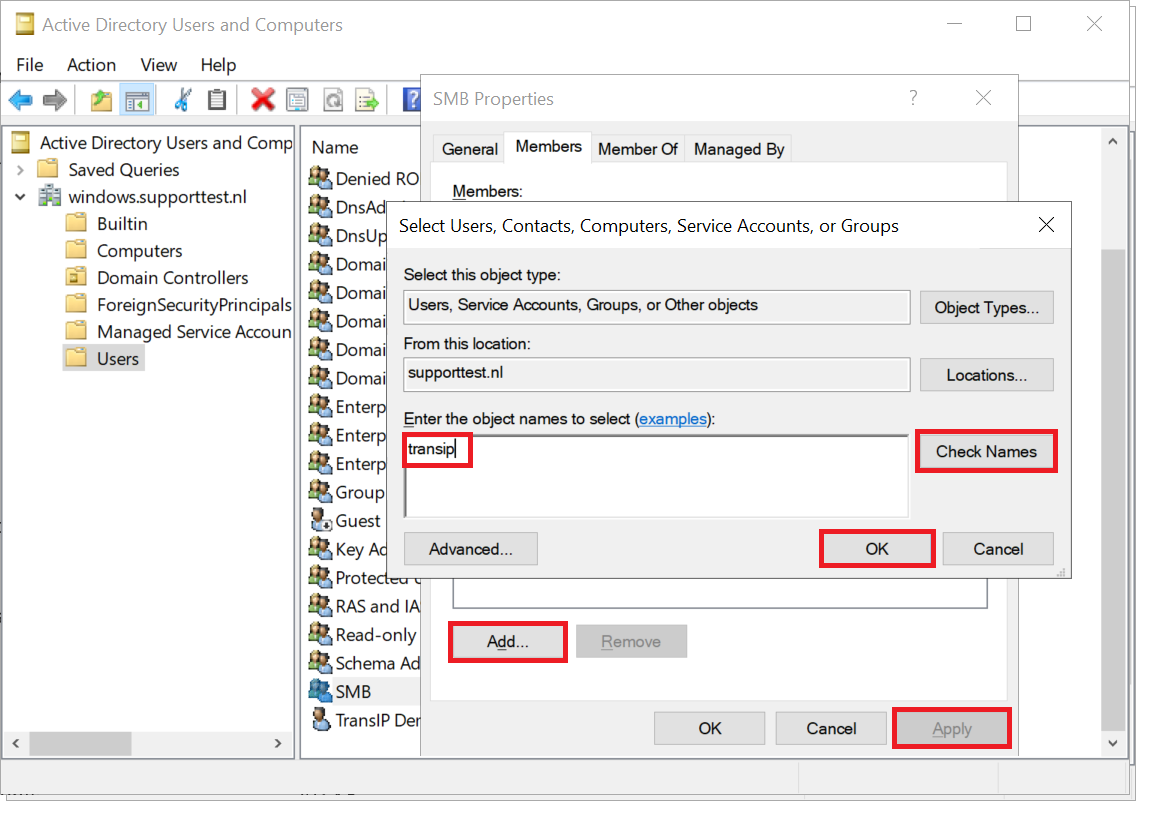
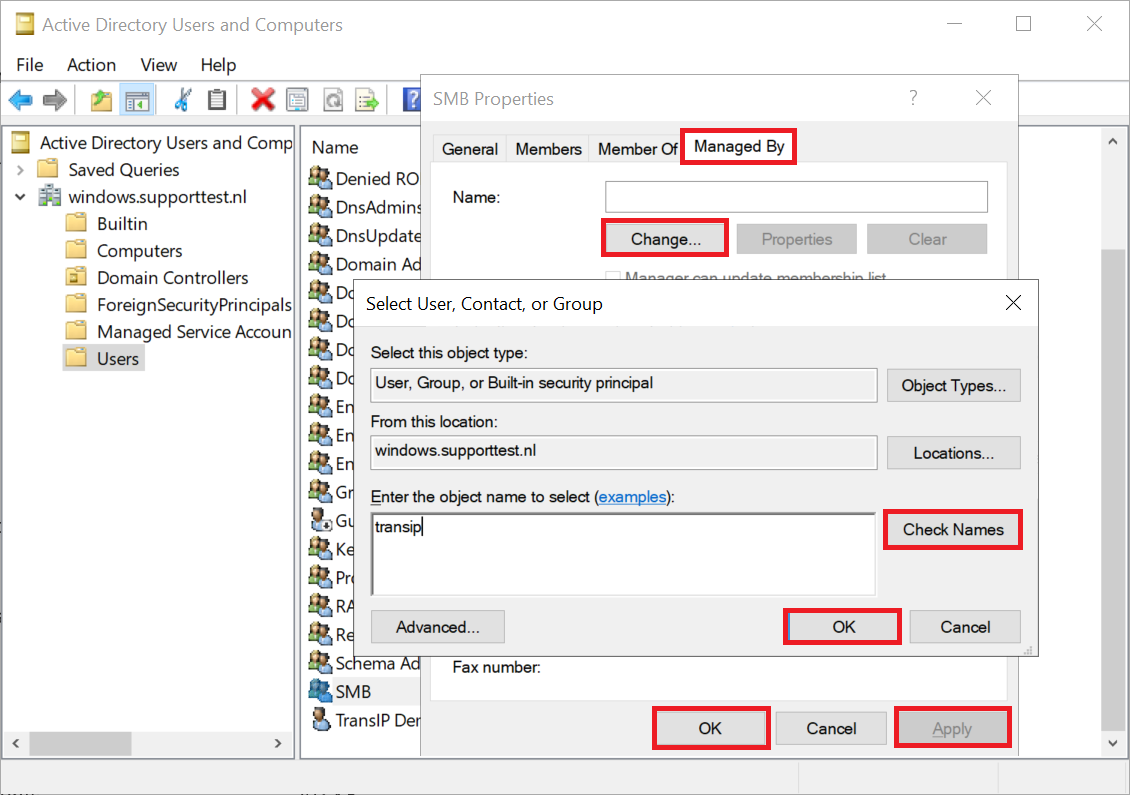
Step 4 - Add Administrators
Now go to the 'Managed by' tab and click 'Change' to assign an administrator to the group. Again enter the name, or part of the name of the administrator and then click 'Check Names'. Select the desired user and click 'OK' > 'Apply' > 'OK' to add them to the group.
Adding computers or servers to a group
Just like users, you can easily add computers to groups. After creating a group, add computers as follows:
Step 1
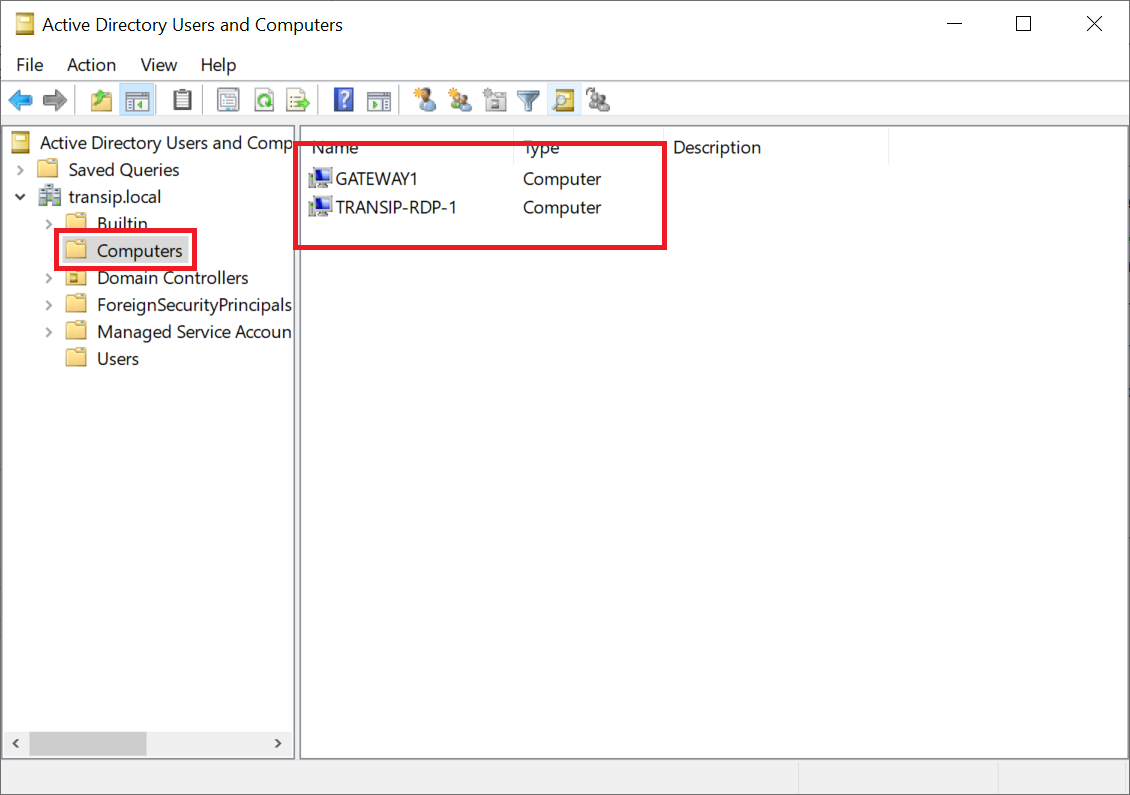
In the ADUC tool, click 'Computers' and then double click the desired server/computer.
Step 2
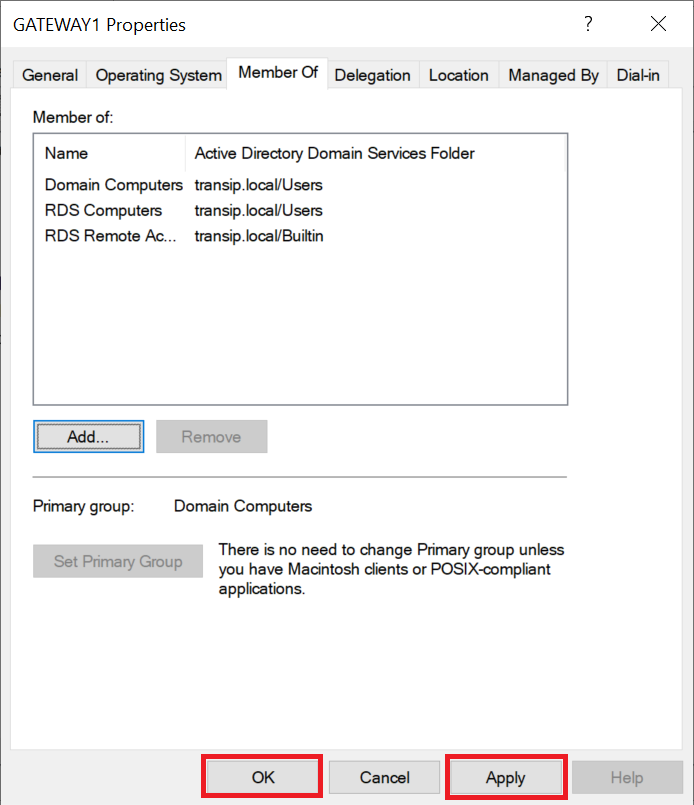
Go to the 'Member of' tab and click 'Add'.
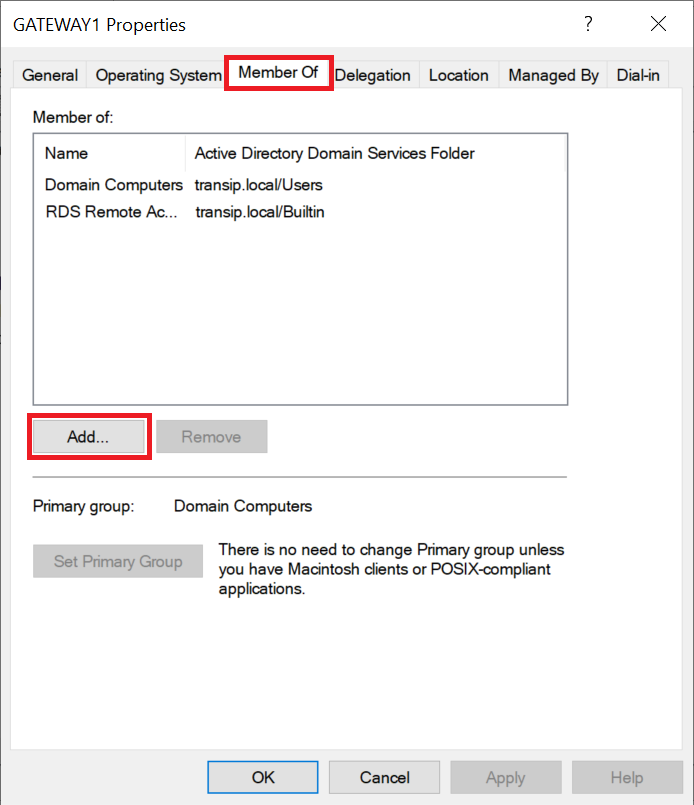
Step 3
Search in the familiar search screen for the name of the group you want to add the server to and click 'OK'.
Step 4
Finally, click 'Apply' and 'OK' to apply the changes and close the window respectively.
Deleting AD users or groups
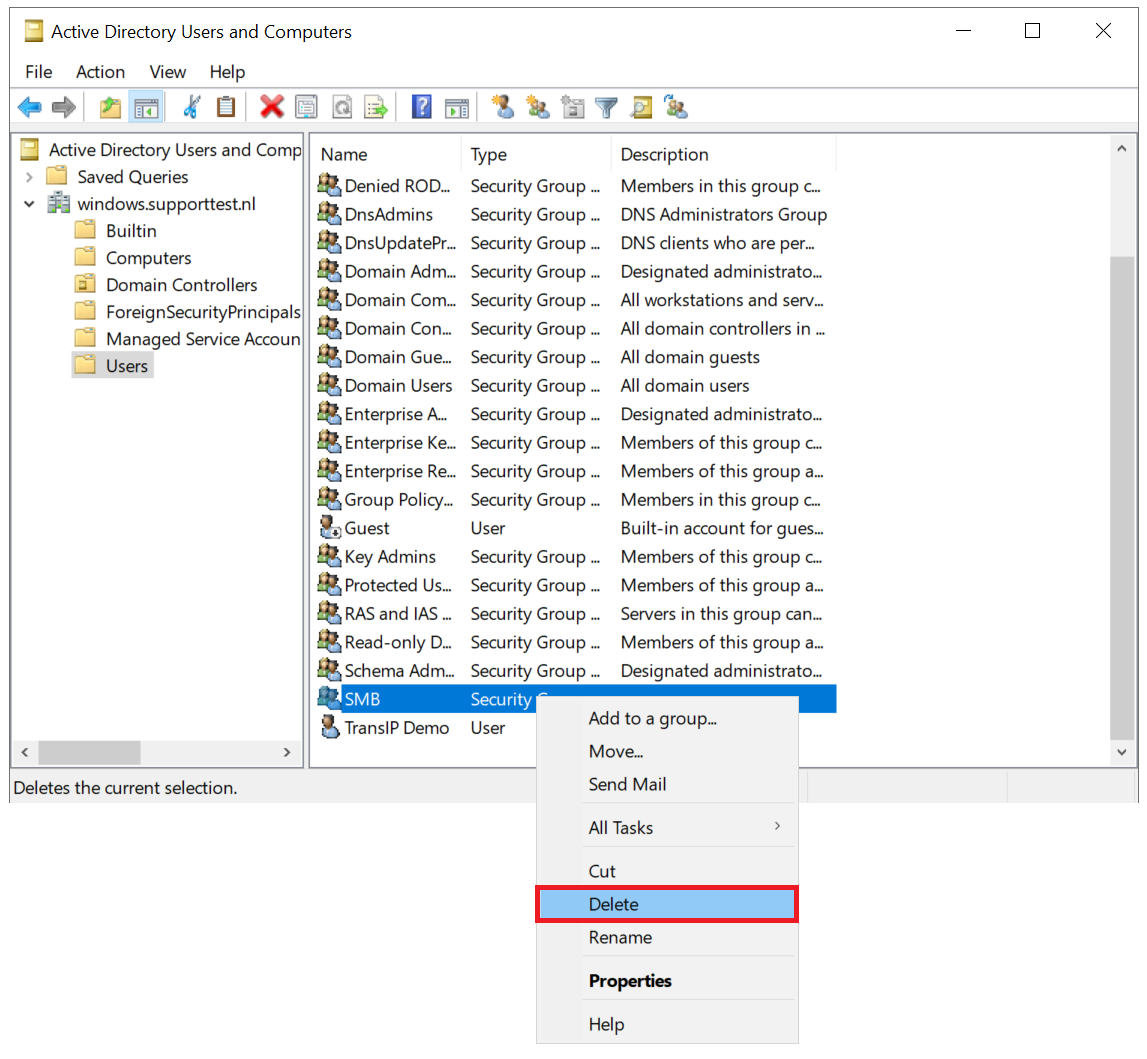
You can remove Active Directory users and groups as easily as you add them. To do this, open the ADUC tool and click 'User'. Then right-click the name of the user or group you want to delete and click 'Delete'.
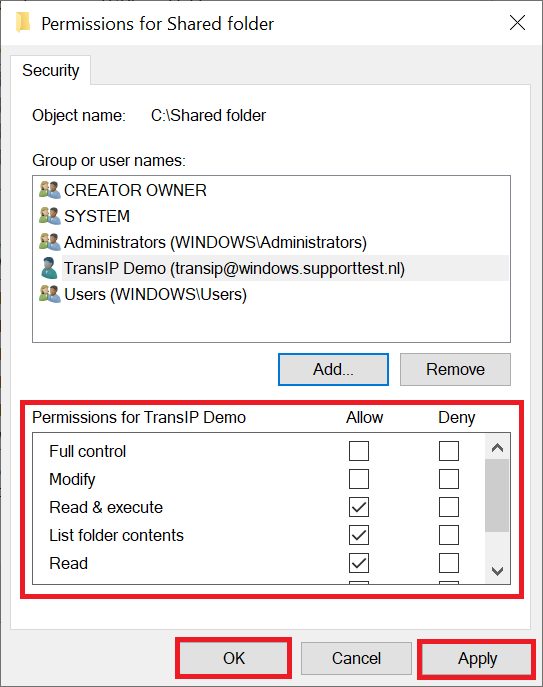
Giving/removing a user or group access to a shared folder
You can give users and groups access to folders within a Windows domain in the same way, for example from an SMB-share.
Step 1
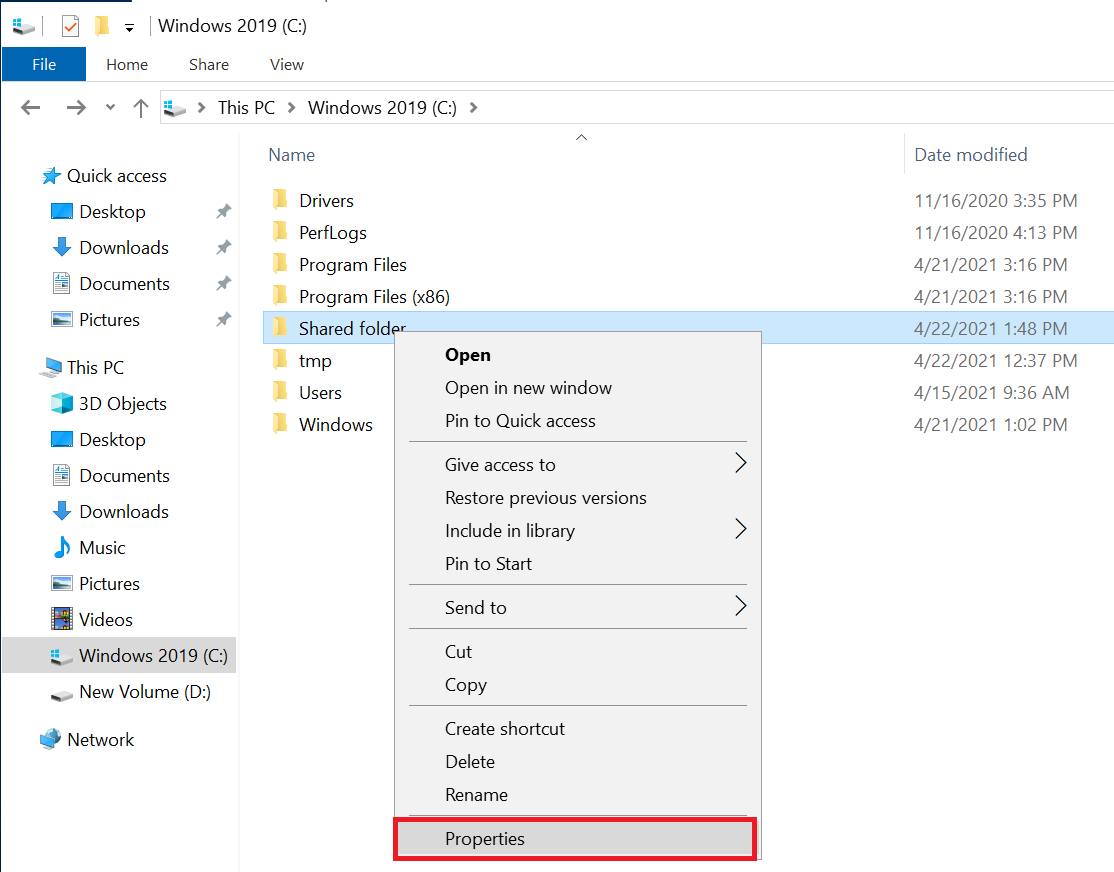
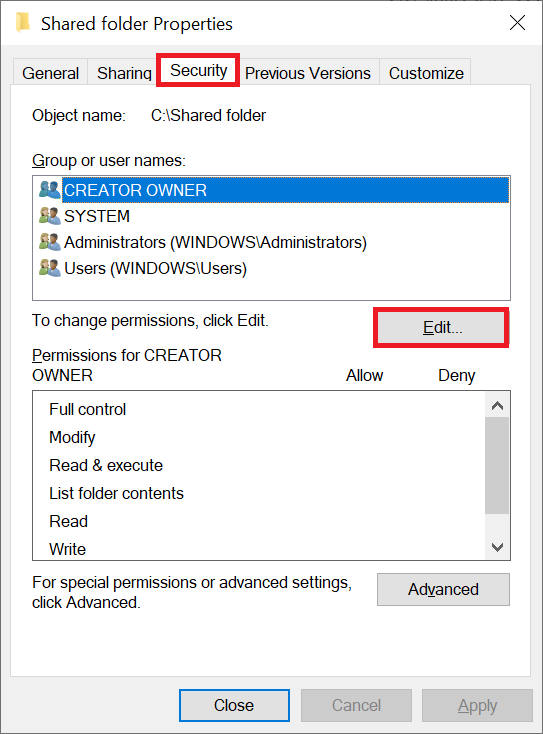
As administrator in Windows Explorer, go to the folder where you want to give a user or group access and right click the folder and select 'Properties'.
Step 2
Click the 'Security' tab and then 'Edit'.
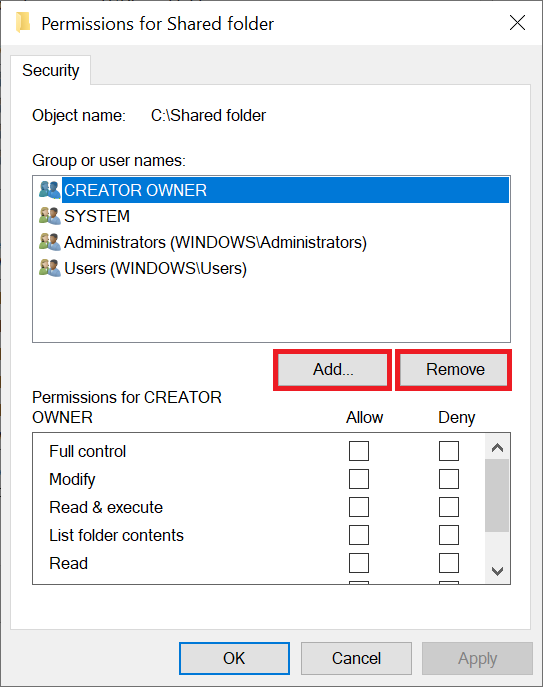
Step 3
Click 'Add' to add a user or group.
Do you want to remove a user or group instead of adding it? Then select the name of the user or group and click 'Remove' > 'Apply' > 'OK'. You do not need to continue with step 4.
Step 4
Search in the now familiar tool for the name or part of the name of the user or group and then click 'Check Names'. Select the desired user/group and click 'OK'.
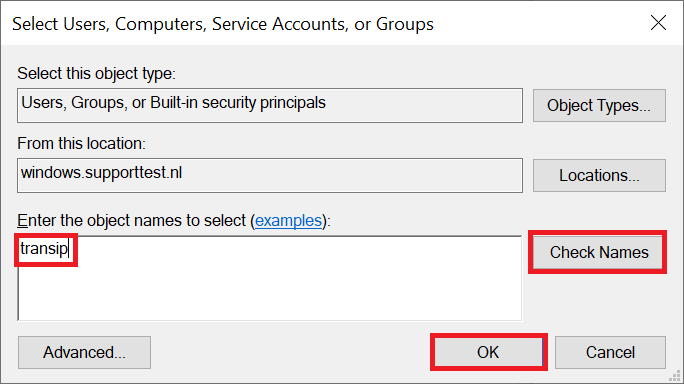
This example shows the user name 'transip'. In a production setup, we recommend working with groups here.
Step 5
Adjust the permissions of the added user or group to your liking and click 'Apply' > 'OK' > 'Close' to save the changes and close all open windows.