


Spammers often try to impersonate third-party domains by spoofing them. The more well-known and trusted the party they impersonate, the higher the chance that a recipient will read the spam.
Besides necessary measures such as SPF checks, you can use DKIM. DKIM is used to verify the validity of the sender of emails. When sending emails, DKIM sends a digital signature, which is checked using the key included in the DKIM record.
In this tutorial, we show how to sign outgoing mail with DKIM on a VPS with Postfix. Incoming mail can be automatically scanned for DKIM with Spamassassin.
Step 1
Connect to your VPS via SSH or the VPS console in the TransIP control panel.
Step 2
DKIM support is not included by default in Postfix. First, install OpenDKIM with:
Ubuntu & Debian:
apt -y install opendkimCentOS Stream, AlmaLinux & Rocky Linux:
dnf -y install opendkim
Step 3
Then open the DKIM configuration:
nano /etc/opendkim.conf- In the file, adjust the 'Mode' under 'configuration options' as follows:By default, OpenDKIM is in verification mode. Adding 's' (sign) indicates that OpenDKIM should also sign outgoing messages.
Mode sv
-
CentOS:In the same file, adjust the email address under ReportAddress and uncomment the line, or add it if it does not exist yet.Incoming emails with incorrect DKIM verification will receive a failure report from this email address. Note that you must also create this email address if it does not already exist.
ReportAddress "example.com postmaster"
- Adjust the 'Selector' as follows:The selector is a symbolic name for signing your mail. This is also the name that appears in your DNS records for ._domainkey, for example, key._domainkey
Selector key
- Finally, comment out the KeyFile location and uncomment the KeyTable, SigningTable, ExternalIgnoreList, and InternalHosts (add the lines manually in Ubuntu / Debian) so that the respective lines look like this:KeyFile determines which file is normally used to sign mail with DKIM. This only works for a single domain set under #Domain. To sign multiple different domains with DKIM, use the KeyTable, SigningTable, ExternalIgnoreList, and InternalHosts
#KeyFile /etc/opendkim/keys/dkim.private.key
KeyTable            /etc/opendkim/KeyTable
SigningTable        refile:/etc/opendkim/SigningTable
ExternalIgnoreList  refile:/etc/opendkim/TrustedHosts
InternalHosts       refile:/etc/opendkim/TrustedHosts
- Find the Socket variable and adjust the value as follows:
Socket inet:8891@localhost
-
Ubuntu/Debian:Create the /etc/opendkim/keys folder with:
mkdir -p /etc/opendkim/keys
Save the changes and close the file (ctrl + x > y > enter). Using CentOS? Then proceed to step 5.
Ubuntu & Debian:
The OpenDKIM socket is controlled not only from /etc/opendkim.conf but also from /etc/default/opendkim. It is necessary to also adjust the socket in this file.
Open /etc/default/opendkim:
nano /etc/default/opendkimAlso, adjust the socket value here to:
Socket inet:8891@localhost
Save the changes and close the file (ctrl + x > y > enter).
Step 5
Open the file /etc/opendkim/KeyTable:
nano /etc/opendkim/KeyTable
Step 6
Add the following line for each domain at the bottom of the file. Replace example.com with the name of your domain and key with the desired DKIM selector.
key._domainkey.example.com example.com:key:/etc/opendkim/keys/dkim.private.key
You are free to adjust the location /etc/opendkim/keys/dkim.private.key and generate a unique key for each domain. Note that you must keep this in mind in the following steps.
Save the changes and close the file (ctrl + x > y > enter).
Step 7
Then open the file /etc/opendkim/SigningTable:
nano /etc/opendkim/SigningTable
Step 8
At the bottom of the file, add the following line for each of your domains. Replace 'key' with your DKIM selector and example.com with your domain name.
*@example.com key._domainkey.example.com
This tells OpenDKIM that all mail from @example.com should be signed by key._domainkey.example.com.
Save the changes and close the file (ctrl + x > y > enter).
Step 9
Finally, open the file /etc/opendkim/TrustedHosts:
nano /etc/opendkim/TrustedHosts
Step 8
At the bottom of the file, add the following line for each of your domains. Replace example.com with your domain name.
*.example.com
Mail sent to your mail server and addressed to domains in the TrustedHosts file will not be checked for DKIM validity.
Save the changes and close the file (ctrl + x > y > enter).
Step 9
Go to the OpenDKIM keys directory and then generate a 4096-bit key for signing your mail:
cd /etc/opendkim/keys
openssl genrsa -out dkim.private.key 4096
You are free to adjust the directory and the name dkim.private.key. Note that you must use the same directory and name in the following steps.
Step 10
Then extract the public key from the .key file you just created with the command:
openssl rsa -in dkim.private.key -out dkim.public.key -pubout -outform PEMThe public key is included in the DNS records of the domains that send mail via your mail server, see the next step.
Step 11
For each domain from which you send mail from your VPS, you need a TXT record containing the public key. In the previous step, you created a separate .key file containing your public key. Print the contents of this file with the command:
cat /etc/opendkim/keys/dkim.public.keyThe output looks like this:
-----BEGIN PUBLIC KEY-----
MIGfMA0GCSqGSIb3DQEBAQBAA4GNADCBiQKBgQDU4Fi7KotzLl789XQtY7nGU7Pd
sJ7tz1cTrr5JL6NNNO2bICv8rmm6fslxtk0nH0tvomsHY4d7A9IoCVog7QMs67Px
YXubn0sT2Ye5VtxkgHj6yaMpwUCMzQE1TzyLdnn6fYveRrTHBAeeGVE33svW/d1h
n11NKwcRxGtXveqc2QIDAQAB
-----END PUBLIC KEY-----
Copy the content into a text editor (e.g., notepad or TextEditor), remove the first and last line (begin / end public key), and place the entire content on one line to get a long code like the one below:
MIGfMA0GCSqGSIb3DQEBAQBAA4GNADCBiQKBgQDU4Fi7KotzLl789XQtY7nGU7PdsJ7tz1cTrr5JL6NNNO2bICv8rmm6fslxtk0nH0tvomsHY4d7A9IoCVog7QMs67PxYXubn0sT2Ye5VtxkgHj6yaMpwUCMzQE1TzyLdnn6fYveRrTHBAeeGVE33svW/d1hn11NKwcRxGtXveqc2QIDAQAB
Step 12
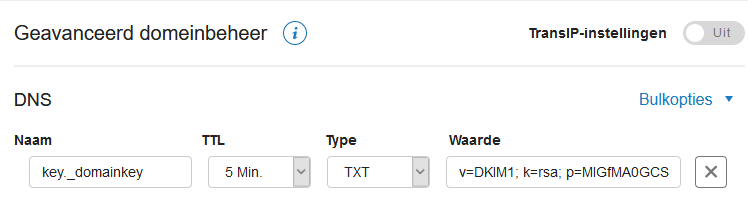
Next, create a TXT record in the DNS settings of each domain you send mail from your VPS with the syntax below.
- name: key._domainkey
- ttl: 5 min
- type: TXT
- value: v=DKIM1; k=rsa; p=MIGfMA0GCSqGSIb3DQEBAADCBiQKBgQDU4etcetera
- Replace the value after p= with the value of your public key that you noted in step 11.
- Are you emailing from a subdomain? Then the name of your DNS record will be key._domainkey.yoursubdomain.
In the TransIP control panel, the result looks like this:
Finally, save your new record. It will take up to 24 hours (usually no longer than a few minutes) for the changes to be processed. This is due to the global processing time of DNS changes, and unfortunately, we have no control over this.
You can then test the DKIM key with the command:
opendkim-testkey -d example.com -s key -vvvReplace 'example.com' with the domain for which you added the DNS record and 'key' with the Selector (see step 6).
In Ubuntu/Debian, you may need to install the opendkim-tools first before you can use this command. You can do this with:
apt -y install opendkim-tools
Step 13
Now that OpenDKIM is configured, we set up Postfix to use it. Open the Postfix configuration with:
nano /etc/postfix/main.cf
Step 14
Add the following code at the bottom of the file:
# Milter configuration for DKIM
milter_default_action = accept
milter_protocol = 6
smtpd_milters = inet:127.0.0.1:8891
non_smtpd_milters = $smtpd_milters
Save the changes and close the file (ctrl + x > y > enter).
Step 15
OpenDKIM does not have access to the certificates for signing the mail, and Postfix does not have access to the OpenDKIM group. You can adjust this with:
chown opendkim:opendkim /etc/opendkim/keys/ -R
usermod -a -G opendkim postfix
Step 16
Finally, start and enable OpenDKIM and restart Postfix:
systemctl start opendkim
systemctl enable opendkim
systemctl restart postfix
Renewing Public and Private Keys
In this guide, you have generated a public and private key with OpenSSL. SSL keys do not expire (unlike SSL certificates), but for security reasons, it is recommended to periodically (e.g., annually) replace your public and private key.
A relatively simple way to achieve this is by using a structure with multiple DKIM records. We use such a structure for TransIP, and it works as follows:
Earlier in this article, we explained that the DKIM selector is the first part of the name of the DKIM record. The selector 'key' gives you the subdomain name 'key._domainkey'. Suppose you want to send mail on behalf of example.com and the domain you use as the smtp/mx domain is mymailserver.com.
Instead of a TXT record named 'key._domainkey', create two CNAME records in the DNS settings of each domain that sends mail via your VPS (here example.com), for example:

- For DKIM verification, the value of key._domainkey.example.com is checked in this example. This is because the dkim_selector is set to 'key'. key1._domainkey.example.com is not used at this time.
- key._domainkey.example.com points to the subdomain dkim_a.mymailserver.com. In the DNS settings of mymailserver.com, create the actual TXT record for the subdomain dkim_a, which includes your public key, for example:

- You do not need to create a record for dkim_b.mymailserver.com at this time (although you should create key1._domainkey pointing to it). Do this only when you want to update your keys.
Now suppose you want to update your public and private key. You generate a new key (see step 2), but for the dkim_b record, for example:
cd /etc/opendkim/keys/
openssl genrsa -out dkim_b.private.key
openssl rsa -in dkim_b.private.key -out dkim_b.public.key -pubout -outform PEM
Then create a TXT record for dkim_b at your SMTP domain (here mymailserver.com) with the public key you just created. After creating this record, wait 24 hours to be sure before proceeding, to give the DNS change time to propagate.
Now adjust the value of the private_key and dkim_selector in the OpenDKIM configuration (/etc/opendkim.conf), /etc/opendkim/SigningTable, and /etc/opendkim/KeyTable where necessary, so that they use the values of key1 / dkim_b, for example:
Selector = key1
key1._domainkey.example.com example.com:key1:/etc/opendkim/keys/dkim.private.key
*@example.com   key1._domainkey.example.com
Then restart OpenDKIM and Postfix. From that point on, the key in the DNS record named key1._domainkey will be used, which in turn points to dkim_b.mymailserver.com.
Repeat these steps to generate new keys for dkim.private.key and dkim.public.key, adjust the TXT record of dkim_a.mymailserver.com to the new public key, and then set the dkim_selector back to the value 'key'.
This concludes our guide on using DKIM in Postfix. If you have any questions based on this guide, do not hesitate to contact our support department. You can reach them via the 'Contact Us' button at the bottom of this page.