TransIP's OpenStack implementation 'Public Cloud' provides you with a scalable and flexible virtual data center. You are free to create as many servers in your Public Cloud as your available hardware allows.
OpenStack is highly flexible and therefore more complex than, for example, our VPS platform. That's why we guide you through the first steps of using OpenStack in this guide: We show you how to log in to the OpenStack web interface Horizon and the necessary steps to create and use your first Windows or Linux 'instance'. An instance in OpenStack is essentially a virtual server/VPS within your OpenStack project. These steps include:
Setting a Password and Logging In to the Horizon Web Interface
You have received an email containing a link to the OpenStack web interface 'Horizon' along with a user account. Before you can use this account, you need to set a password using the steps below.
Step 1
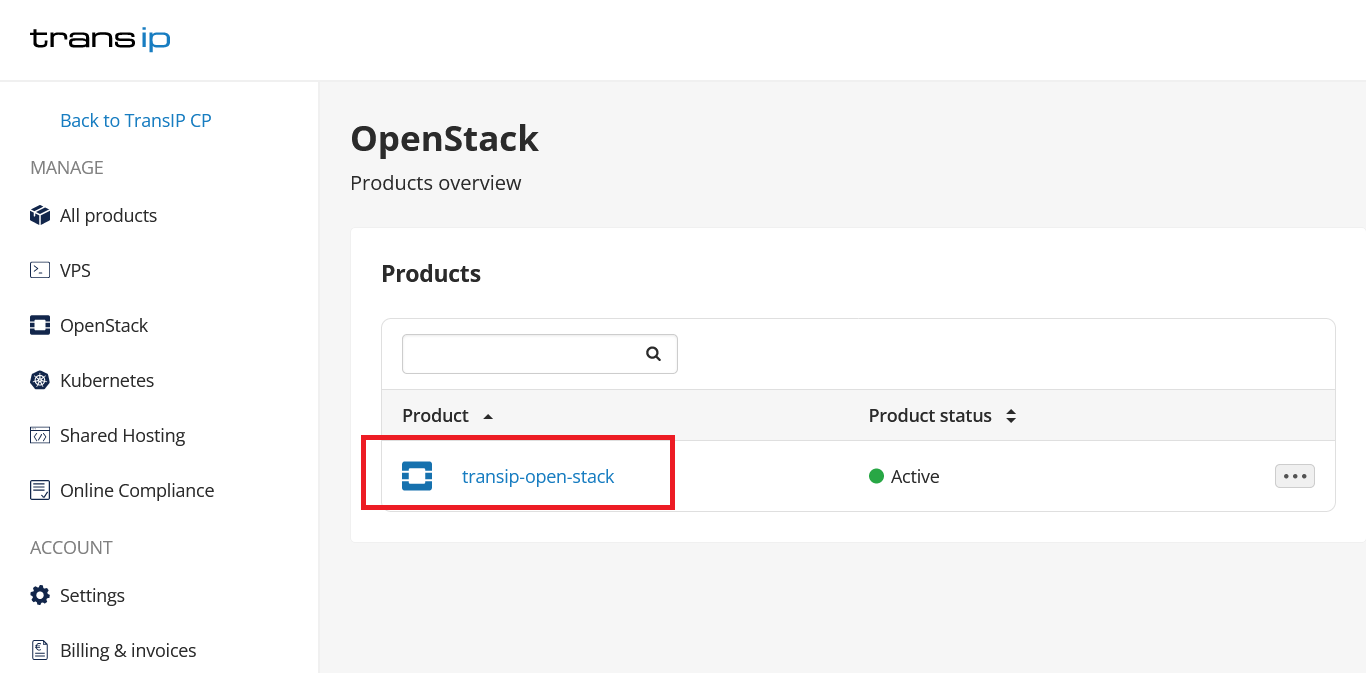
Log in to the TransIP control panel via this link and click on the name of your OpenStack project.
Step 2
Click on the tab 'Users' > '...' and select 'Change Password' to set a password. This is also how you set a new password later if you happen to lose it.
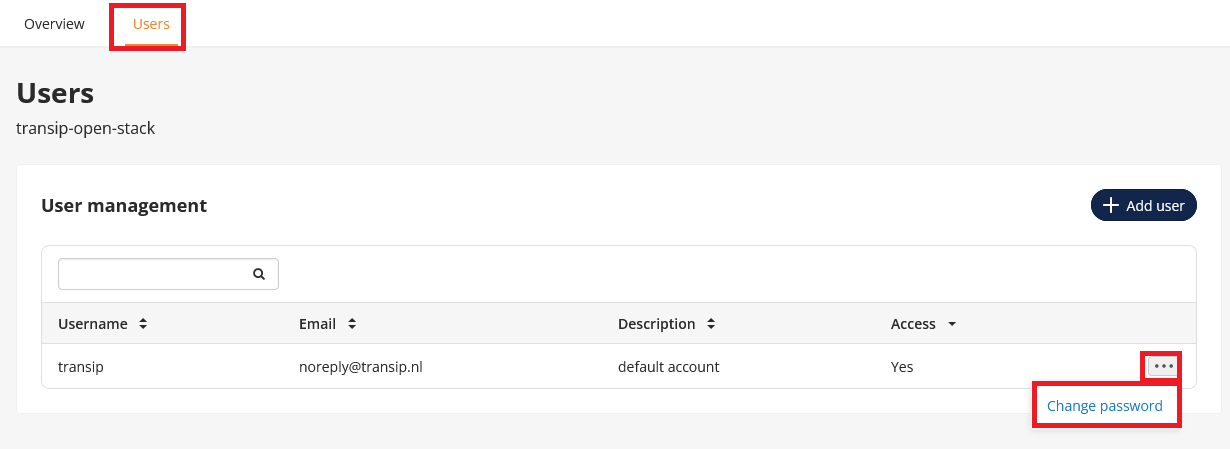
You can also add multiple users on this page using 'Add User', or proceed to step 3.
Step 3
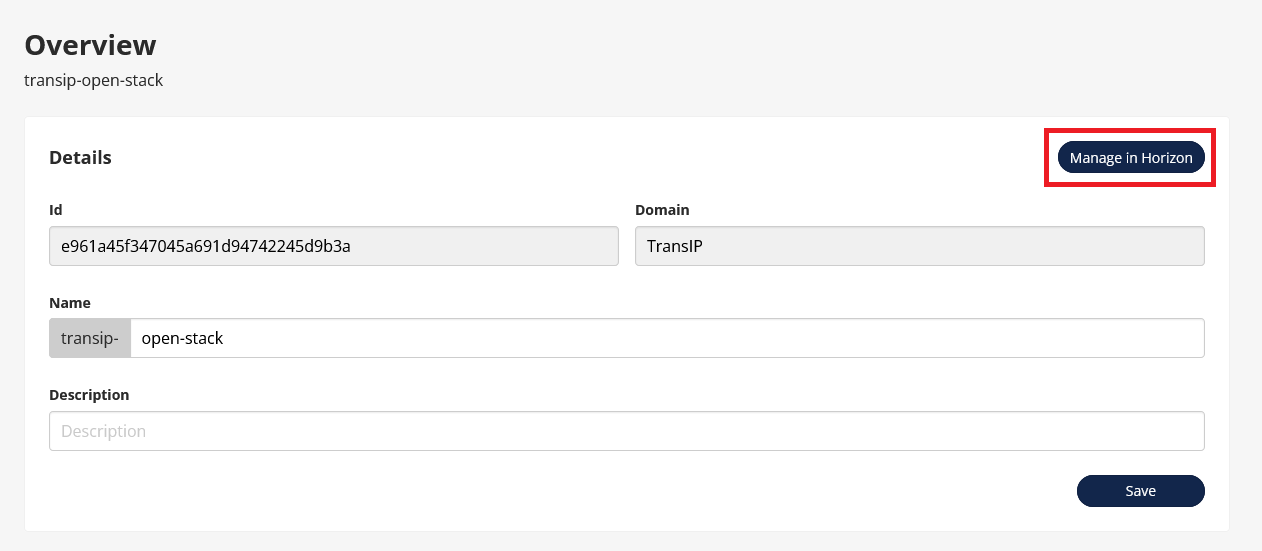
Go back to the 'Overview' tab and click on 'Manage in Horizon' (or use this link).
Step 4
Now you will see the login page below. Change the 'Domain' to 'TransIP' and log in with the username and password you set in step 2 and log in to Horizon.
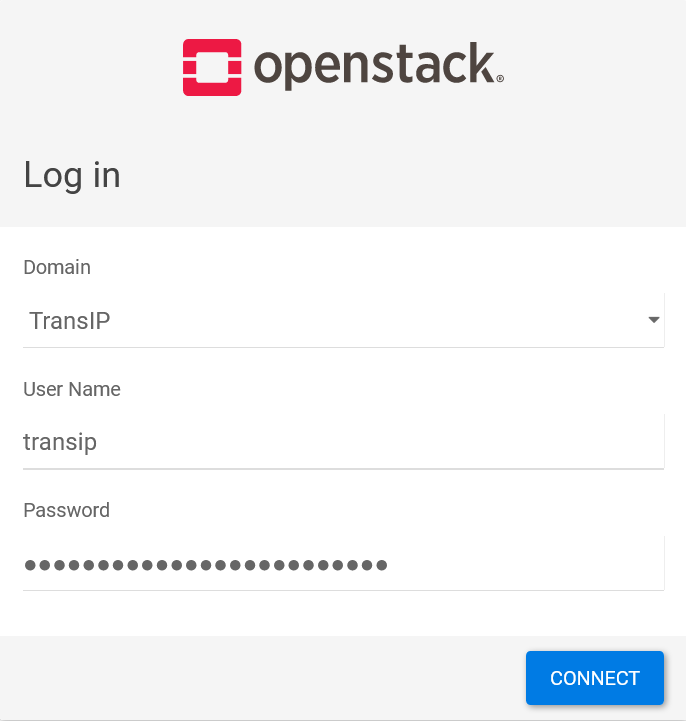
You will now be greeted by the Horizon overview page. Here, you can see an overview of your available and used resources for your OpenStack project.
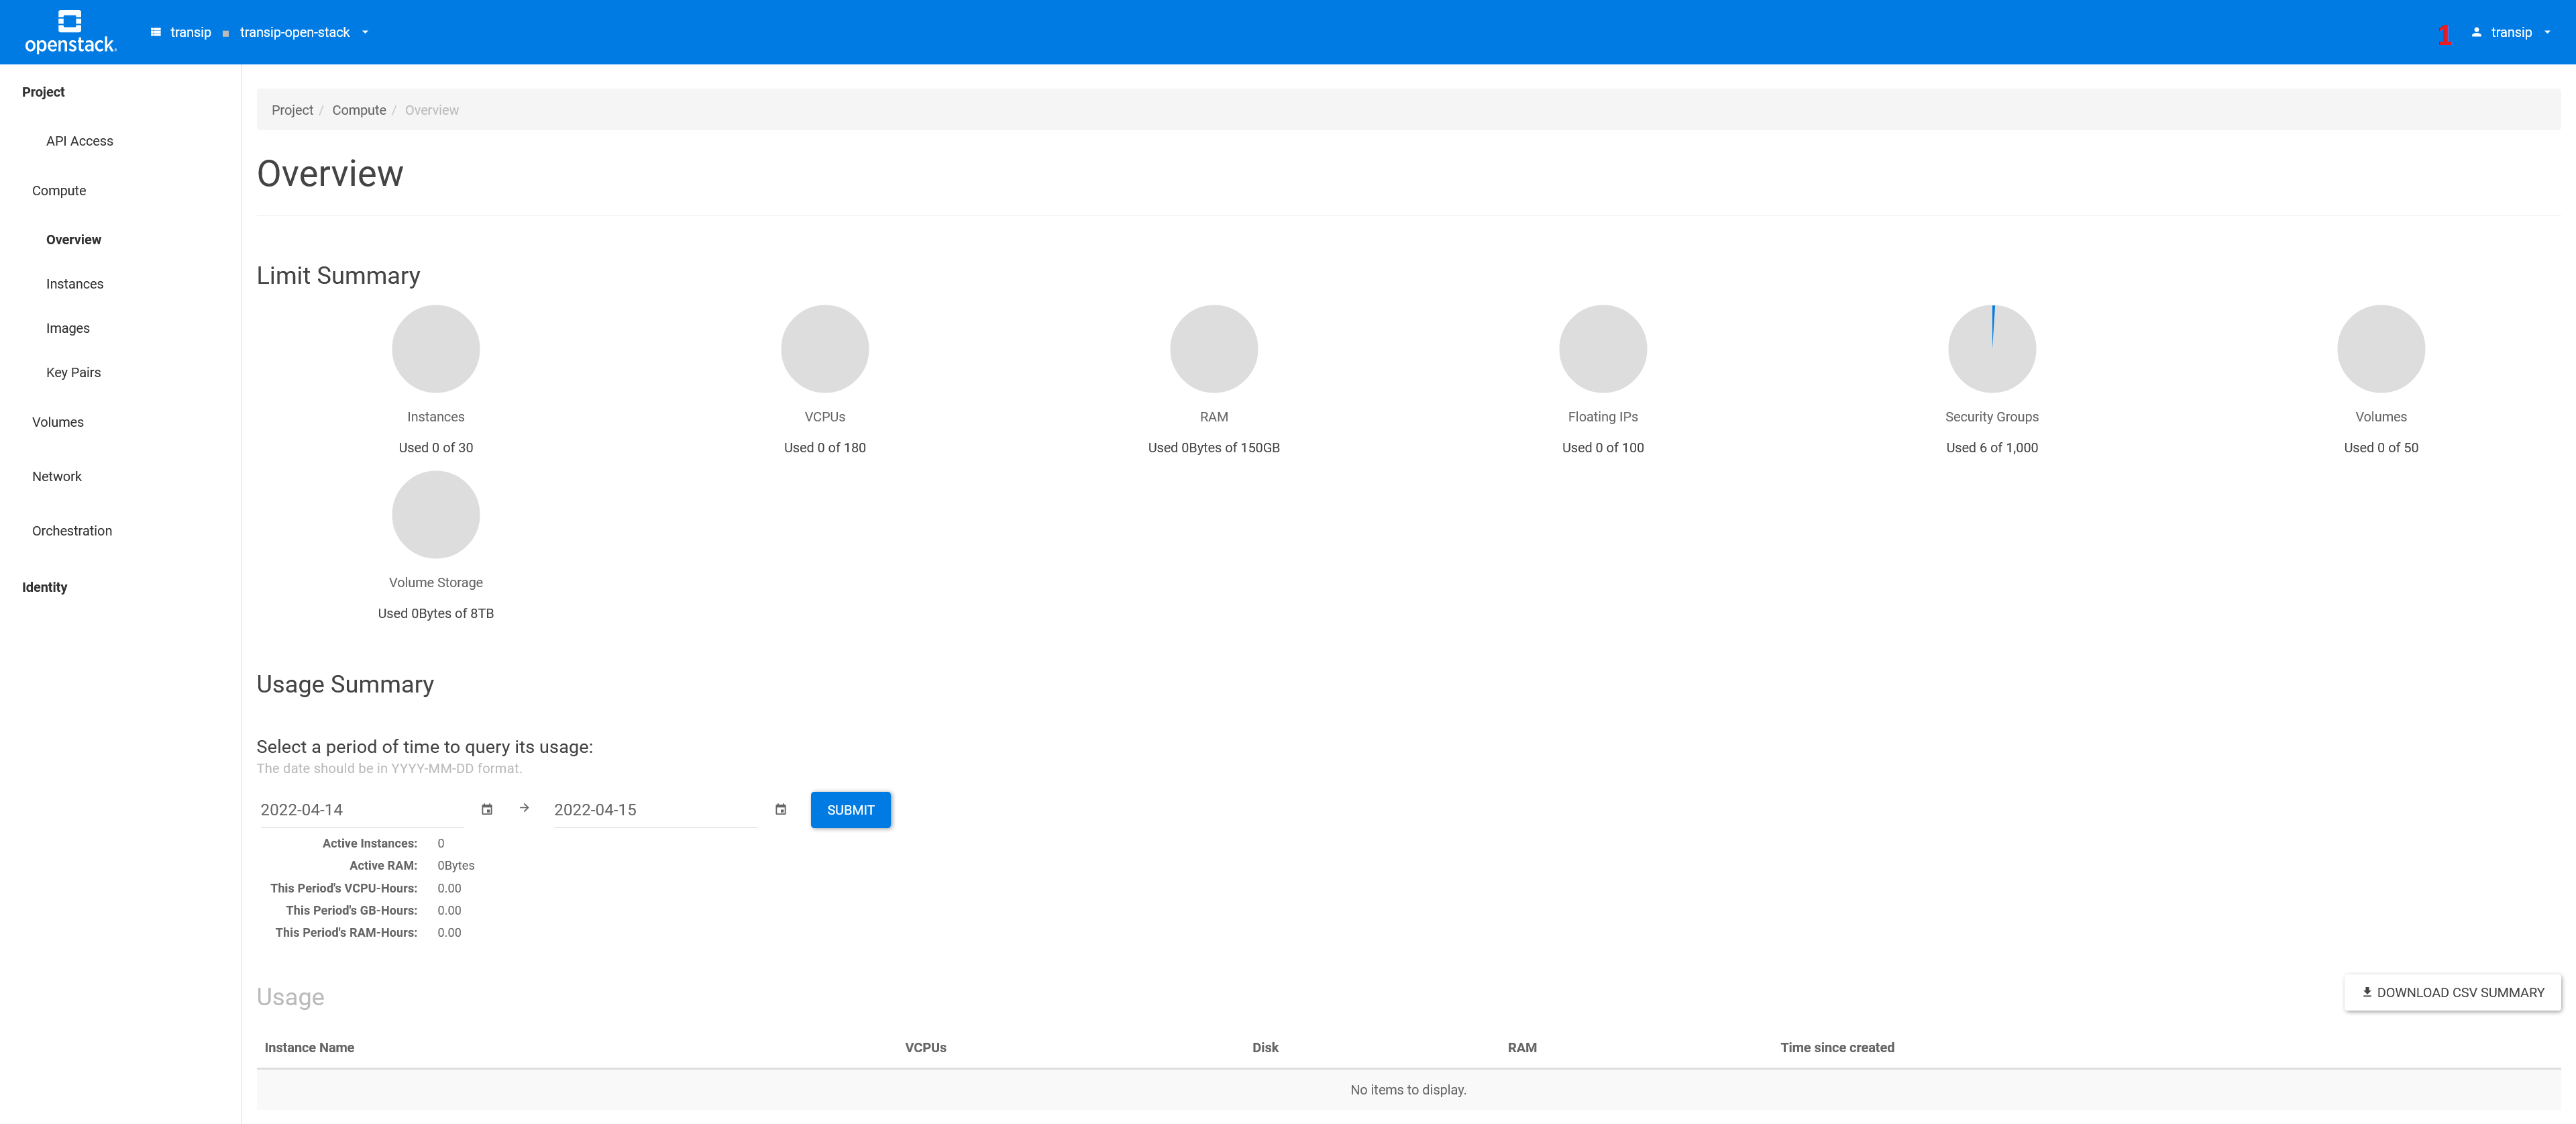
In the following paragraphs, we will guide you through the steps necessary to create your first instance. An instance in OpenStack is essentially a virtual server/VPS within your OpenStack project.
Creating a Keypair
An OpenStack key pair is the 'public key' and the 'private key' of an 'ssh key pair'. These are used in OpenStack to retrieve the password of a Windows Server instance, or to connect to a Linux instance using SSH.
Step 1
If you are not logged in to the OpenStack web interface 'Horizon' anymore, log in there. You will now see the 'Overview page' of the OpenStack web interface (Horizon).
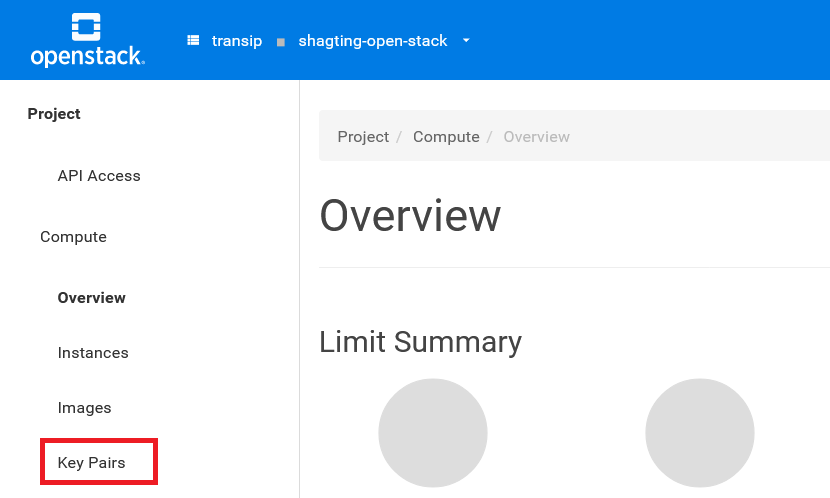
Step 2
Click the 'create key pair' button at the top right..

Step 3
Give the key pair a name. In our example, this is 'server 2022'. Click on 'create keypair'.
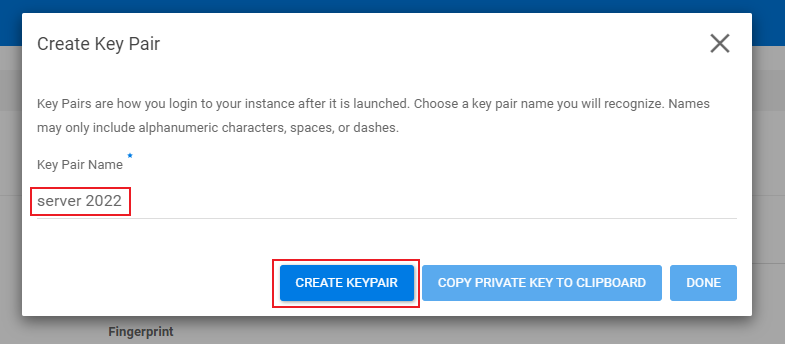
Step 4
Click on 'copy private key to clipboard' to copy the private key and save it in a secure place.
- After creating the key pair, the private key cannot be retrieved anymore and will not be shown. So, keep it safe!
- If you lose the password for a Windows Server, you'll need the private key to generate a new one.
After saving your private key, click on 'Done' to create the key pair.
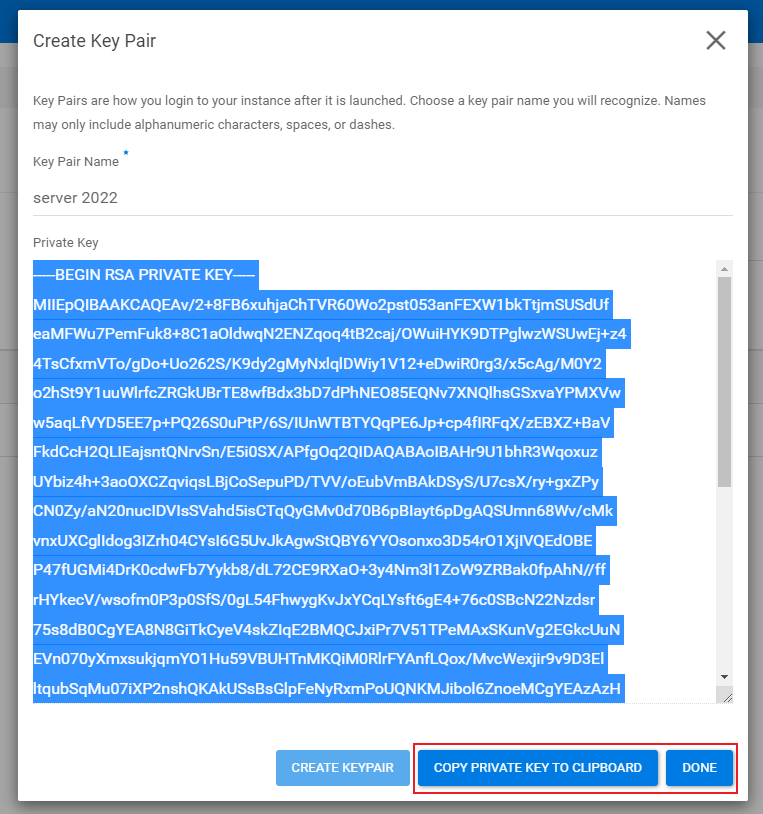
Your key pair is now in the 'Key Pairs' overview as shown in the example below. You can also delete the key pair from this page if needed. This concludes this section.

Creating a Security Group
A security group is essentially a form of a 'network-level firewall' and is required to create an OpenStack instance. Therefore, we'll first create a security group that you will assign to your instance later in this guide. Default security groups are available, but they are somewhat generic. However, you are free to use an existing group or customize one.
Step 1
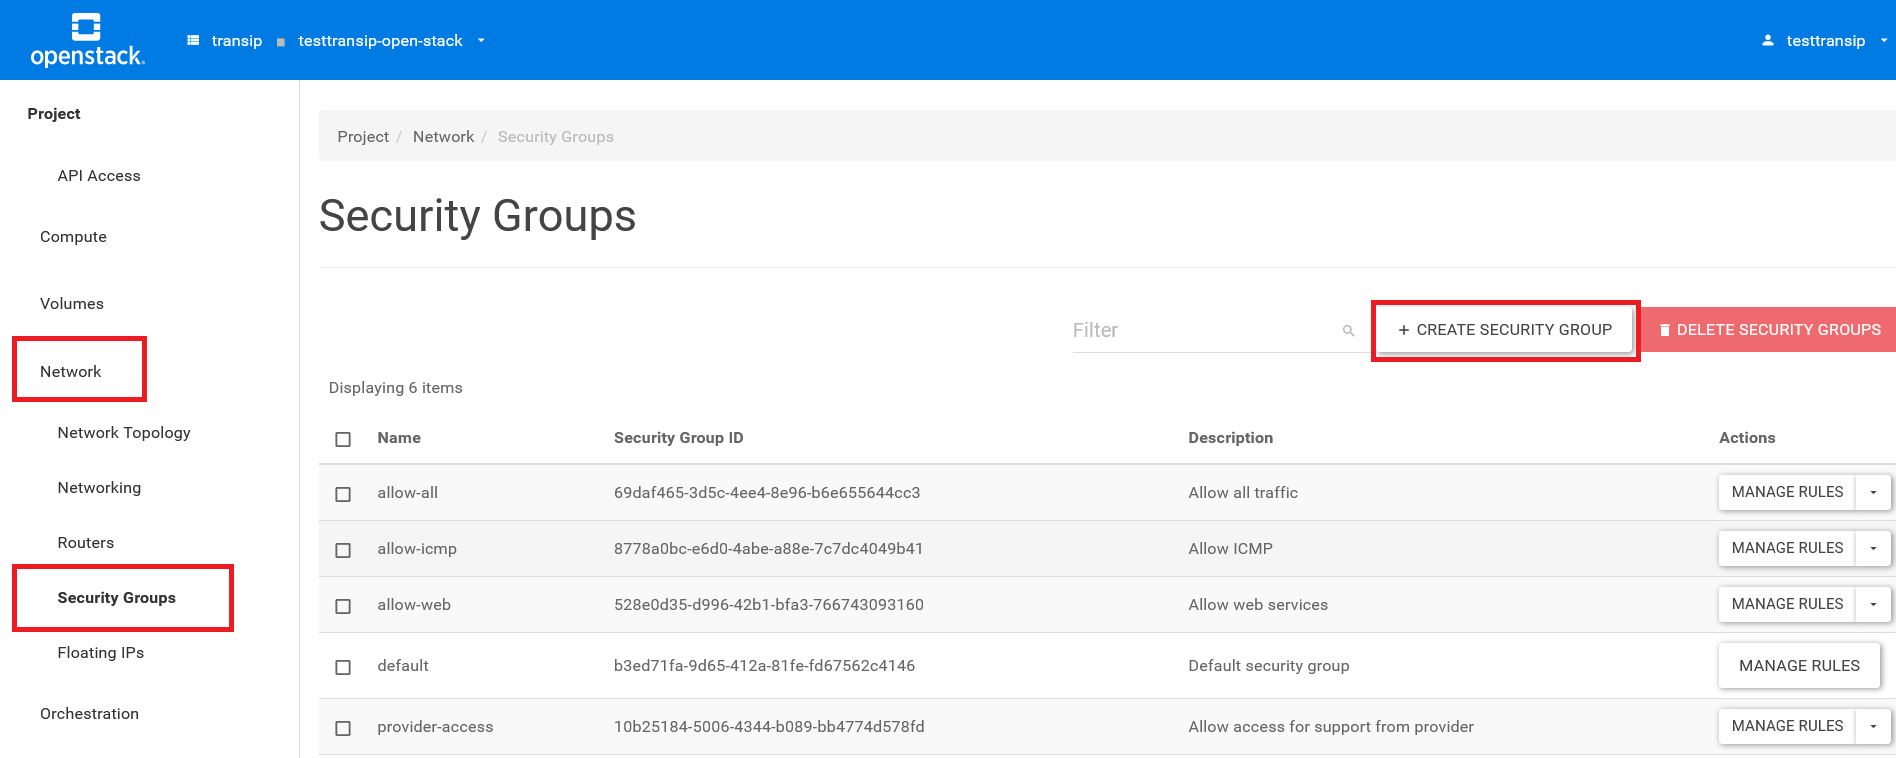
In Horizon, click on 'Network' in the left menu > 'Security Groups' and then click on 'Create Security Group' on the right.
Step 2
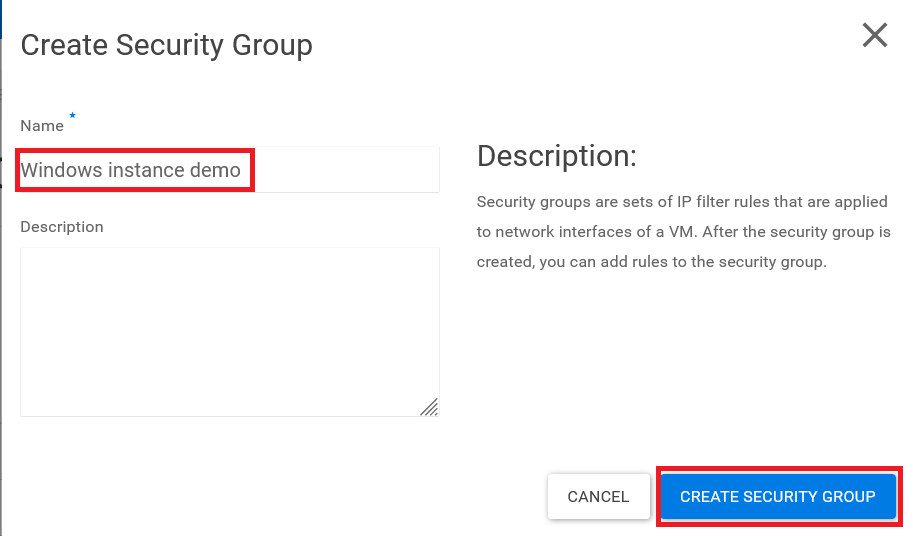
Give the security group a name, for example, one that refers to the use case of the instance you intend to create it for. In our example, it's 'Windows instance demo'. Optionally provide a description under 'Description' and finally, click on 'create security group'.
Step 3
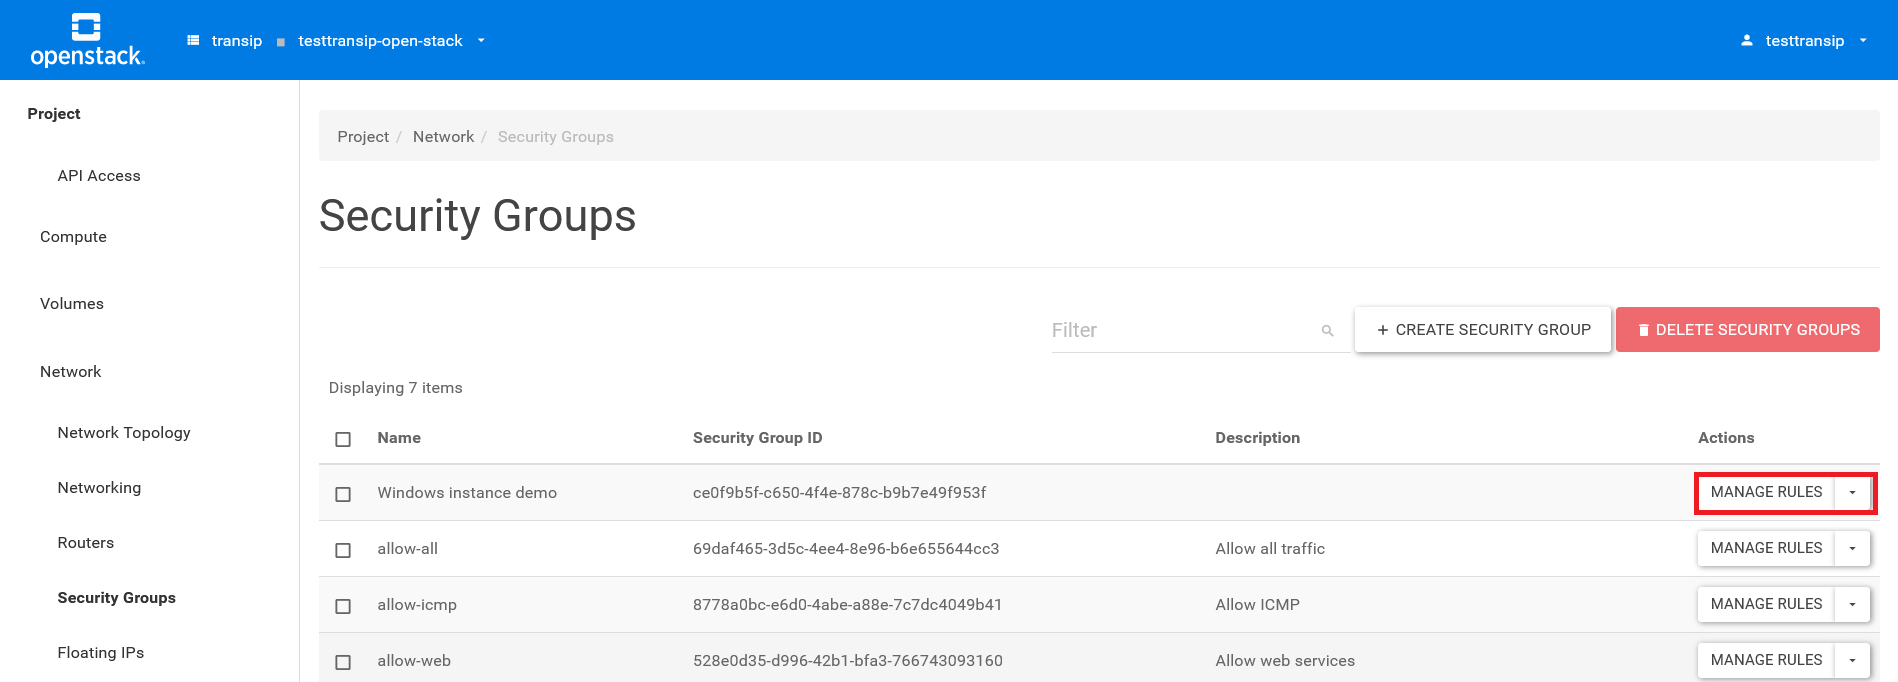
You will now be taken back to the overview screen. Click on 'manage rules' behind the newly created security group.
Step 4
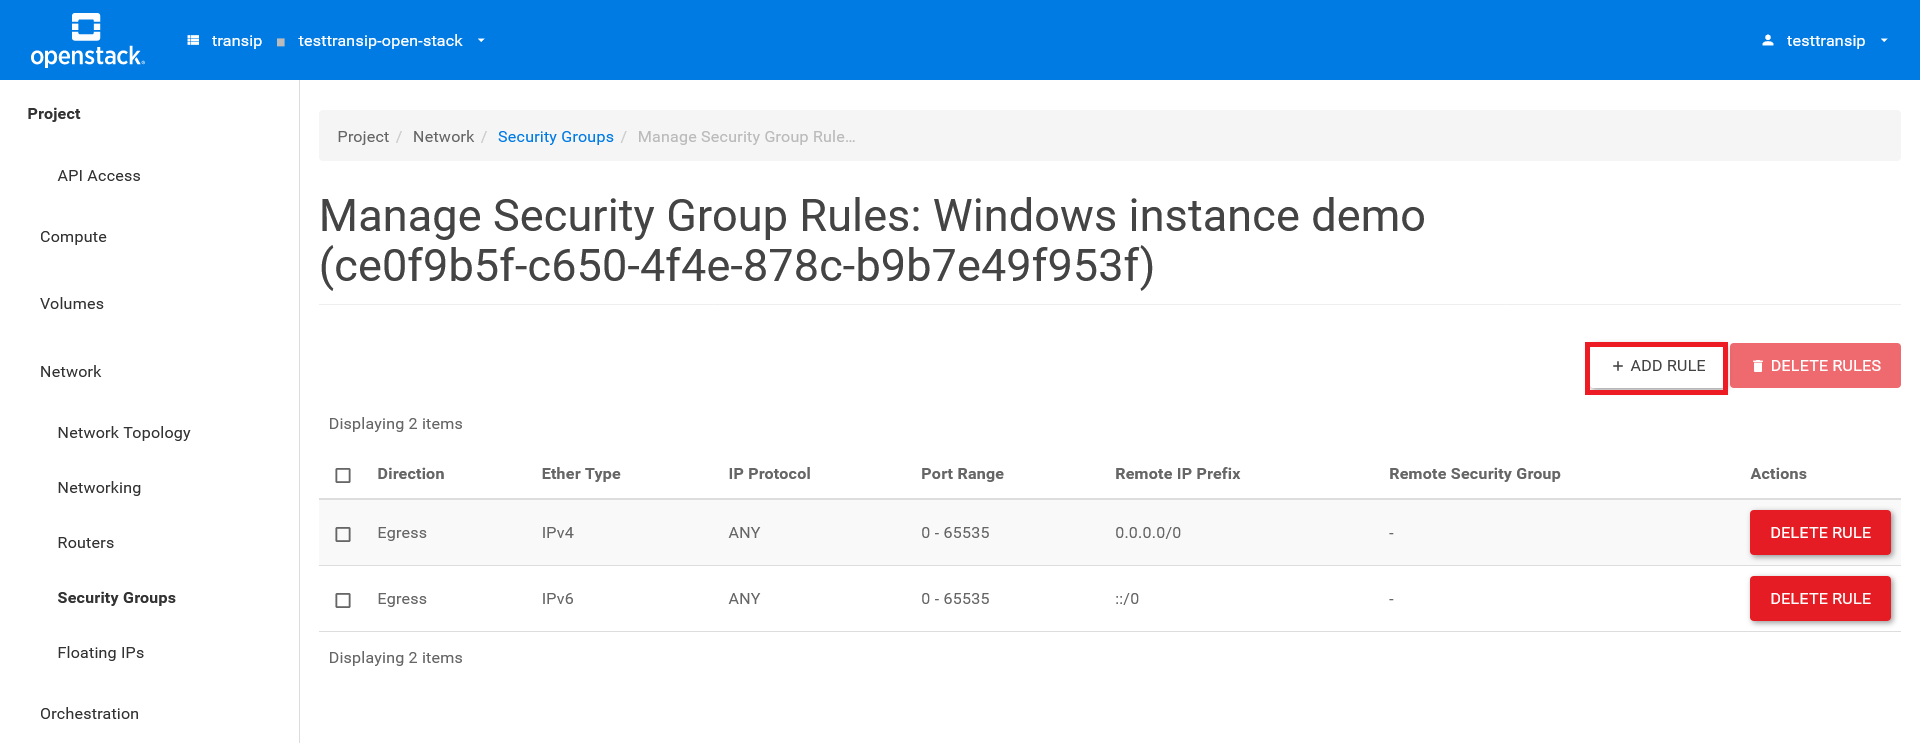
There are two default Egress rules present, which are rules for outgoing traffic. These default rules allow all outgoing traffic.
Click on 'add rule' to add a new rule.
The screen below appears. Below the screenshot, we'll explain the available options in more detail, but go ahead and add the following two rules for now:
- Select 'all icmp' under 'Rule' and click 'add'. The 'all icmp' rule allows you to ping your instance if it's configured for that. You can restrict this to a specific IP range, see points 5 and 6 below the screenshot, if needed.
- Click 'add rule' again and depending on whether you are creating a Windows Server instance, select 'RDP', or for Linux distros, select 'SSH', and click 'add'.
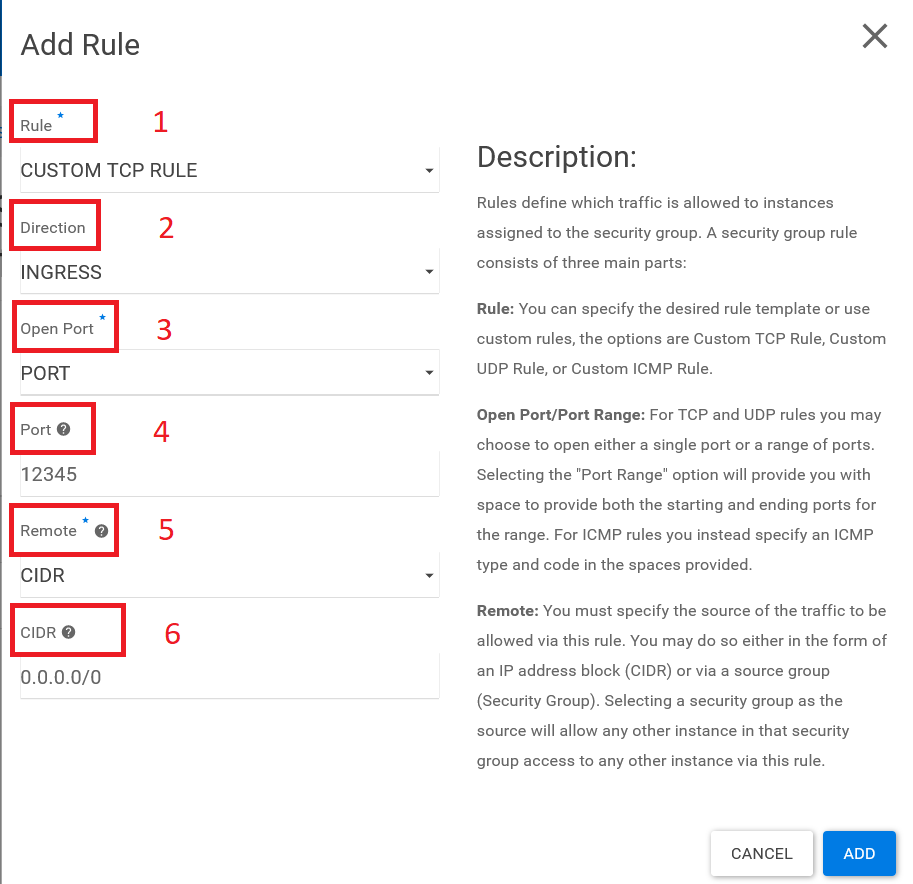
- Rule: Select a predefined service like HTTP or create your own rule using one of the custom options.
- Direction: Select Ingress for incoming traffic to your instances, or Egress for outgoing traffic from your instance to the outside world. By default, all Egress traffic is allowed, and you generally don't need to add new Egress rules unless in doubt.
- Open Port: Select whether to open a port, a port range, or all ports.
- Port: Specify the port number you want to open, or the first and last port in the case of a port range.
- Remote: Choose 'CIDR' if you want the rule to apply to the entire Internet or a specific IP address/range, or 'Security Group' if you only want to give access to instances within the same security group.
- CIDR: Specify the IP range to which you want the rule to apply. The default is 0.0.0.0/0, which means the entire Internet. For example, if you want to restrict RDP or SSH access to specific IP addresses/ranges, you can do so by providing those here. Note that you need to specify one rule per IP address or range. You cannot use a comma-separated list, for instance. If you choose the option 'Security Group' under 5, you can select which security group the rule applies to and whether it applies to IPv4 or IPv6.
Public or Private Network
In this guide, we'll show you how to create an instance with access to the public internet. If you're creating multiple instances and you want to connect them to both the public internet and a private network, you should first go through this guide.
Creating an Instance
Step 1
In the Horizon web interface, click on 'Compute' in the left menu > 'Instances', and then click on 'launch instance' on the right.

Step 2
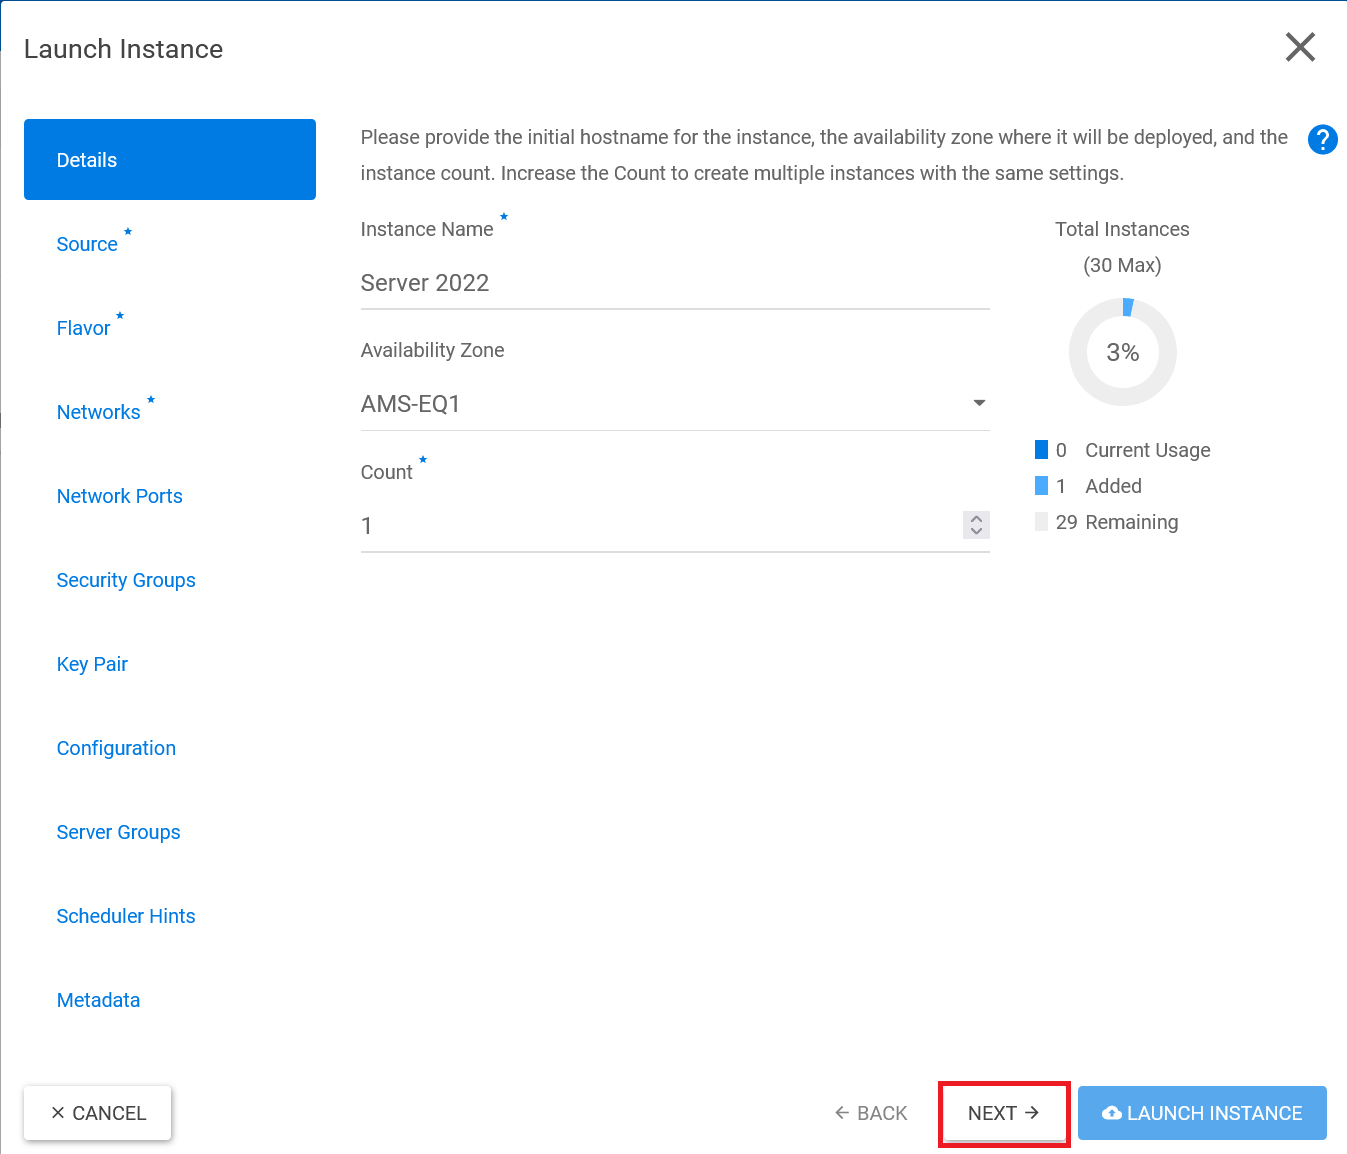
You'll now see a pop-up where you configure the instance, as shown in the screenshot below.
- Enter the name of the Instance under 'Instance Name' (e.g., Server 2022).
- Choose under 'Availability zone' select 'any Availability Zone' or a specific availability zone. The available options are: AMS-EQ1 (NorthC Amsterdam), AMS-EQ2 (Equinix Amsterdam), and AMS-EU4 (EUNetworks).
For redundancy, we recommend spreading instances across different availability zones.
- Under 'Count', specify the number of instances you want to create at once. For this guide, we'll create one instance.
Click on the bottom right 'next' to proceed to the next item, 'Source'.
Step 3
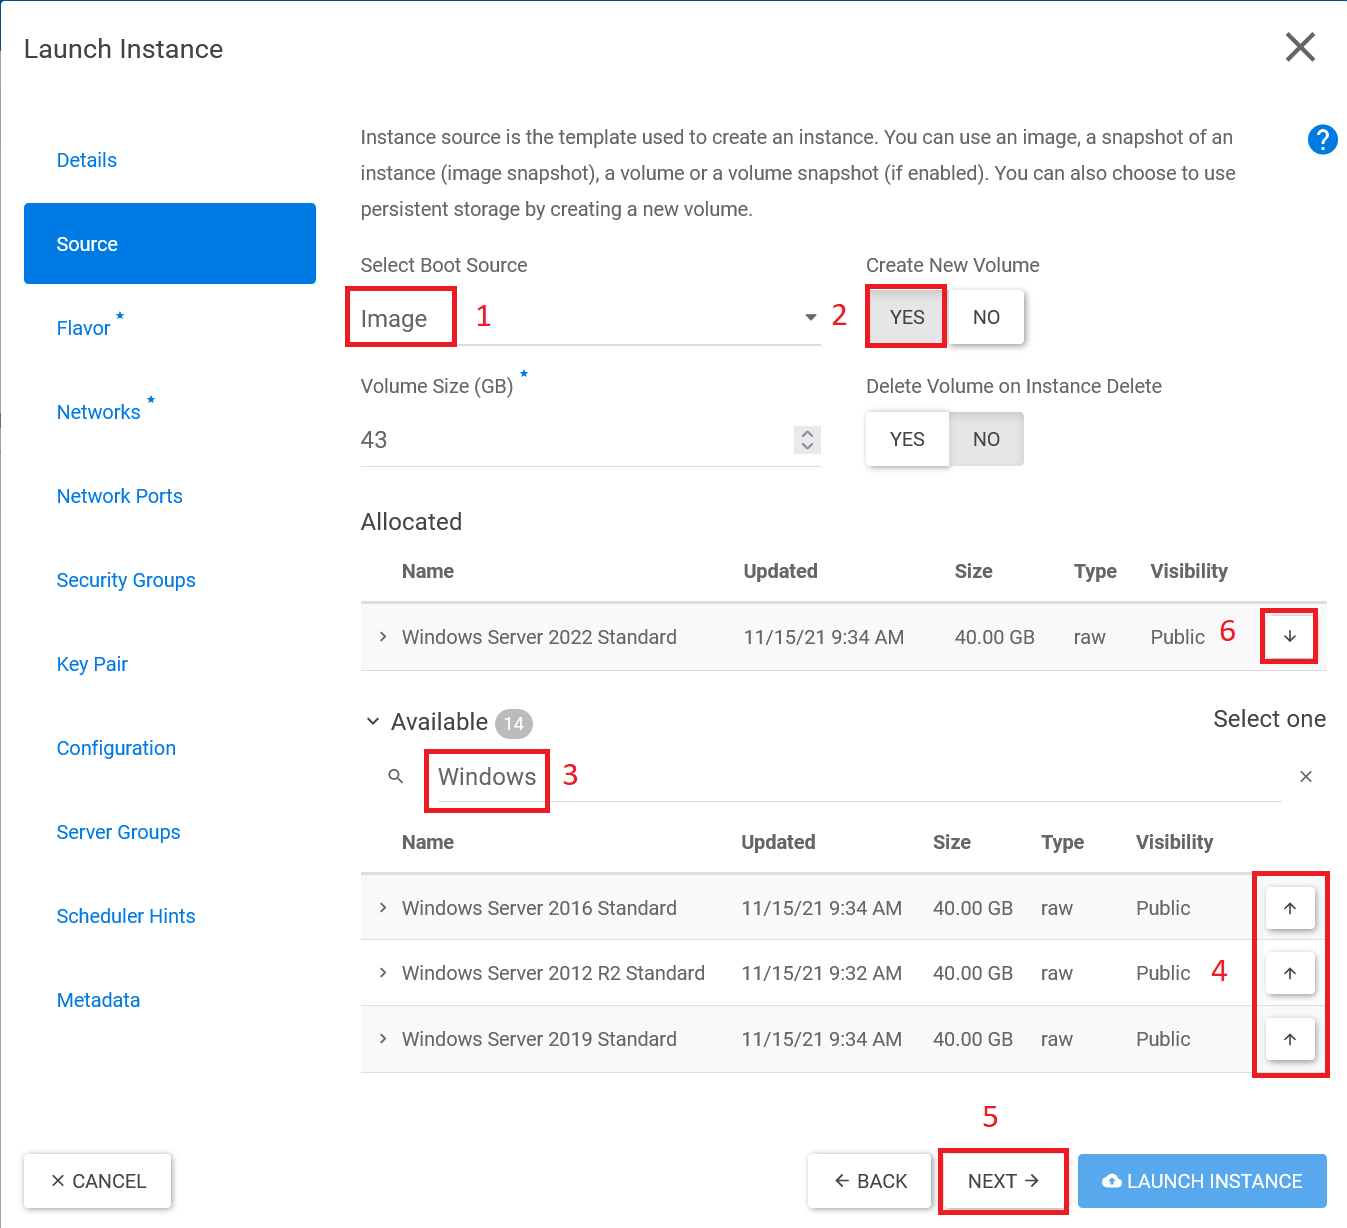
Under 'Select Boot Source' (1), choose 'image' and for 'Create New Volume' (2), select 'Yes'. Under 'Available', click the arrow pointing up (4) next to the operating system you want to install. In this example, it's 'Windows Server 2022 standard'.
The selected image will now appear under 'Allocated'. In this example, it's 'Windows server 2022 standard'. If you want to choose a different operating system, you can remove the image by clicking the arrow pointing down (6).
Finally, click 'Next' (5) to proceed.
- A boot source is the template used to create an instance. You can choose an image, a snapshot of an instance, a volume, or a snapshot of a volume. In a new OpenStack project, there are no available snapshots or volumes.
- A volume is disk space that you can attach to the instance. If you delete the instance, the volume remains unless you set the '' option to 'Yes'.
- Click on 'Name' to sort the Images alphabetically or search for the name of the operating system by typing it in the 'Click here for filters' (3) field.
Step 4
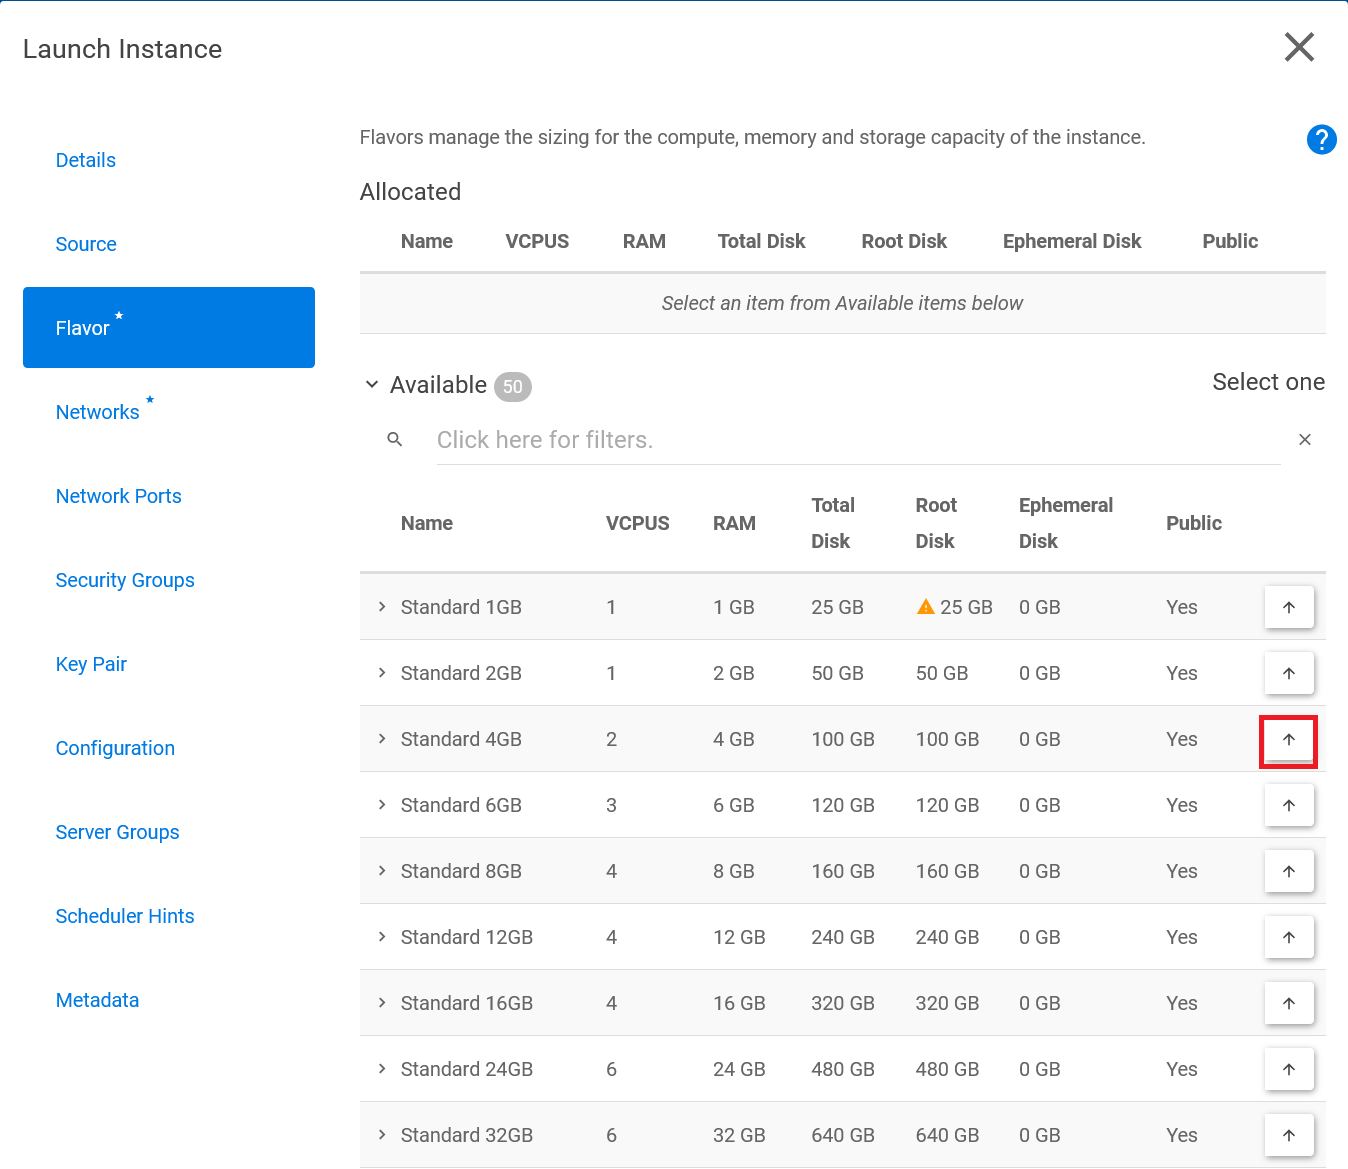
Click the arrow pointing up next to 'Standard 4GB' (or another Flavor) to choose a 'Flavor'.
Choosing a flavor determines how much memory (RAM), processor cores (CPU), and disk space the instance/VM will have. Operating systems require a certain amount of memory (RAM) and disk space. An overview of available Flavors and their corresponding rates can be found on this page.
If a Flavor has insufficient RAM and/or disk space to install the image selected in step 3, an exclamation mark will indicate this.
After selecting a Flavor, scroll down a fair bit and click on the bottom right 'next' to move to the next item, 'Networks'.
Step 5
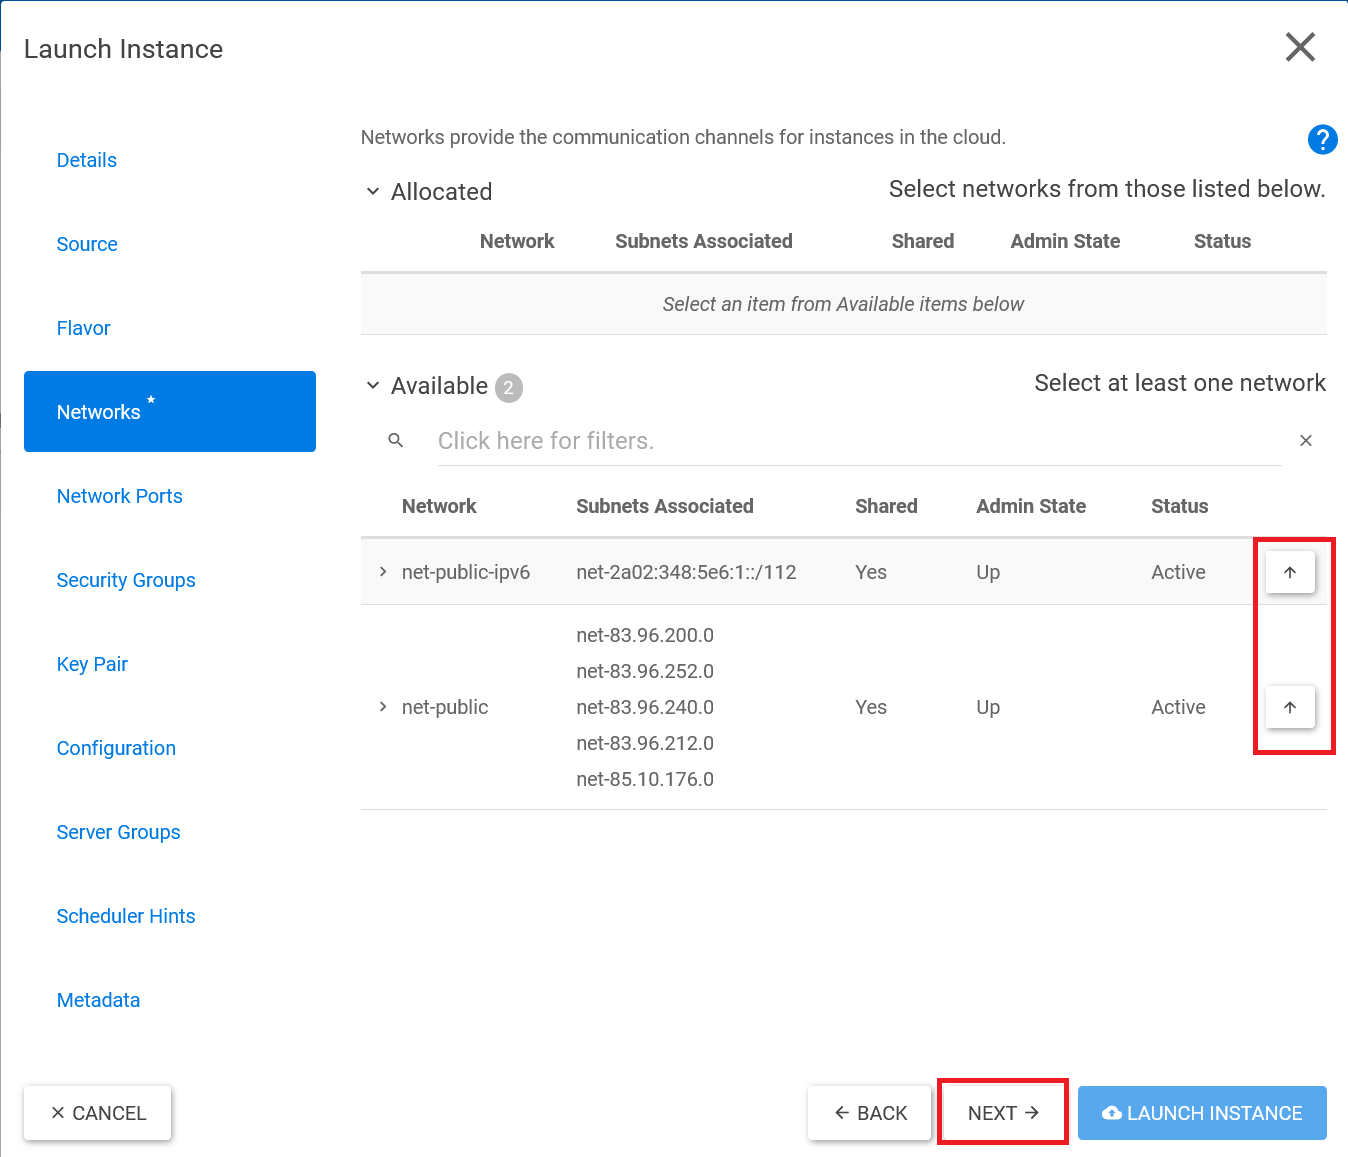
Click the arrow pointing up next to 'net-public' and 'net-public-ipv6' to assign a public IPv4 and IPv6 address respectively to the instance, then click 'next' twice (we'll skip the Network Ports option).
If you chose to configure a private network in the previous section, it will also be available here. If you want your instance to be reachable only via a private network or the console in Horizon, then do not select 'net-public' and 'net-public-ipv6', but only choose your private network.
You can always change the assigned networks later.
Step 6
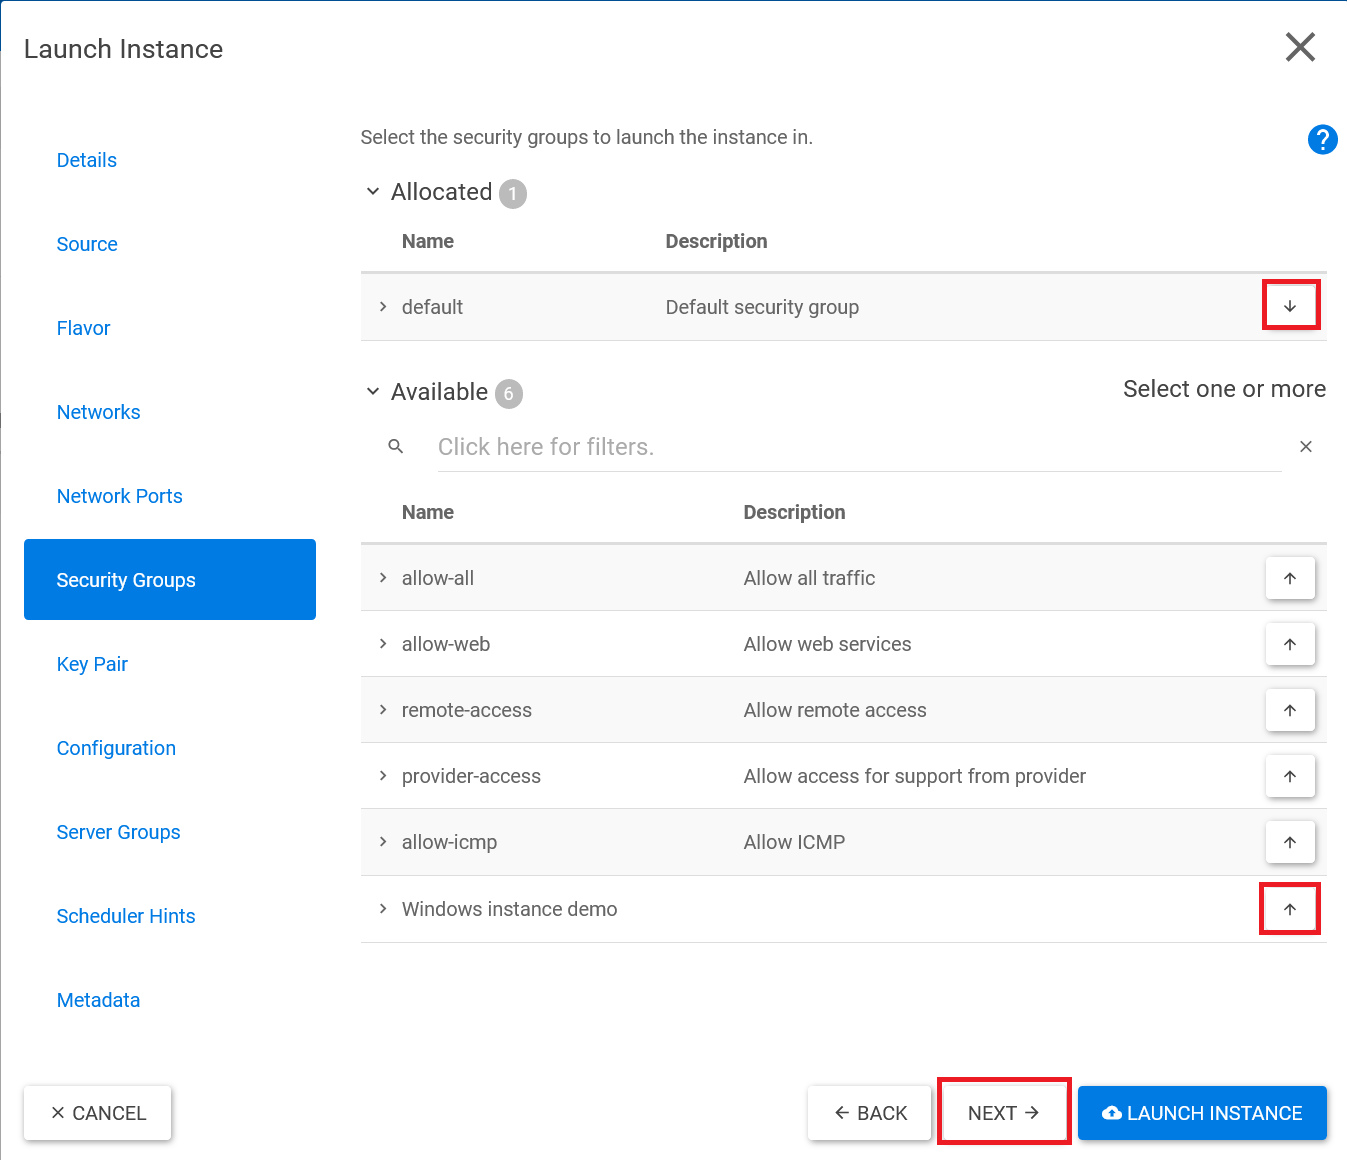
By default, the 'default' security group is assigned under 'Allocated'. Remove this by clicking the arrow pointing down.
Then, click the arrow pointing up next to the security group you created earlier in this guide and click 'next' to proceed.
Step 7
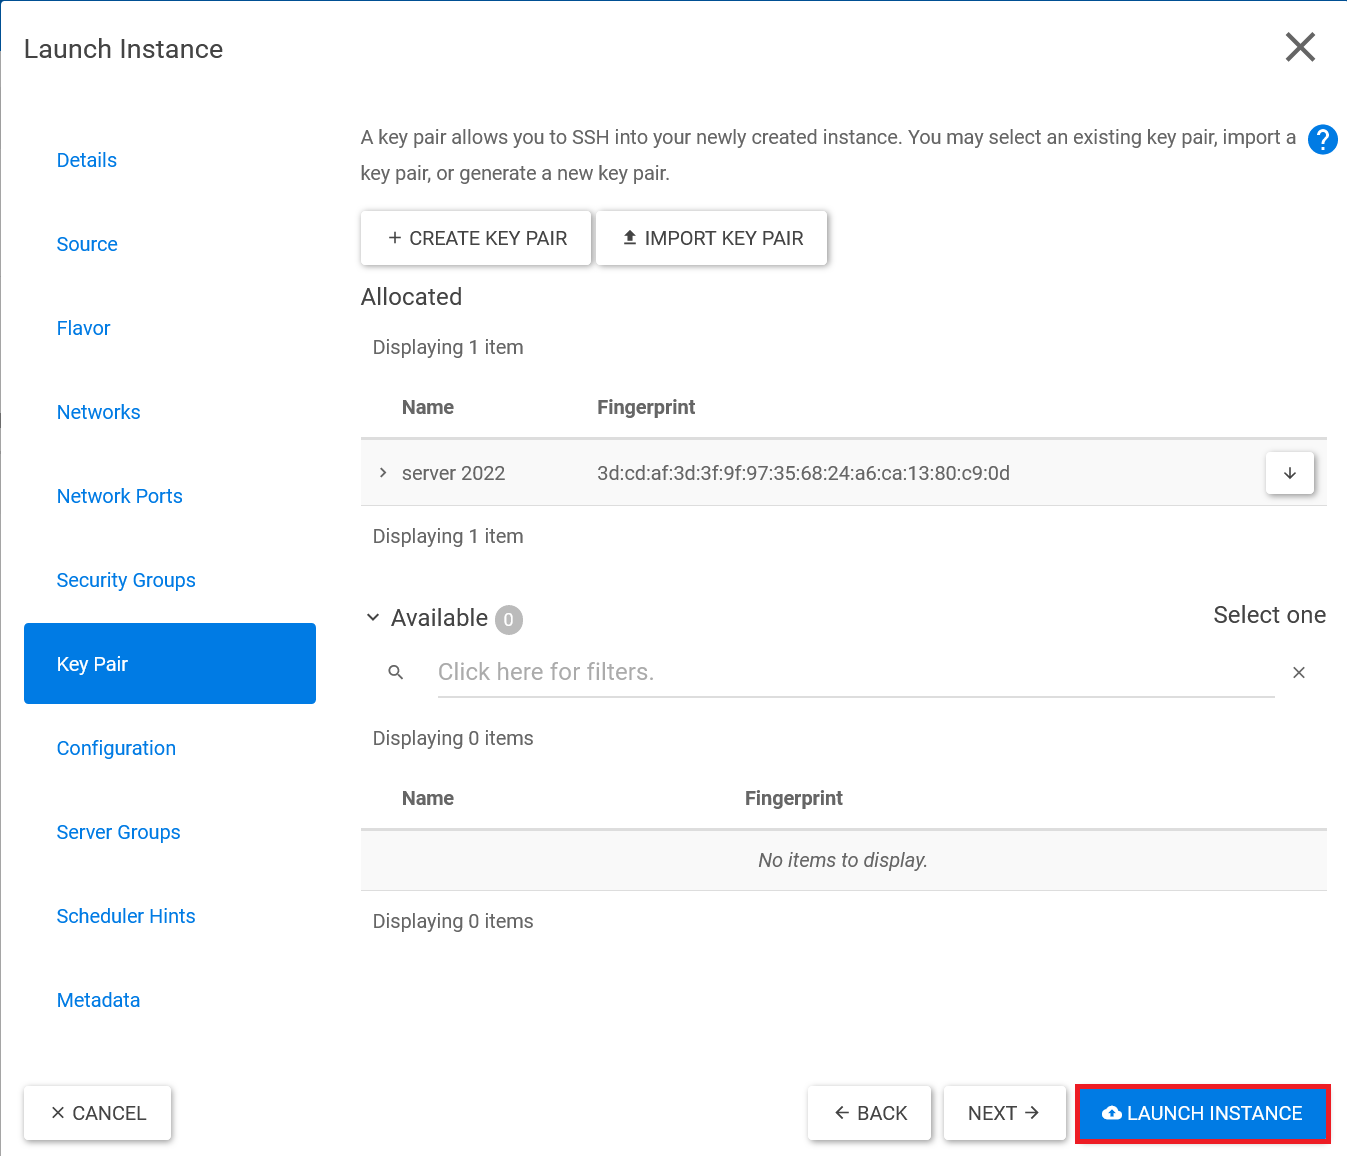
If this is your first instance, the previously created Key Pair is automatically selected. If you have already created multiple Key Pairs, remove any currently selected Key Pair by clicking the arrow pointing down, and click the arrow pointing up under 'Available' to add the Key Pair. You are also free to assign multiple Key Pairs.
After creating the instance, you cannot change or add the 'key pair' anymore. If you want to change or add the 'key pair' after creating the instance, you must create a new instance.
Finally, click on 'Launch instance' at the bottom right to create the instance. Depending on the chosen operating system, it will take a few minutes for the instance to be ready for use.
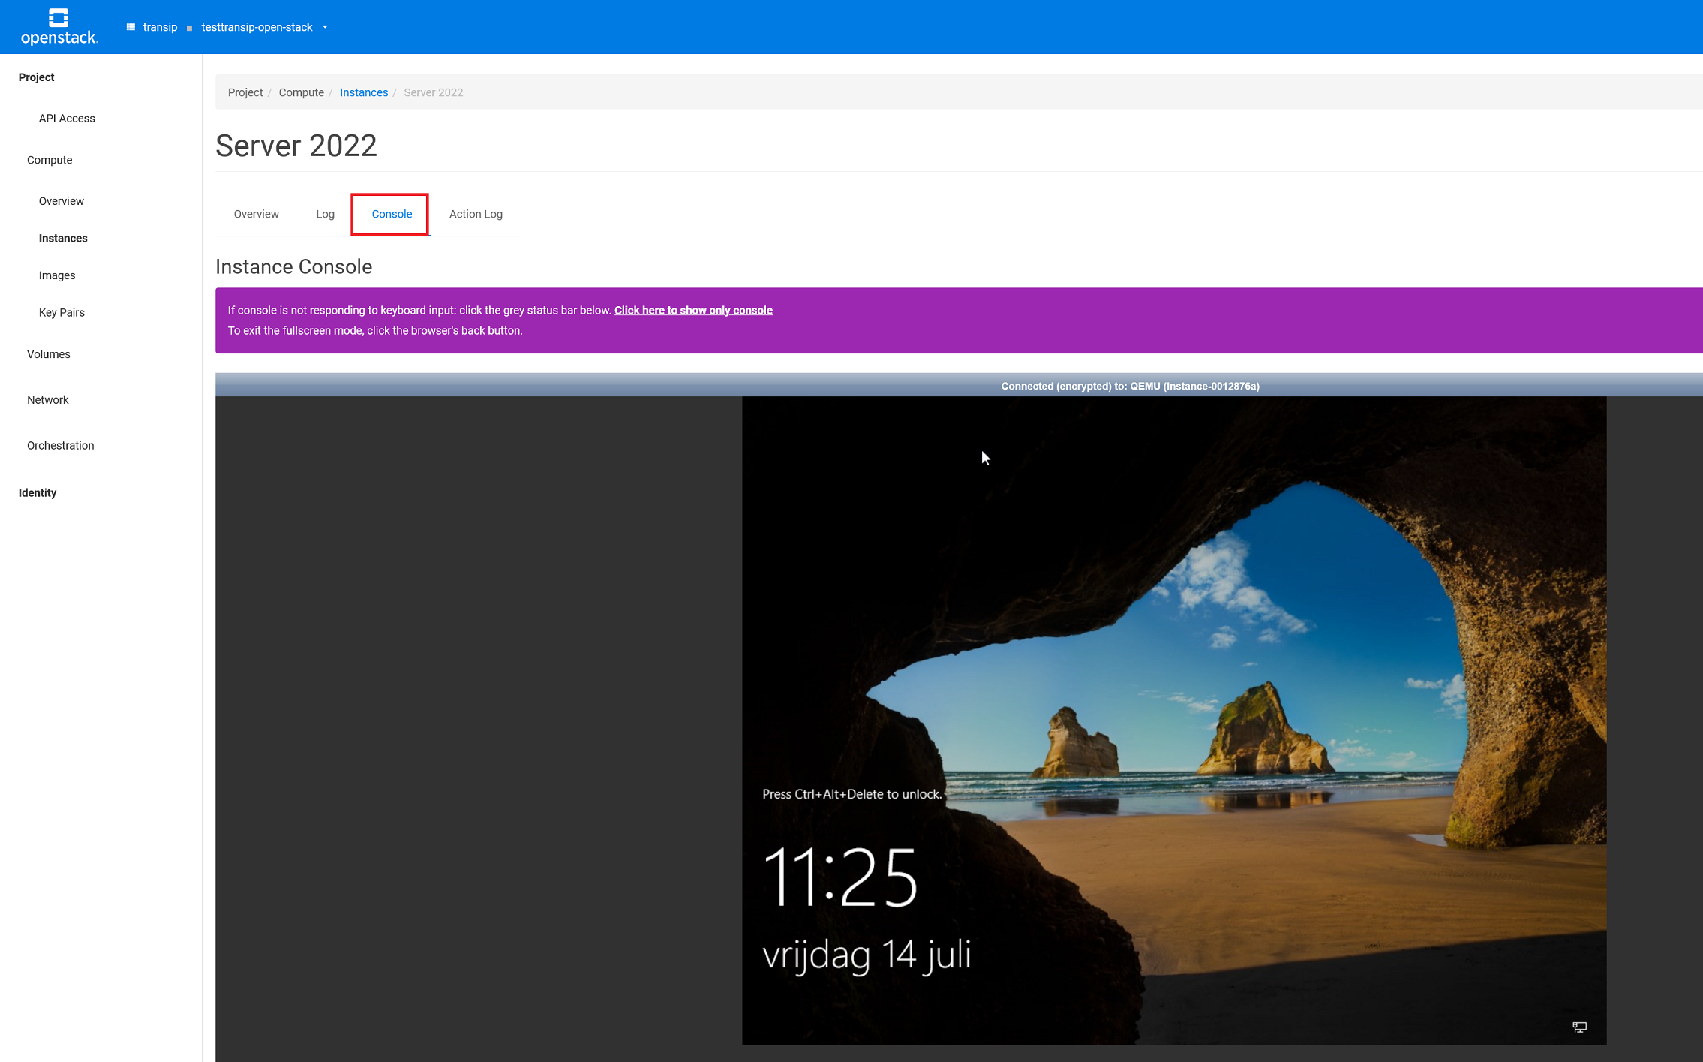
Once the instance is created and ready for use, you will see that the 'Status' of the instance is 'Active' and the 'Power State' is 'Running'.
Optionally, you can also click on the name of the instance and go to the 'Console' tab to monitor its progress.
Further Configuration
Congratulations! Your instance is now ready for use, and you can start configuring it. Below are some useful guides to help you get started with OpenStack.
If you have created a Windows instance, first retrieve the Administrator password and then proceed with the guides below.
Important! We strongly recommend starting with securing your instance. Windows Server instances come with a publicly accessible RDP port, and Linux distros have an accessible SSH port, which means they are susceptible to attacks as soon as your instance is created. Therefore, we recommend the following guides:
Windows:
Linux:
- If you prefer to work via the command-line, install the OpenStack command-line tools
- Looking for more OpenStack documentation? Check out our overview of OpenStack documentation.
- In our knowledge base, we cover the detailed configuration of various operating systems you can install on your instances.


