


A VPN server is a very useful tool to make local services available remotely. For example, you can add VPSs to a private network, close your public network interface (a VPS is then no longer directly accessible via the internet) and make it accessible via a VPN connection. This provides several security and privacy benefits:
-
Security: Working remotely via SSH and RDP connections in particular becomes a lot safer. Via a VPN network, these protocols no longer have to be directly accessible via the internet.
- Privacy: Traffic is sent encrypted, so you enjoy a degree of privacy protection in public (e.g. on a public Wi-Fi network) or insecure locations (countries where freedom of speech is less for granted).
In this tutorial, we'll show you how to set up an OpenVPN server on a pfSense firewall. The configuration of a pfSense firewall as an open VPN server consists of three parts:
- Setting up your pfSense firewall as internal Certificate Authority
- Generating an SSL certificate to encrypt your connection
- Installing an Export Manager that allows you to export the necessary client configuration files.
- For this tutorial, we assume that you've used our pfSense installation tutorial.
- Do you want VPN user authentication via an Active Directory? First, configure an LDAP server according to the steps in this manual.
Creating an internal Certificate Authority
pfSense can use SSL in several ways. One of these is by acting as an 'internal Certificate Authority' itself. This means that your pfSense server acts as a party that issues SSL certificates (as Certificate Authority), but does so 'internal', in other words: within your (virtual) private network. We use this method to secure your OpenVPN server.
Step 1
Log in to pfSense and click 'System' > 'Cert. Manager'.
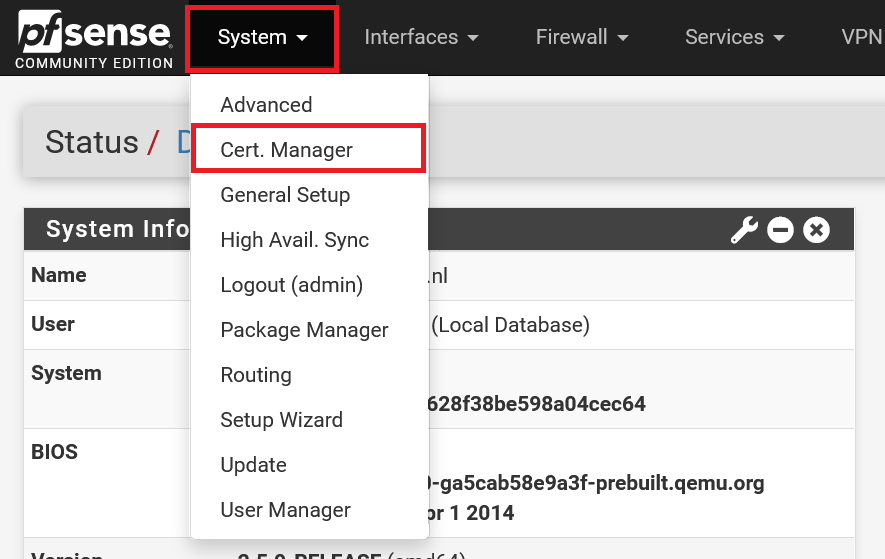
Step 2
You will see an overview of Certificate Authorities (CAs) that are configured on your server. Click 'Add' to add a new one.
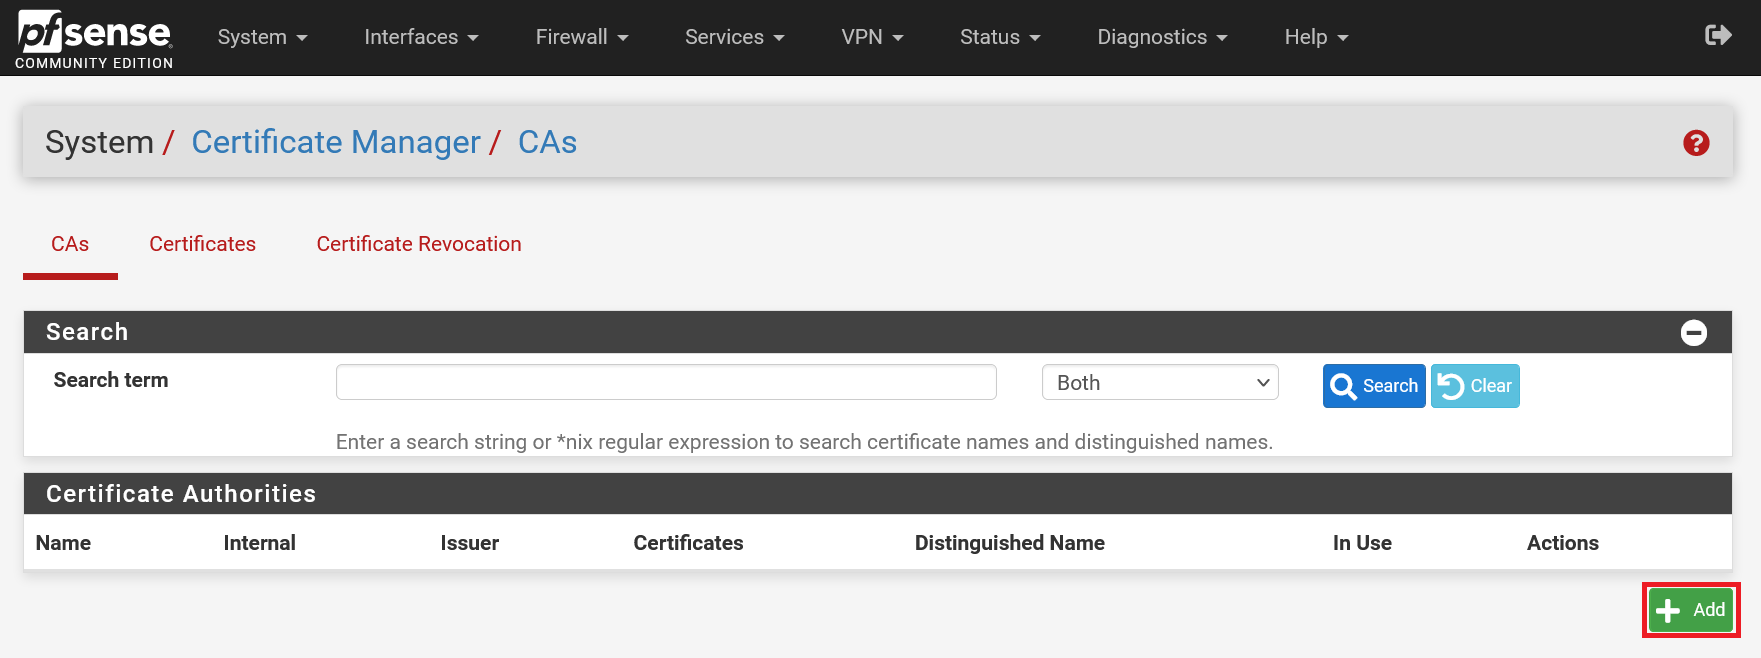
Step 3
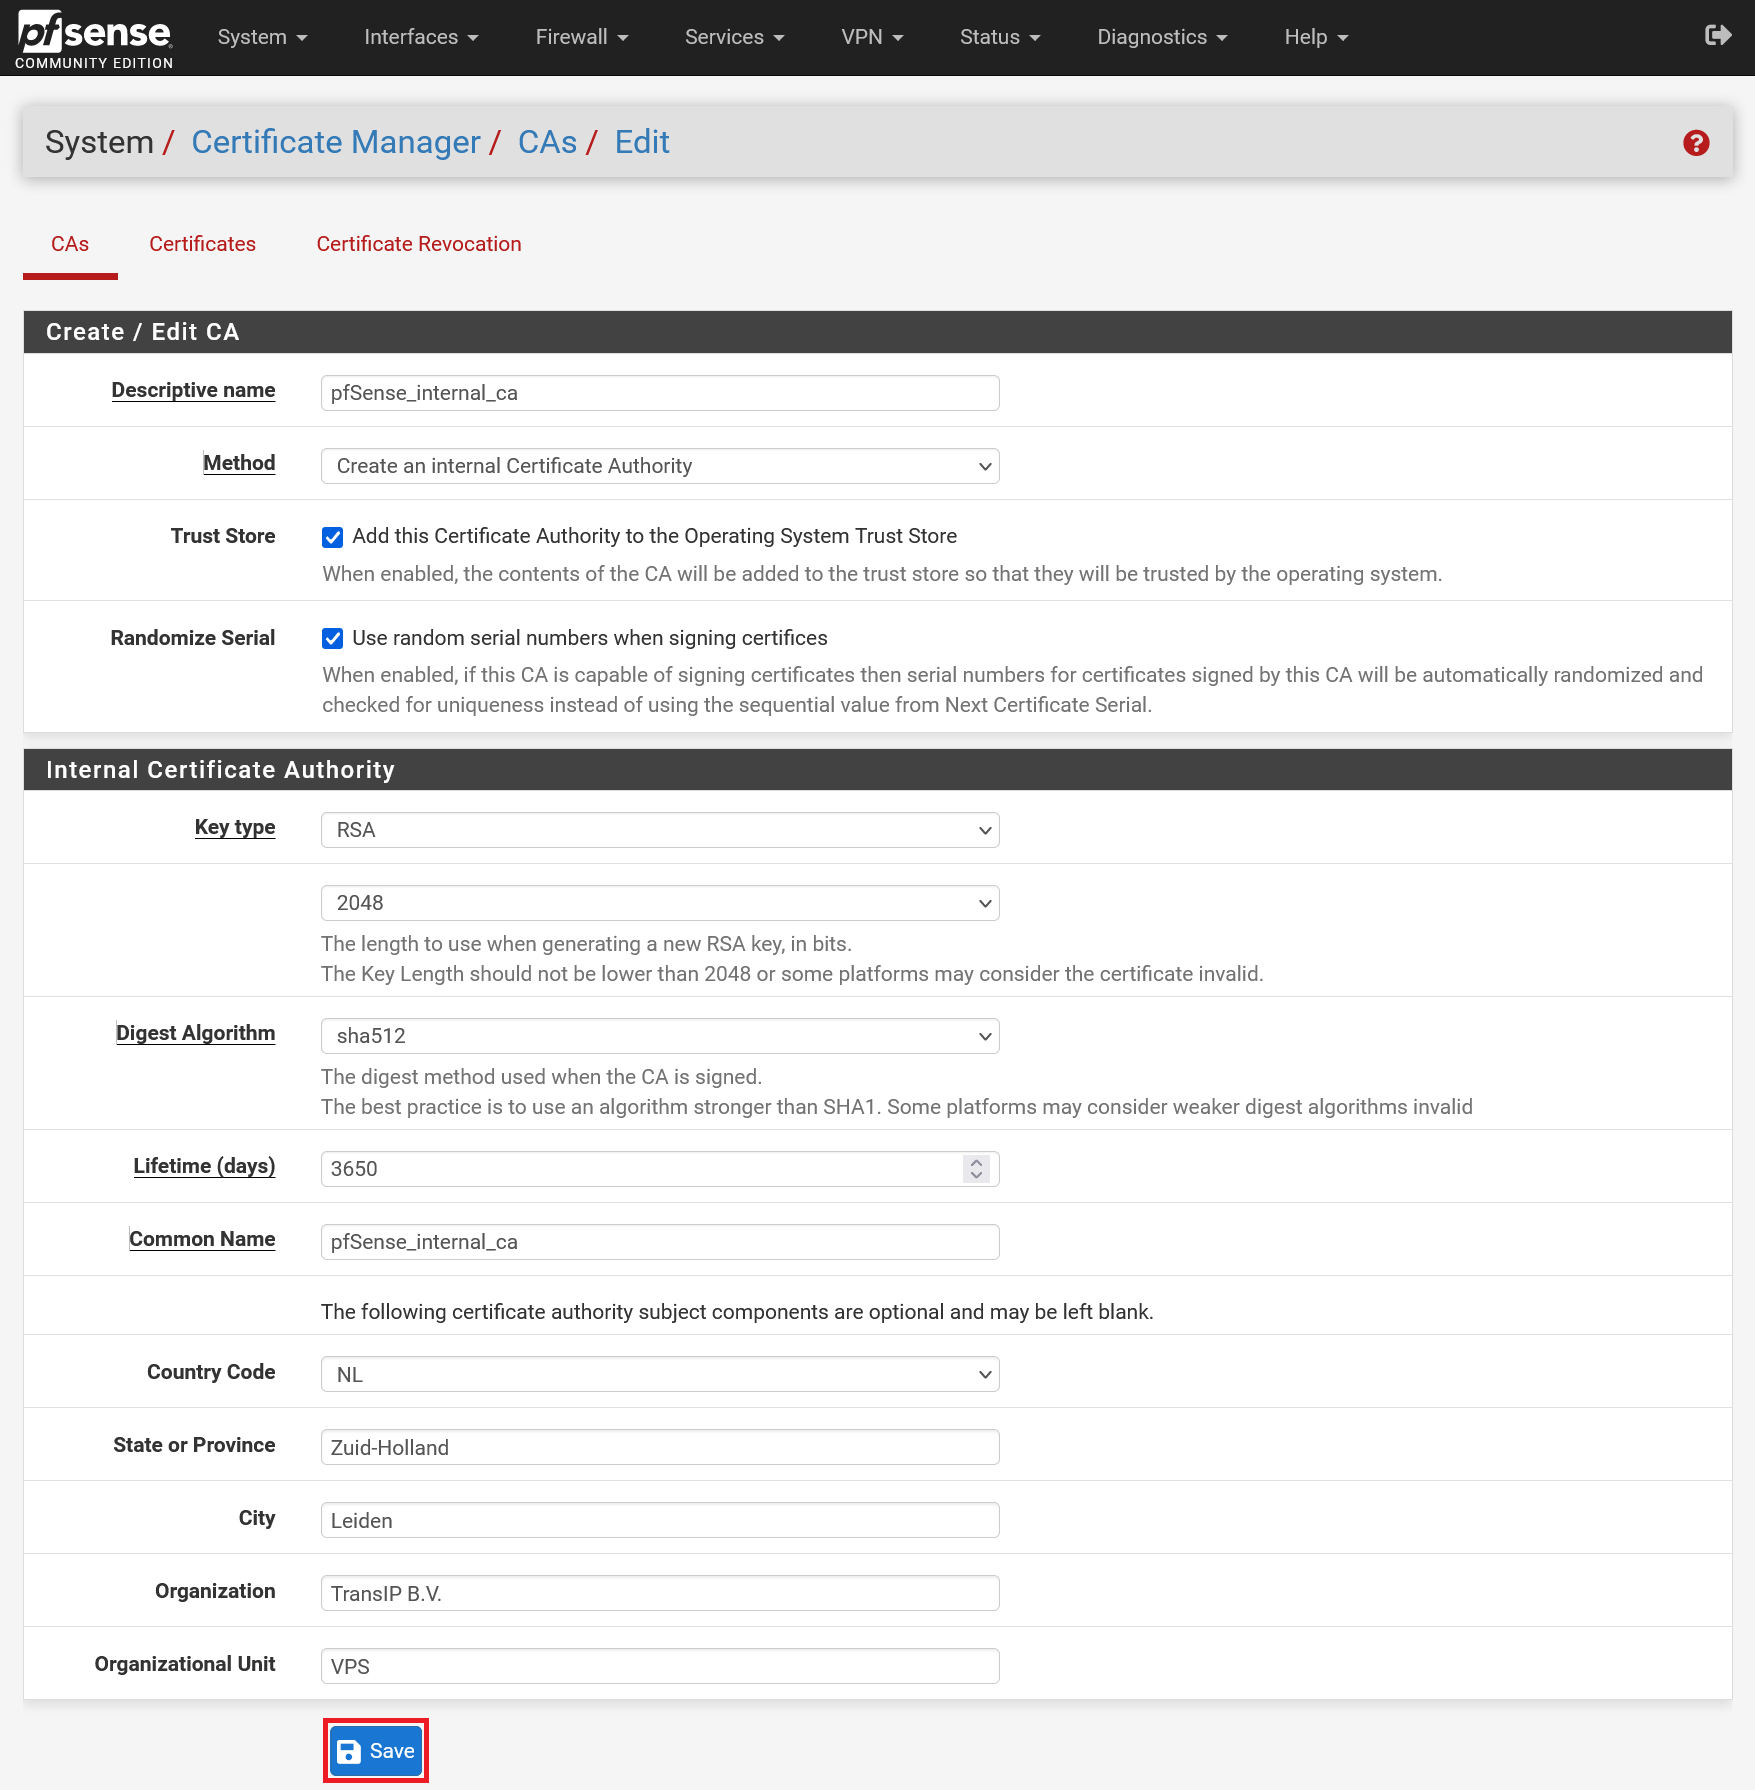
Fill in the data on the page as in the example below, with the following adjustments if necessary:
- Descriptive name / Common name: you are free to change this as you wish. We recommend choosing a name that makes it easy to determine what it is for.
- Digest Algorithm: Today the performance impact of SHA512 is very small and you probably won't notice it. For just that little bit of extra performance you can also choose SHA256.
- Company data: Adjust this to the data of your own company.
Most importantly, leave 'Method' set to 'Create internal Certificate Authority'. In addition, we recommend checking the 'Trust Store' and 'Randomize Serial' options.
Now proceed to the next section to create a certificate.
Generating an SSL Certificate
Now that you've set up an internal CA, the next step is to create a certificate for the OpenVPN server that clients use to verify the identity of your pfSense firewall.
Step 1
Click the 'Certificates' tab and then click 'Add/Sign'.

Step 2
Most of the page is already filled in automatically. The most important thing is that on this page you change the 'Certificate Type' to 'Server Certificate'. Enter a clearly descriptive 'Descriptive name' and 'Common name' here as well. You are free to change the key length and the algorithm. For a combination of safety and performance, we opt for 4096 and SHA512 respectively.

Your SSL certificate is now ready and you can continue configuring OpenVPN.
Configuring OpenVPN
Step 1
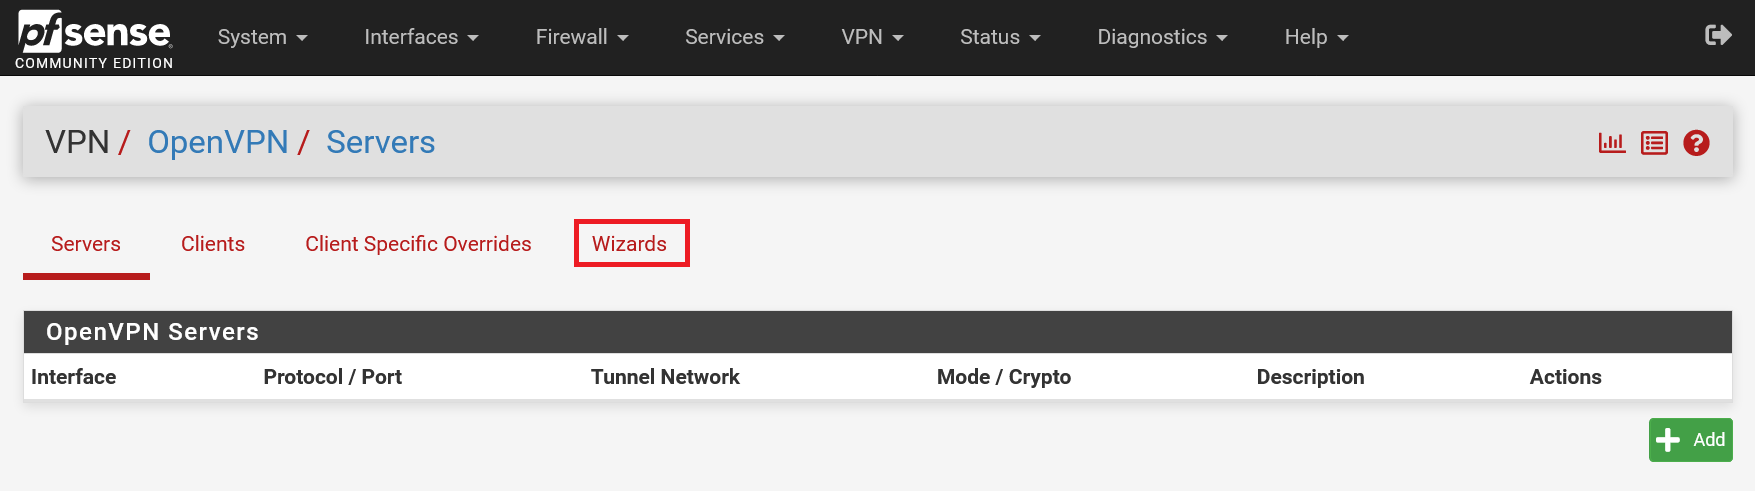
Click 'VPN' > 'OpenVPN' in the top (header) menu.
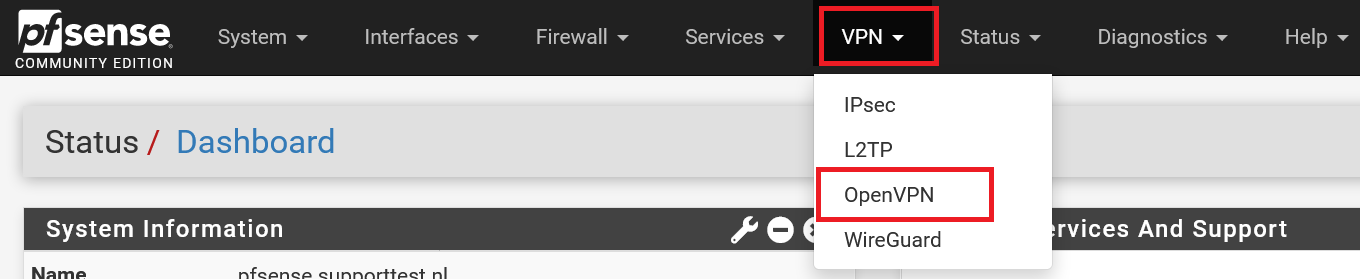
Step 2
pfSense has a handy wizard for configuring an OpenVPN server. Click 'Wizards' to start it.
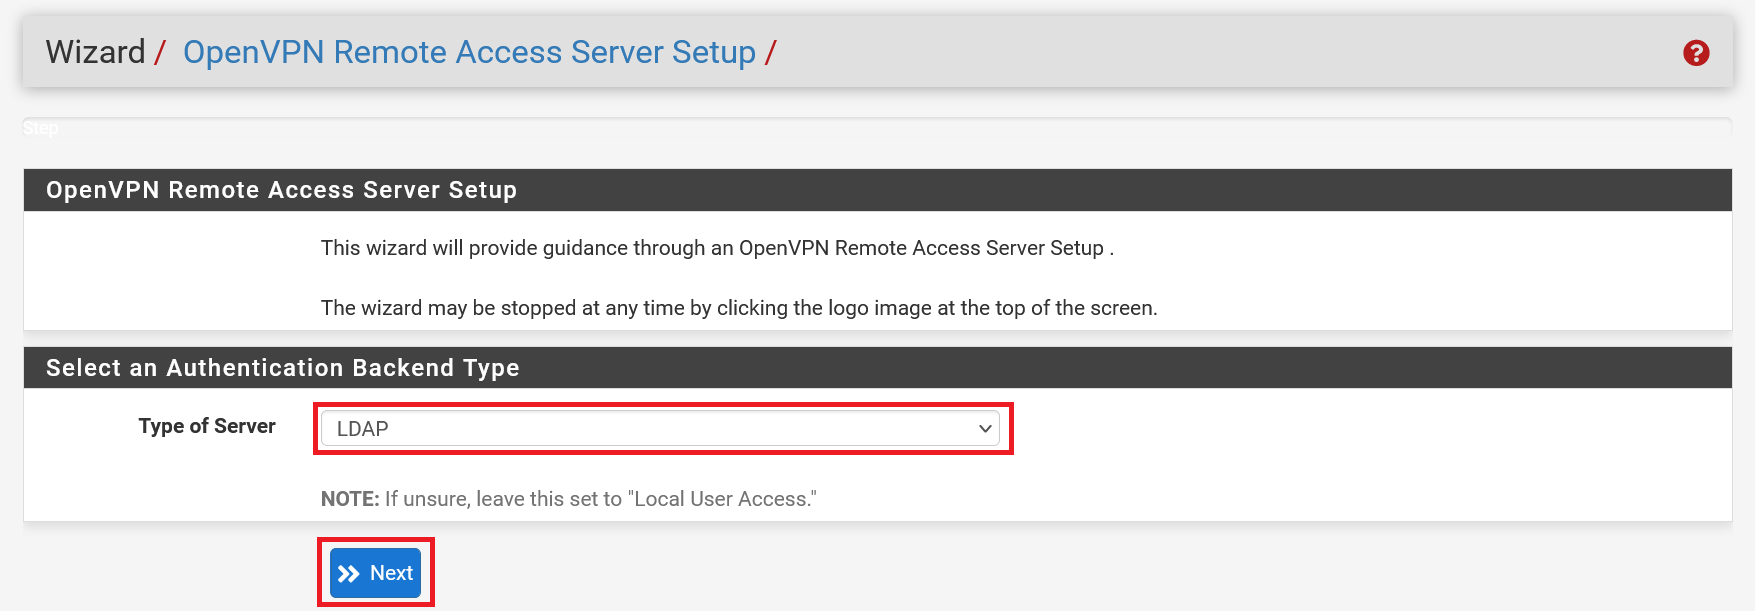
Step 3
Are you using a pfSense/OpenVPN server in combination with a Windows Domain Controller? Then select 'LDAP' and click 'Next'. Would you rather create individual VPN users from pfSense? Then choose 'Local User Access' here.
Please note that regardless of your choice, additional steps are required to configure users. At the end of this guide, we refer to an additional article that explains those steps.
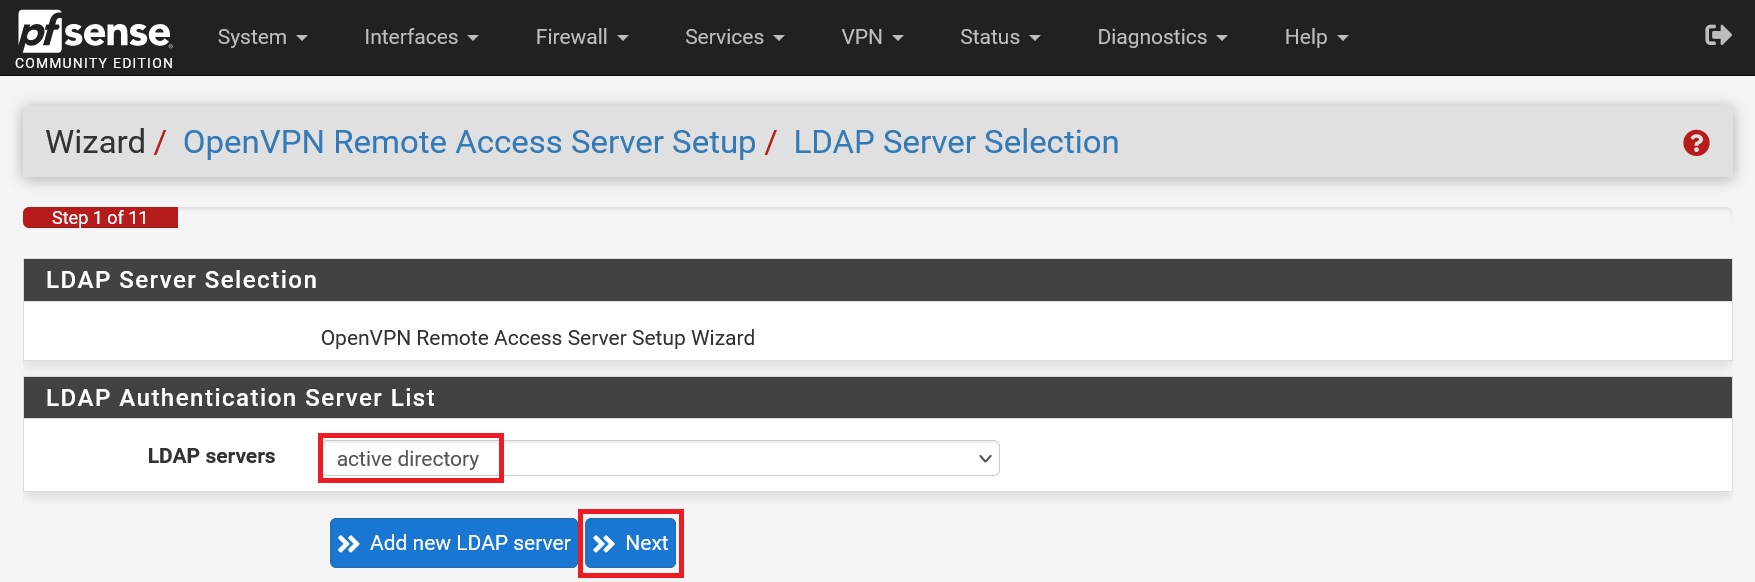
Step 4 – LDAP
If you chose LDAP, choose an LDAP server here. Don't see your Domain Controller here? First configure an LDAP server according to the steps in this manual and restart the wizard.
Step 5
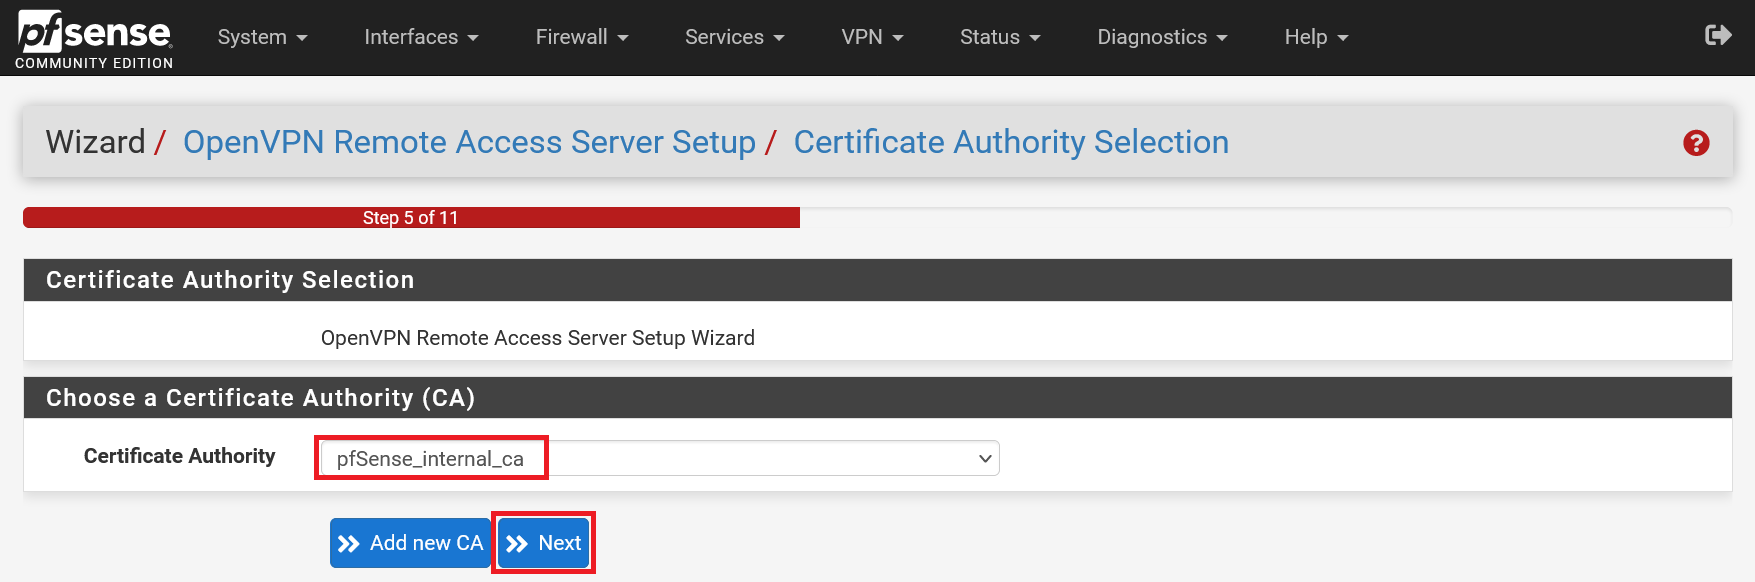
Select the CA you created in the first paragraph. Normally this will already be selected. Then click 'Next'.
Step 6
You will now automatically arrive at step 7. Select here the SSL certificate you created in the first paragraph. If there are no other certificates on your server yet, it is already selected automatically.

Step 7
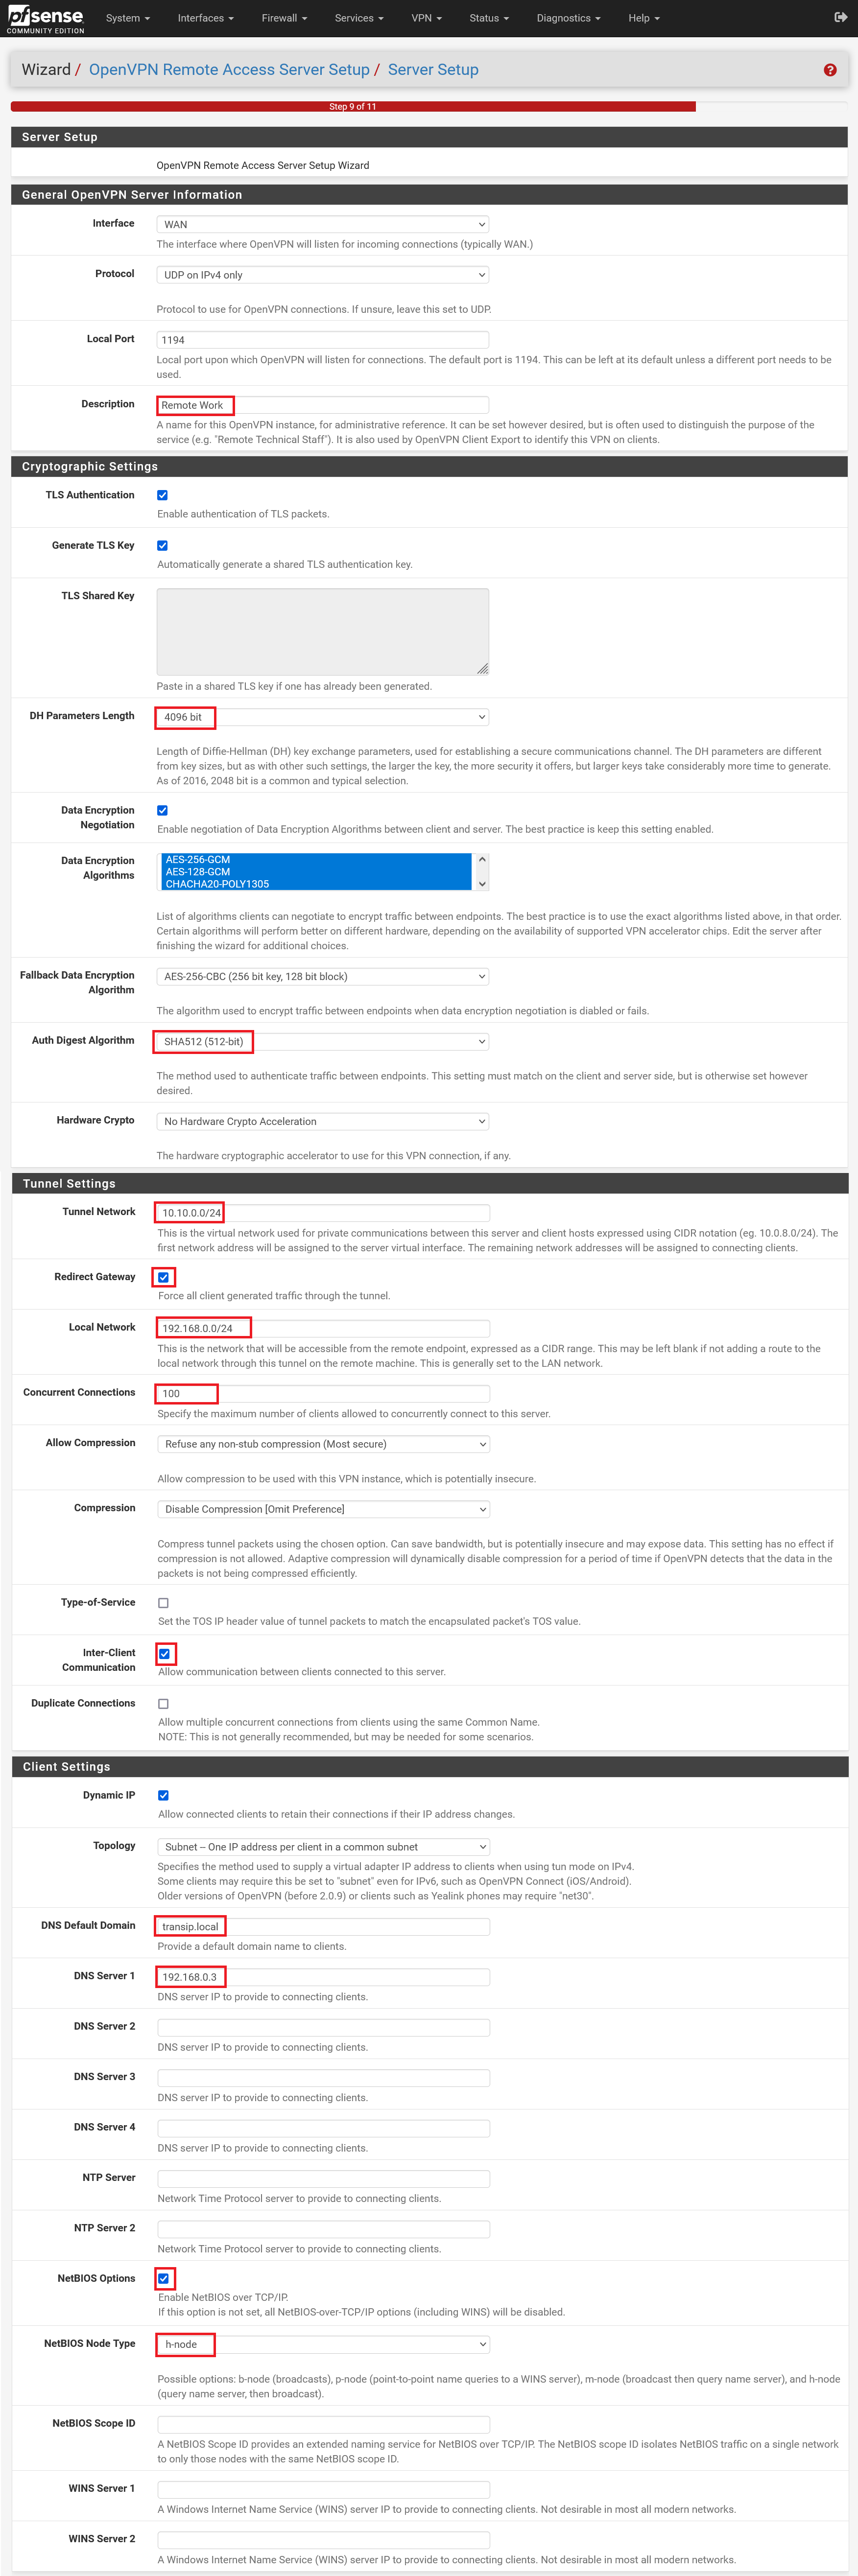
This step is the most comprehensive. Some of the options you select here depend on your own preference and you are free to do so (the DNS Default Domain and DNS Server option can be found with OpenVPN with LDAP under 'Advanced' and must be checked). An extensive overview of available options can be found here, but the most important are:
- Description: An administrative name that specifies what the VPN server is for.
- DH Parameter Length: The longer, the safer. 4096 is a great option to choose here.
- Auth Digest Algorithm: Use at least SHA256 for security reasons. The higher the number, the more there is a performance impact, but with SHA512 it is still negligible.
- Tunnel network: The private IP range from which the VPN network assigns IP addresses to both the OpenVPN server (your firewall) and the clients connecting to it. In this example we choose 10.10.0.0/24 (256 addresses).
- Redirect Gateway: Probably the most important option: by checking this box, all internet traffic from clients is routed through the OpenVPN server. This is the most secure option and desirable for a Windows domain, for example.
- Local Network: The IP range of your local network. In this case this is your private network, but this can also be an office network (in a local setup).
- Concurrent Connections: How many VPN connections are allowed to run through your OpenVPN server at the same time. This should be at least one per end user with some room for growth.
- Interclient Communication: This is an important one: suppose you also want to connect to servers on your private network from outside your private network, for example from a laptop, then this option ensures that all devices that connect to your OpenVPN server via a VPC client can reach each other.
- Duplicate Connections: This option is disabled by default. This is the safest option and we recommend that you don't change it (which is why it is not outlined). Please note that if a user connects to more than one computer/server with the same username, this option will cause the WAN connection to stop working at a random moment. The awkward thing is that the user will not receive a message that his username is already connected. You can see this in pfSense under 'status' > 'system logs' > 'openvpn' based on connected IP addresses for the specific user.
- DNS Default Domain: Optionally provides a domain name to connected clients.
- DNS Server 1 to 4: An important option if you run your own DNS servers on your private network (if not, leave this option empty). This is the case, for example, in a Windows Active Directory environment where the Domain Controller is also the DNS server for the private network.
- NetBIOS options: A must have to enable if your OpenVPN server is used for a Windows network. Windows shares are served through NetBIOS. Without this option, your servers will not be able to use it.
- NetBIOS node type: h-mode is the best option in combination with DNS Servers.
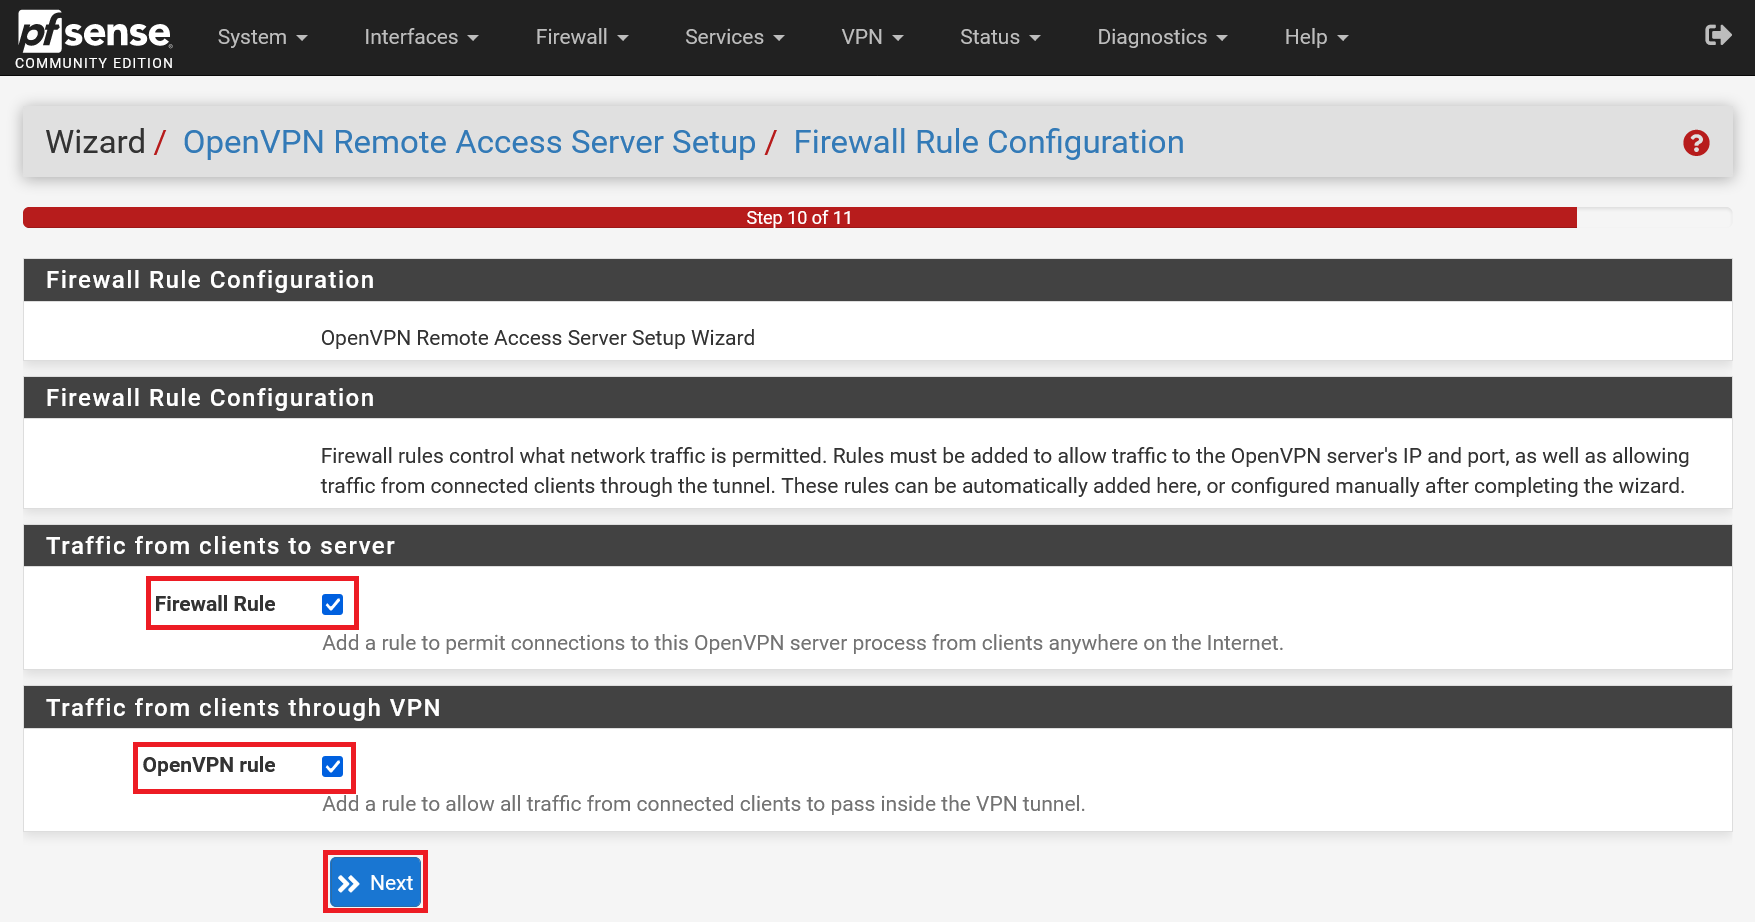
Step 8
Check the 'Firewall Rule' and 'OpenVPN Rule' options respectively to allow VPN clients no matter where they are in the world (useful if you're working from abroad on your laptop) and to route all traffic from a client run the VPN tunnel (i.e. an encrypted connection from the client to the internet).
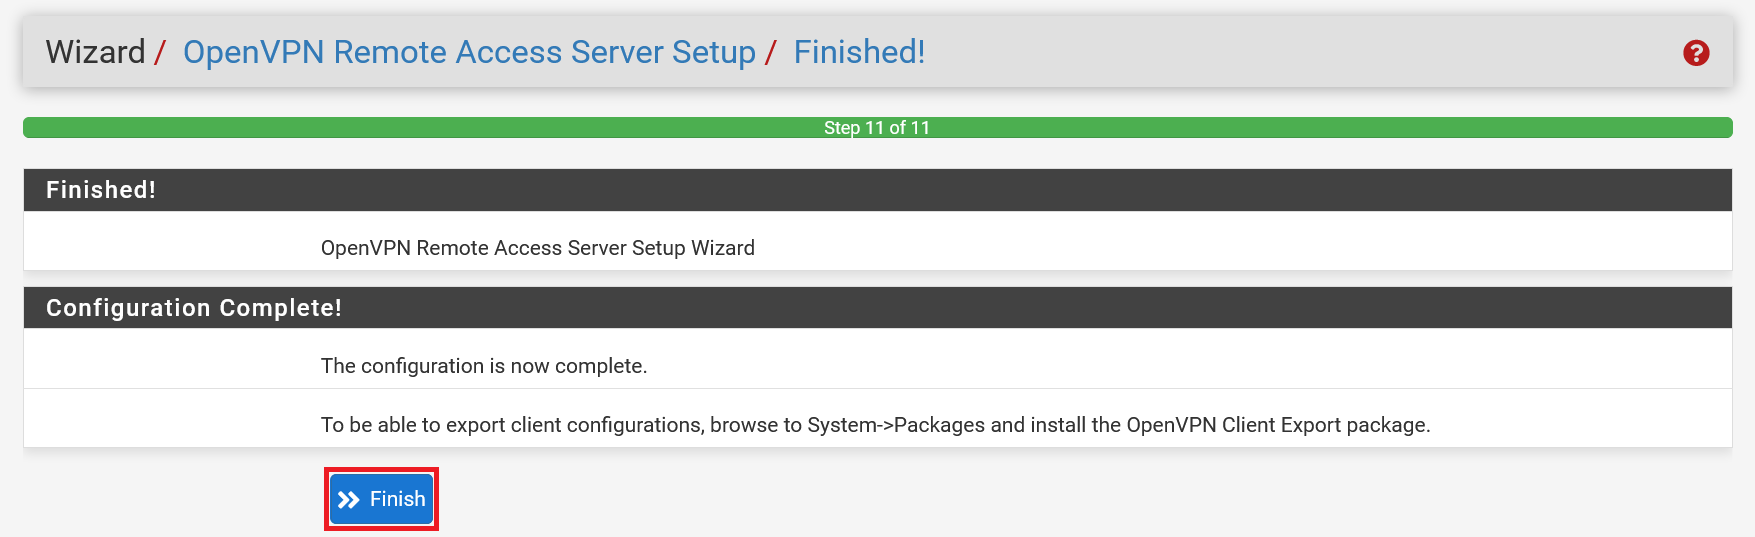
Step 9
That brings us to the end of the wizard. Click 'Finish' to close it. In the top menu you will now find a new rule for the OpenVPN server under 'Firewall' > 'Rules' and the server itself under 'VPN' > 'OpenVPN'.
As the wizard hints, we now move on to client configurations in the following paragraphs, i.e. everything that comes with creating users and making sure they can use your VPN server.
Installing OpenVPN client export package
Before you actually create users, install the OpenVPN client export package. This allows you to export the files from pfSense that users need to connect to your VPN server via a VPN client such as OpenVPN or Viscosity.
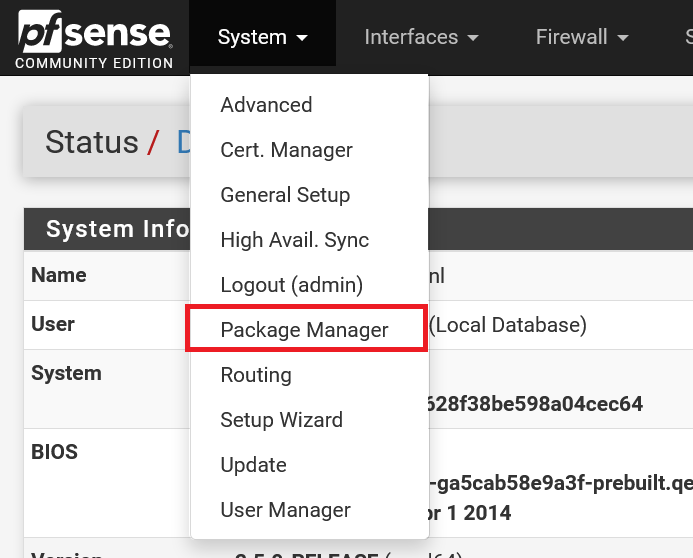
Step 1
In the top menu, click 'System' > 'Package Manager'.
Step 2
Go to the 'Available Packages' tab and search for 'OpenVPN'. In the results click 'Install' behind the package 'OpenVPN Client Export'.
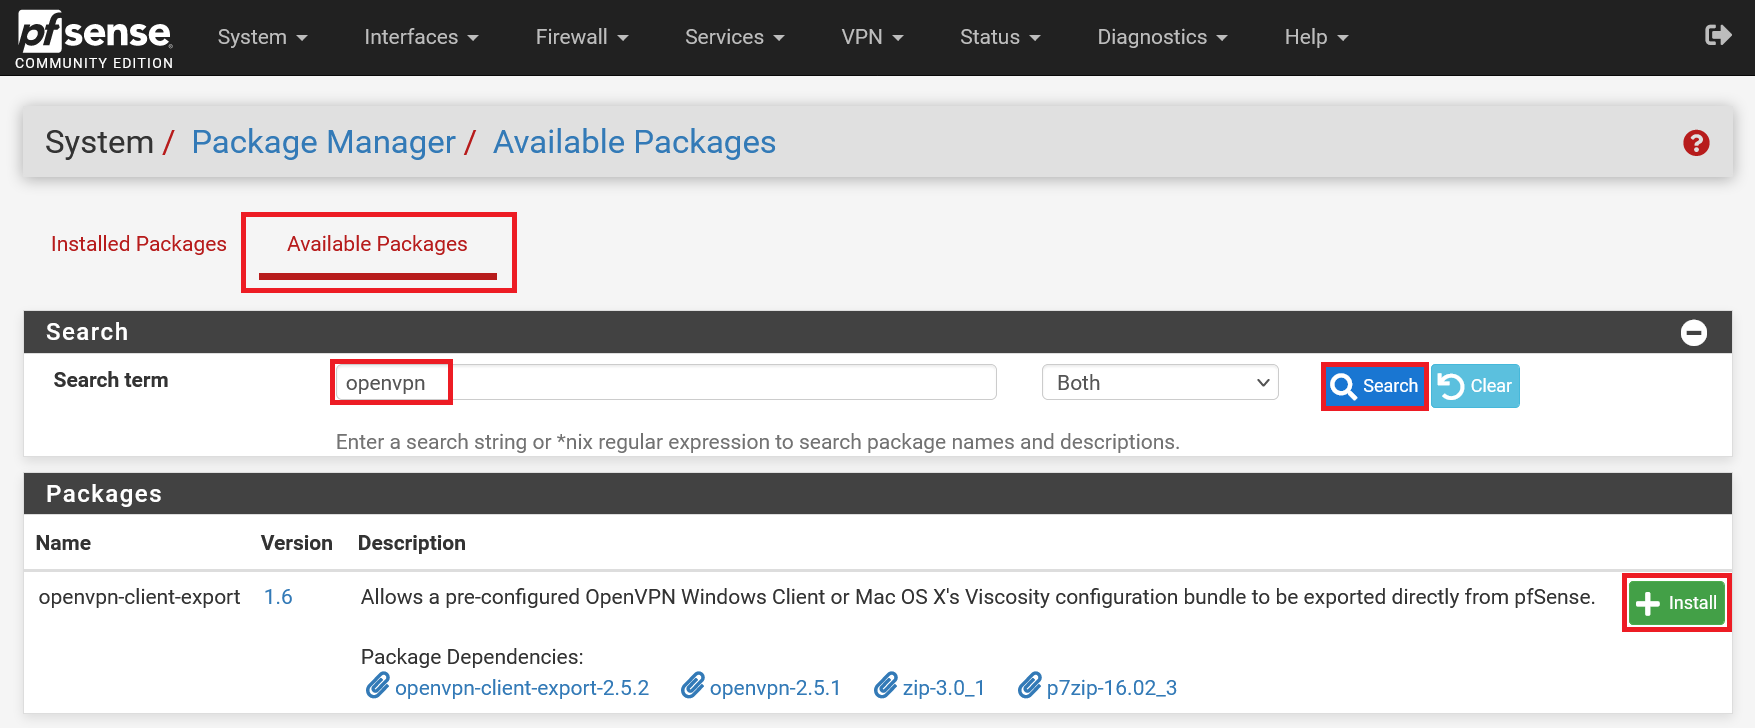
Step 3
pfSense is not yet fully convinced of your intention and asks for confirmation to install the package. Click 'Confirm' to start the installation. The installation takes about a minute.

Now that the export manager is installed, your OpenVPN server is ready to use. You first need at least one user account for this. How to create this with all associated configuration files for different VPN clients, we show in our manual 'pfSense: creating an OpenVPN user'. This tutorial is aimed at both LDAP users and OpenVPN users who are created in pfSense itself.