


A Virtual Private Network (VPN) connection is a private network that connects multiple devices remotely through the Internet. Traffic over the VPN network is sent encrypted. With a VPN connection, you add an extra layer of security to your (company) network. For a more detailed explanation of VPN networks, see our in-depth blog post "What is a VPN connection?".
In this tutorial, we show you how to install a VPN server in Windows Server 2019 and make a VPN connection from another computer, for example, your computer at home.
The steps in this tutorial require an SSL certificate via IIS on your VPN server.
Installing a VPN server
Step 1
Connect to your Windows Server via Remote Desktop or the VPS console.
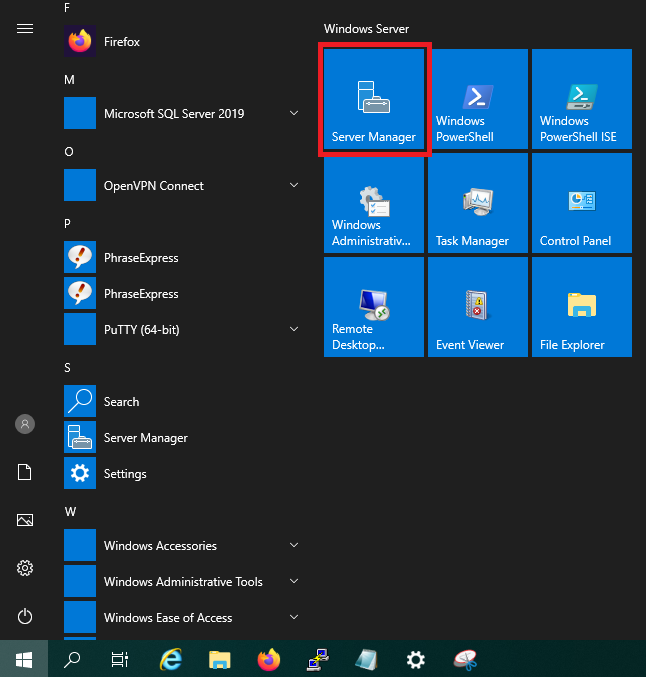
Step 2
Open the 'Server Manager' via the Windows Start button > Server Manager.
Step 3
Click on 'Add roles and features' in the dashboard of the Server Manager.

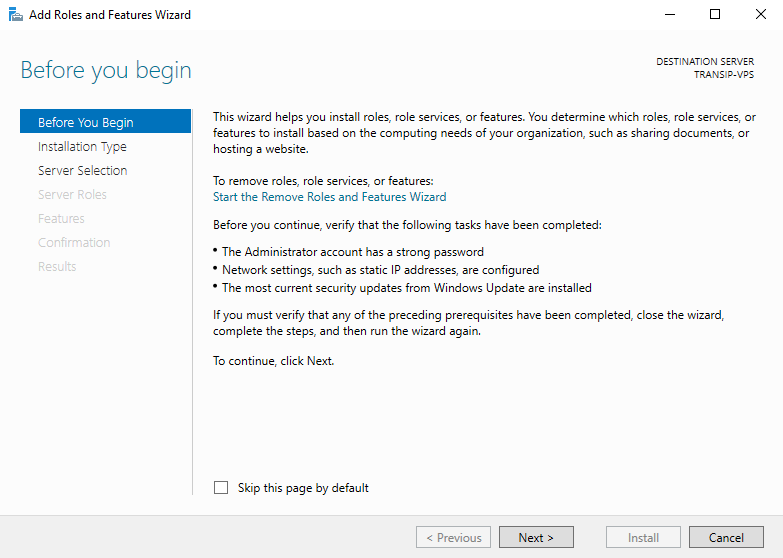
Step 4
You will now see the 'Before You Begin' page. You can select not to see this page again when you add roles & features in the future. Click on 'Next' after you have read the points under 'before you continue'.
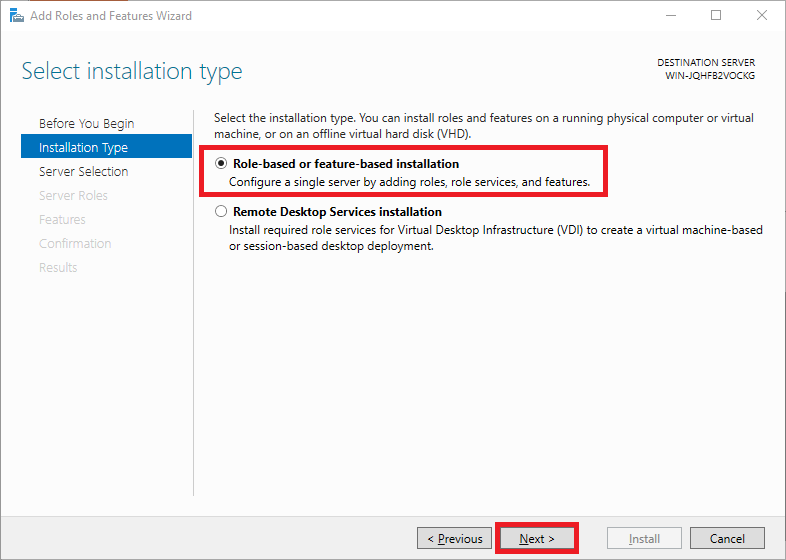
Step 5
Under 'Installation Type' you can choose between 'Role-based or feature-based' and 'Remote Desktop Services installation'. Choose 'Role-based or feature-based' and continue to the next step.
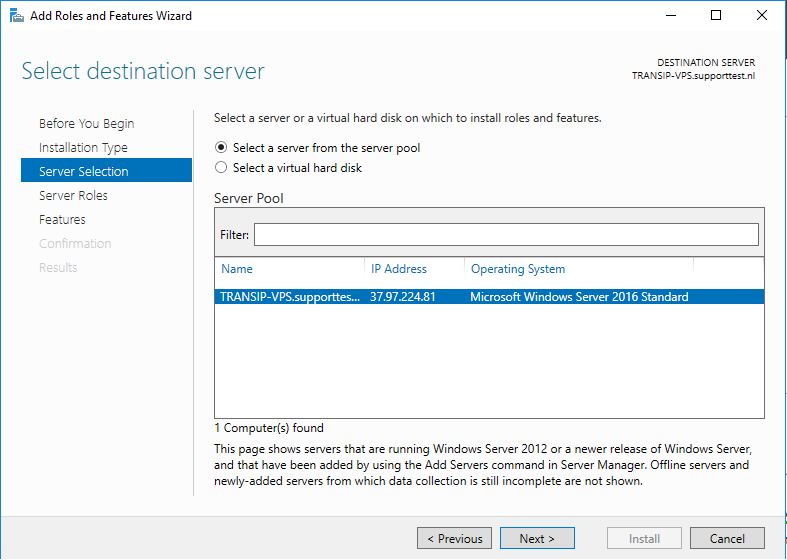
Step 6
Select the desired VPS on which you want to perform the installation. If you use an Active Directory and it contains several VPSs, these are listed in this overview. If you do not use Active Directory, you will see the VPS on which you go through this tutorial.
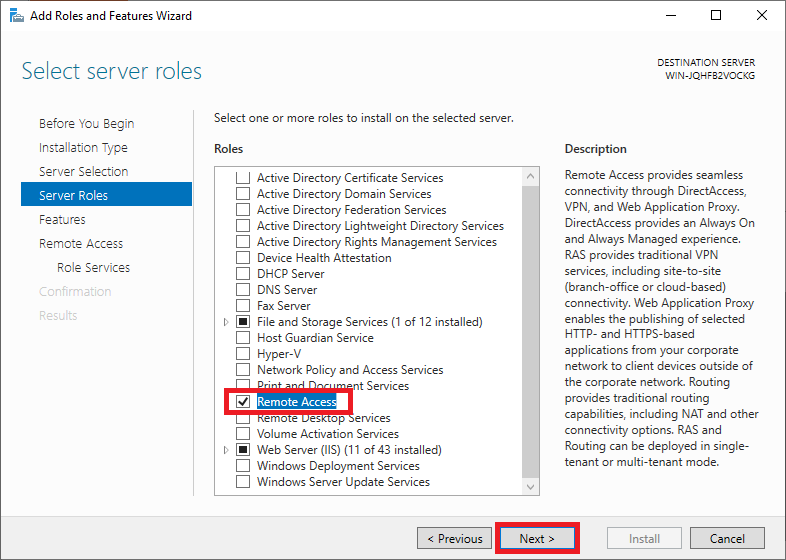
Step 7
On the next page, you can select a 'Server Role'. Select 'Remote Access' (including responsible for VPN) and click on 'Next'. You do not have to adjust any other options already checked.
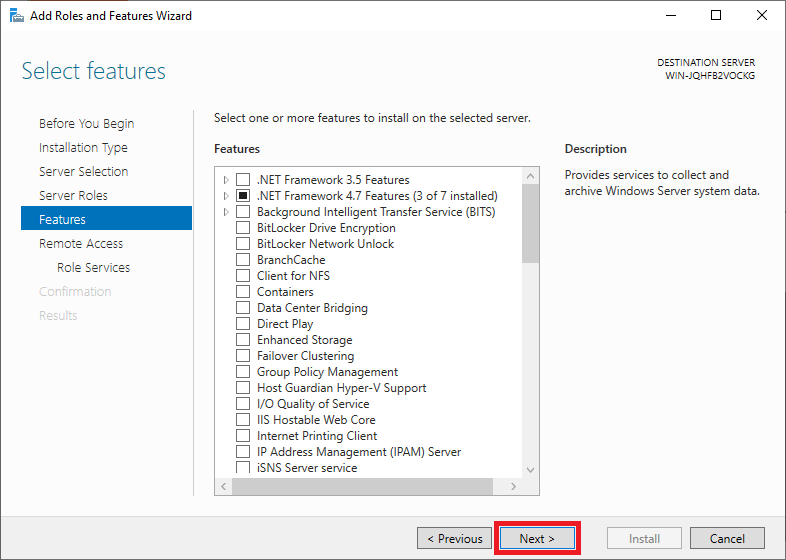
Step 8
You do not have to select or adjust features. Click immediately on 'Next' to continue.
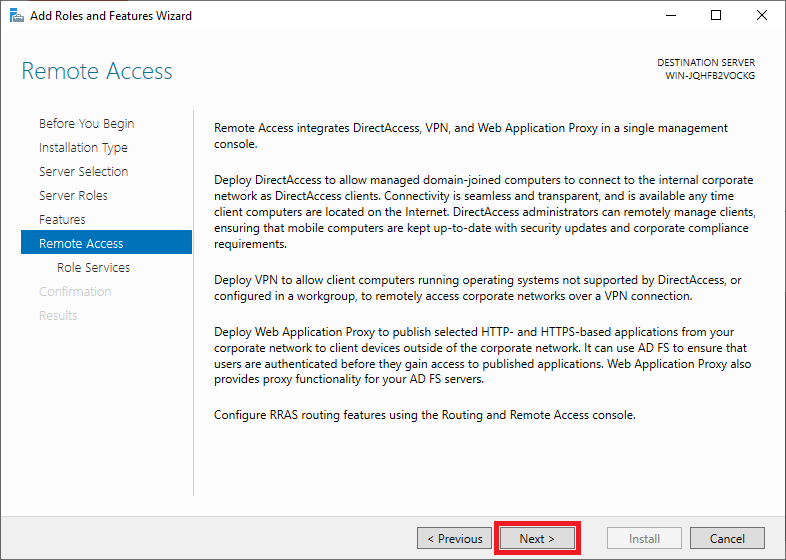
Step 9
You will see a description of the Remote Access role. Click on 'Next' to continue.
Step 10
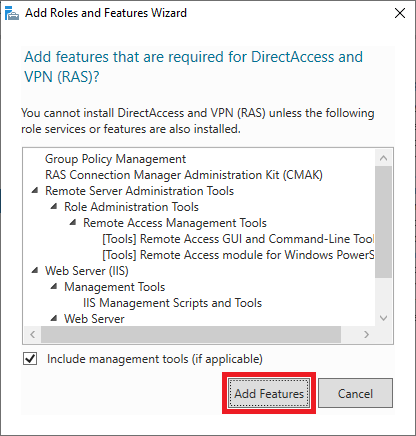
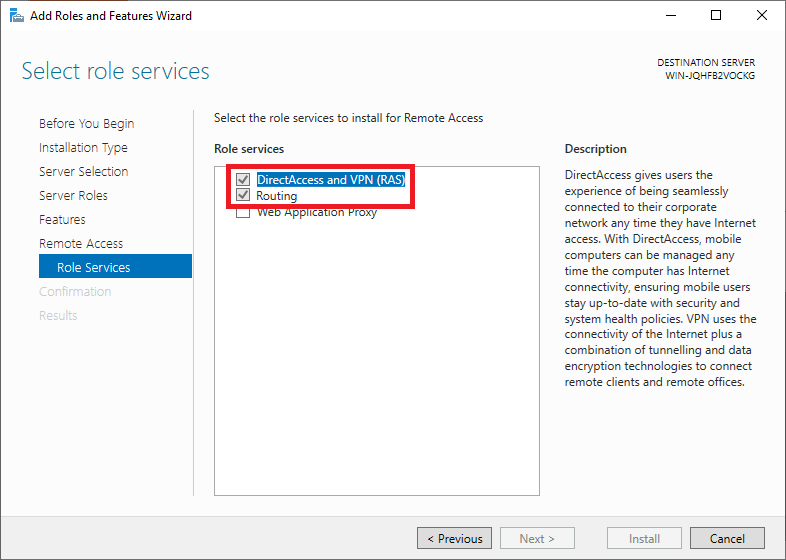
Then select the 'role services' of the Remote Access role you want to use. Click here on 'DirectAccess and VPN (RAS)'.

You should probably see a pop-up with an overview of role services and features that need to be added to use the DirectAccess and VPN (RAS). Click on 'Add Features' to have it added automatically.
After this, you return to the 'Role Services' screen and the option 'DirectAccess and VPN (RAS)' is checked. Also, check the 'Routing' option and click 'Next' to proceed to the next step.
Step 11
Before the installation starts, you will see a confirmation of the options you selected in the previous steps.
Check 'Restart the destination server automatically if required': it is always important (if an installation requires it) to restart your server to ensure the proper functioning of the role/feature.
Finally, click on 'Install'. The installation itself takes a few minutes, so feel free to grab a cup of coffee before proceeding to the next step.

Step 12
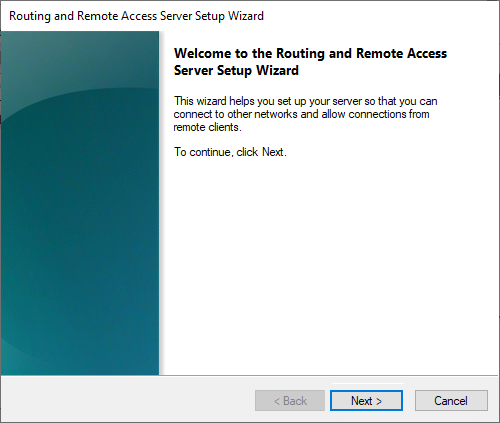
Do not close the confirmation screen after installation, but click on 'Open the Getting Started Wizard'. It may take a minute to open. If not, click in the Server Manager on 'Tools'> 'Remote Access Management'.

Step 13
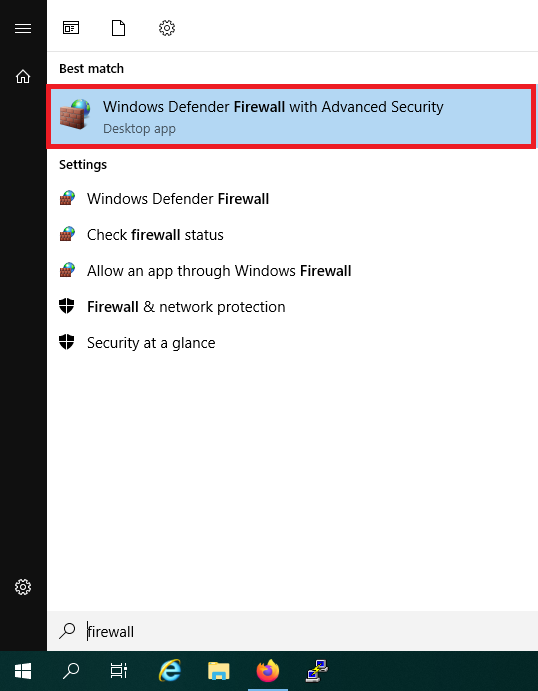
You are greeted by the screen below. Before proceeding with the wizard, it is useful to first open the necessary ports in your firewall; otherwise, you will get an error after going through this wizard.
Do not close the wizard and click the Windows Start button, type 'firewall' and click 'Windows Defender Firewall with Advanced Security' in the search results.
Step 14
Click on 'Inbound rules' and scroll down to the 'Secure Socket Tunneling Protocol (SSTP-in)'. This rule is probably already on. If not, right-click on the line and select 'Enable rule'.
There are several protocols you can use for a VPN server. For this tutorial, we choose the best of all worlds: a combination of security (256-bit encryption), stability and speed. The SSTP protocol using the HTTPS port 443 is the best fit, see this page for more information.

Step 15
Then close Windows Defender Firewall with Advanced Security and return to the 'Remote Access Server Setup Wizard' and click 'Next'.
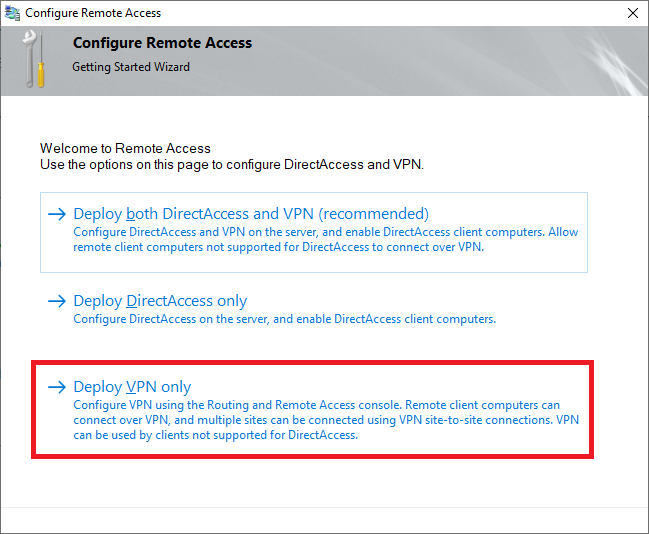
Step 16
Click on 'Deploy VPN only'.
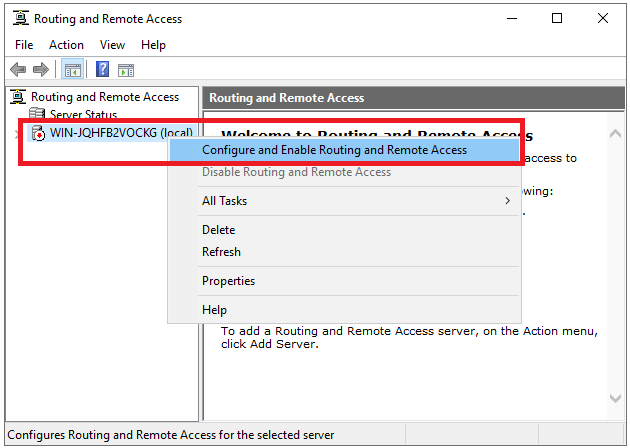
Step 17
The 'Routing and Remote Access Management Console' now opens. Right-click on the name of your VPS and click on 'Configure and Enable Routing and Remote Access'.
Step 18
Click on 'Custom configuration'> 'Next' in the Configuration screen. This gives you the option to specifically configure a VPN server instead of installing services that you don't need.

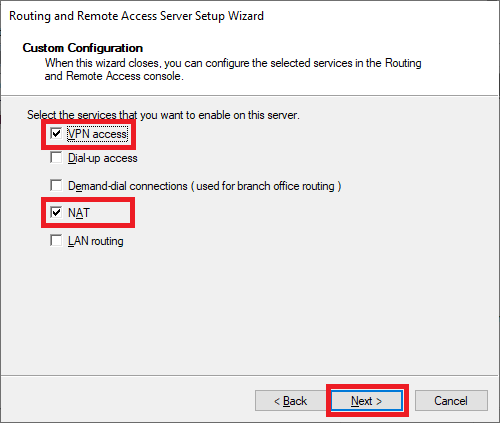
Step 19
Select 'VPN Access' and 'NAT' and click 'Next'.
Step 20
That brings you to the end of the configuration wizard. Click on 'Finish' to complete the configuration.
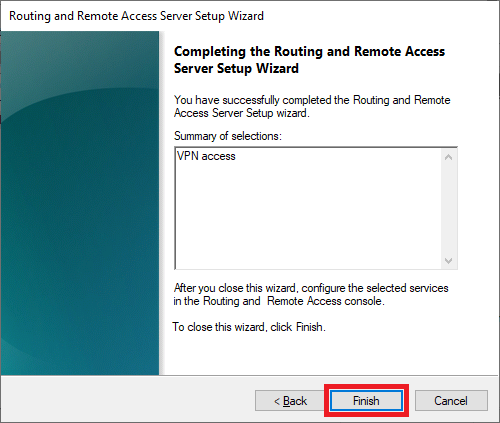
Finally, you will be given the option to start your VPN server. Click here on 'Start service'.

Step 21
You are now back in the 'Routing and Remote Access Management Console', see step 17. Right-click on your VPN server and then 'Properties'.
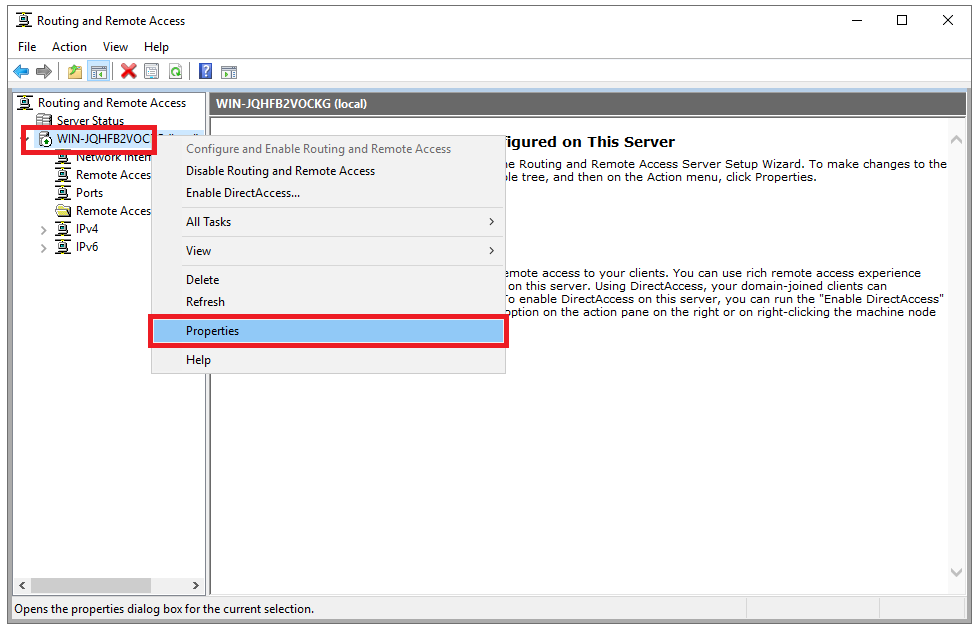
Step 22
Check both 'IPv4 Router' and 'IPv6 Router' with both the option 'LAN and demand-dial routing' and the options 'IPv4 Remote access server' and 'IPv6 Remote access server'.
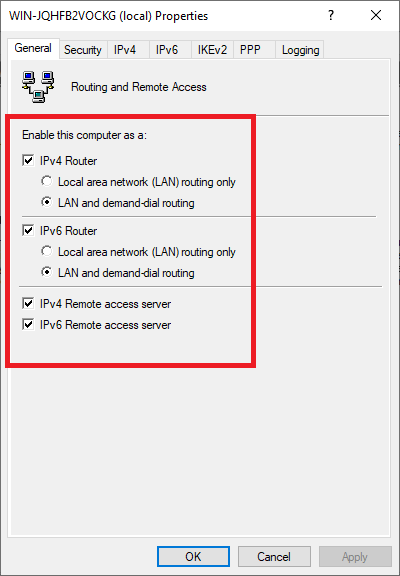
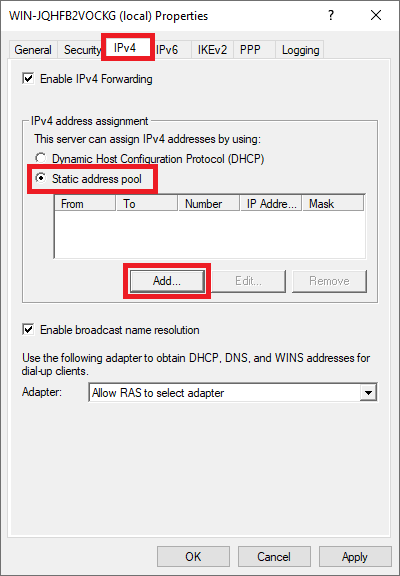
Then, click on the 'IPv4' tab and select 'Static address pool' > 'Add'.
Step 23
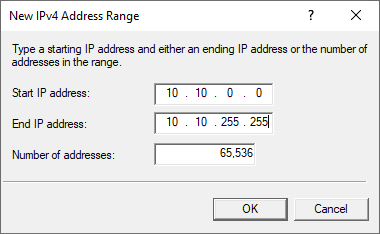
Enter the IP range for your VPN network, for example from 10.10.0.0 to 10.10.255.255 and click 'OK' (a smaller range is of course also possible, such as 10.10.10.0 to 10.10.10.255).
Step 24
You will now return to the screen from the previous step. Now click on the 'IPv6' tab and enter an IPv6 prefix assignment, for example, fe80: 7c8: 7c8: f866::
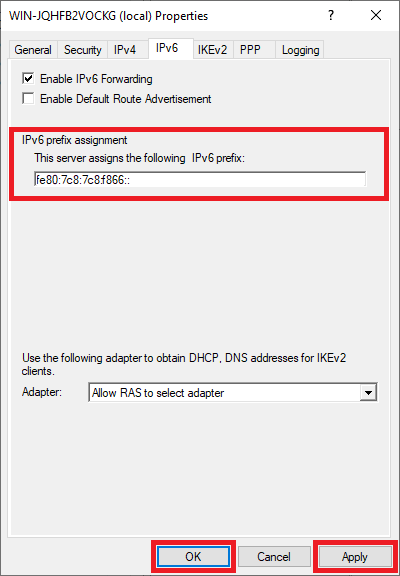
Then click 'Apply' and 'OK' to apply the changes.
You will probably now receive a message that RRAS (Routing and Remote Access) must restart. Allow this and after restarting proceed to the next step.
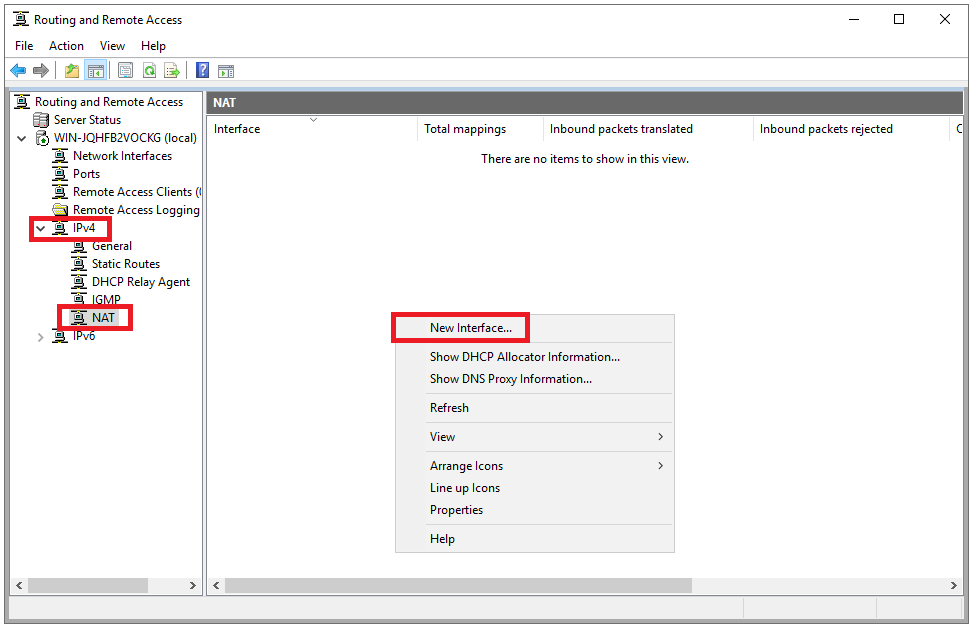
Step 25
Expand 'IPv4' and select 'NAT'. Then right-click on an empty spot on the right side of the screen and select 'New Interface ...'
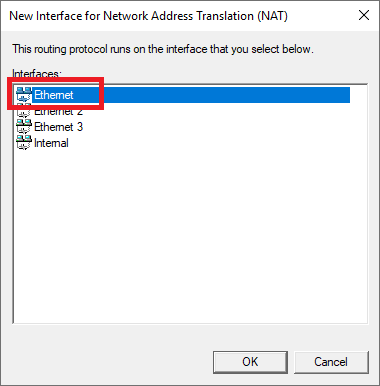
Step 26
Select 'Ethernet' as the interface for the routing protocol and click 'OK'.
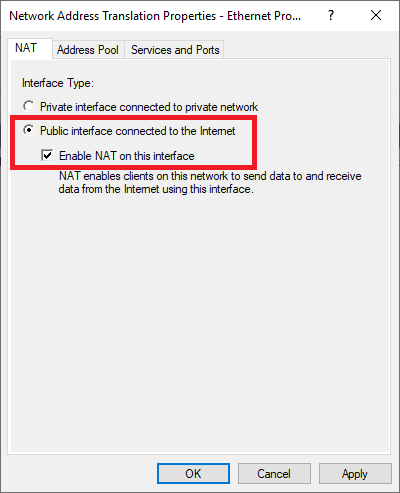
Step 27
Double click on 'Ethernet' and check 'Enable NAT on this interface'.
Step 28
Click on the 'Services and Ports' tab and check the options below one by one. When you click on them, a pop-up will appear with information about the service. Adjust the 'Private Address' value to 127.0.0.1 for:
- IP Security (IKE)
- IP Security (IKE NAT traversal)
- Remote Desktop
- Secure Web Server (HTTPS)
- VPN Gateway (L2TP / IPsec - running on this server)
- VPN Gateway (PPTP)
- Web Server (HTTP)
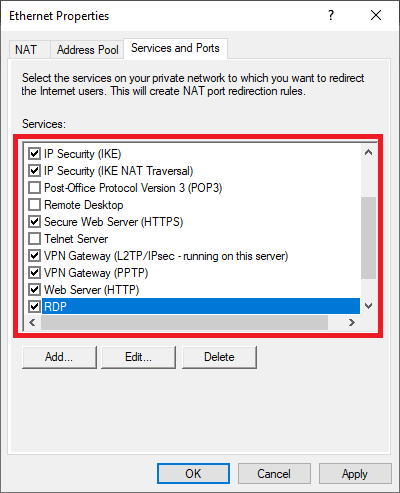
Do you use a custom port for Remote Desktop? Click on 'Add' and add a TCP line for the correct port and also use 127.0.0.1 as a Private address.
Finally, click on 'Apply' and 'OK'.
Step 29
You should now be prompted to restart RRAS. If not, right-click on your VPN server > 'all tasks' > 'restart' in the 'Routing and Remote Access console' to process the changes.

Your VPN server is now ready to accept VPN connections. Great! but what next? In the following sections, we explain how to authorize users, connect to your VPN server and what you can use it for.
Authorize users to connect to your VPN server
Step 1
Before a user can connect to your VPN server, that user must be authorized for Remote Access.
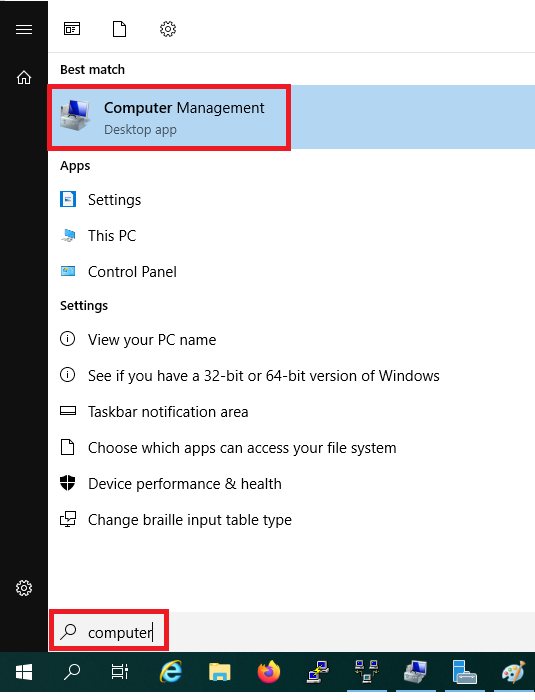
Not using Active Directory? Then click on the Windows start button, search for 'computer' and click on 'Computer Management' in the results.
Do you use an Active Directory? Then click on the Windows start button, search for 'group' and click on 'Group Policy Management' in the results.
Step 2
You are free to create a new user for your VPN connection or use an existing one. Click on 'Local Users and Groups' > 'Users'.
-
Existing user: Click on the name of the user
-
New user: Right-click on an empty piece and then 'New User'. Enter the name of the new user, optionally disable 'User must change password at next logon', and enter a password.
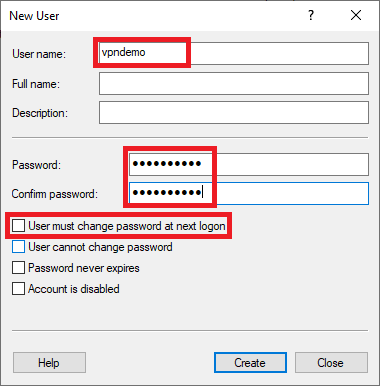
After creating the new user, close the 'New User' screen and double click on the name of the account.
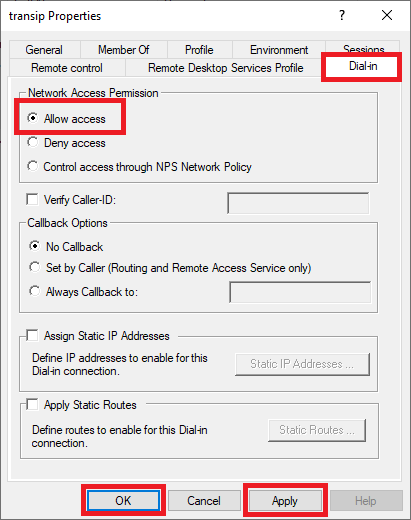
Step 3
Click on the 'Dial-in' tab, under 'Network Access Permission' check the option 'Allow access' and finally click 'Apply' and 'OK' to confirm your changes.
That's it! You can now connect to your VPN server. We explain how this works in the next section.
Connect to your VPN network
- This tutorial assumes a Windows computer/laptop. For MacOS, you can use this guide from Apple. To connect to your VPN server, enter the IP address of your VPS and as VPN type 'SSTP'.
- You go through the steps once per computer. You only need the last step to connect to your VPN server from now on.
Step 1
Now that your VPN server is ready and your user is authorized, it's time to connect to your VPN server. First, you need to add the VPN connection to your (client) computer/laptop once.
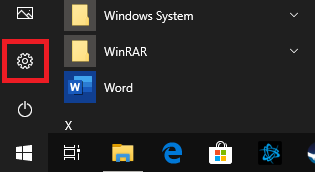
Click the Windows Start button and the Settings icon.
Step 2
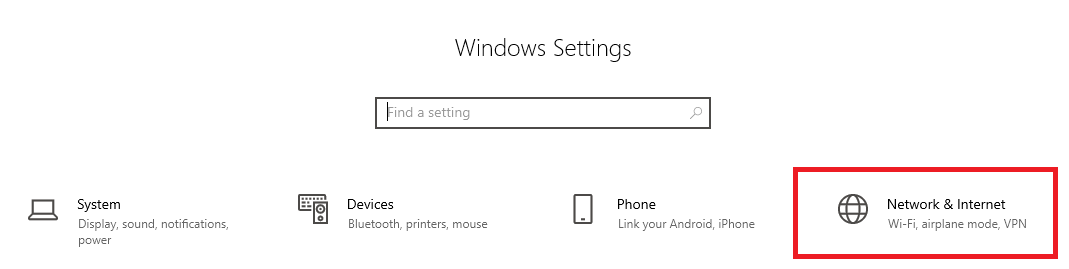
Then click on 'Network & Internet'.
Step 3
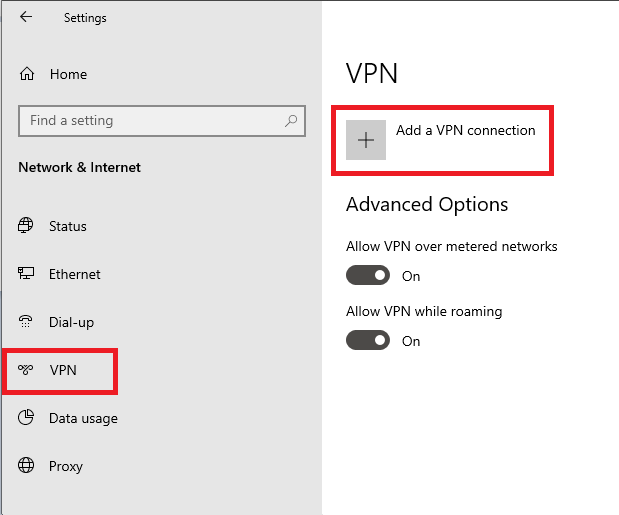
Click on 'VPN' on the left and then on 'Add a VPN connection'.
Step 4
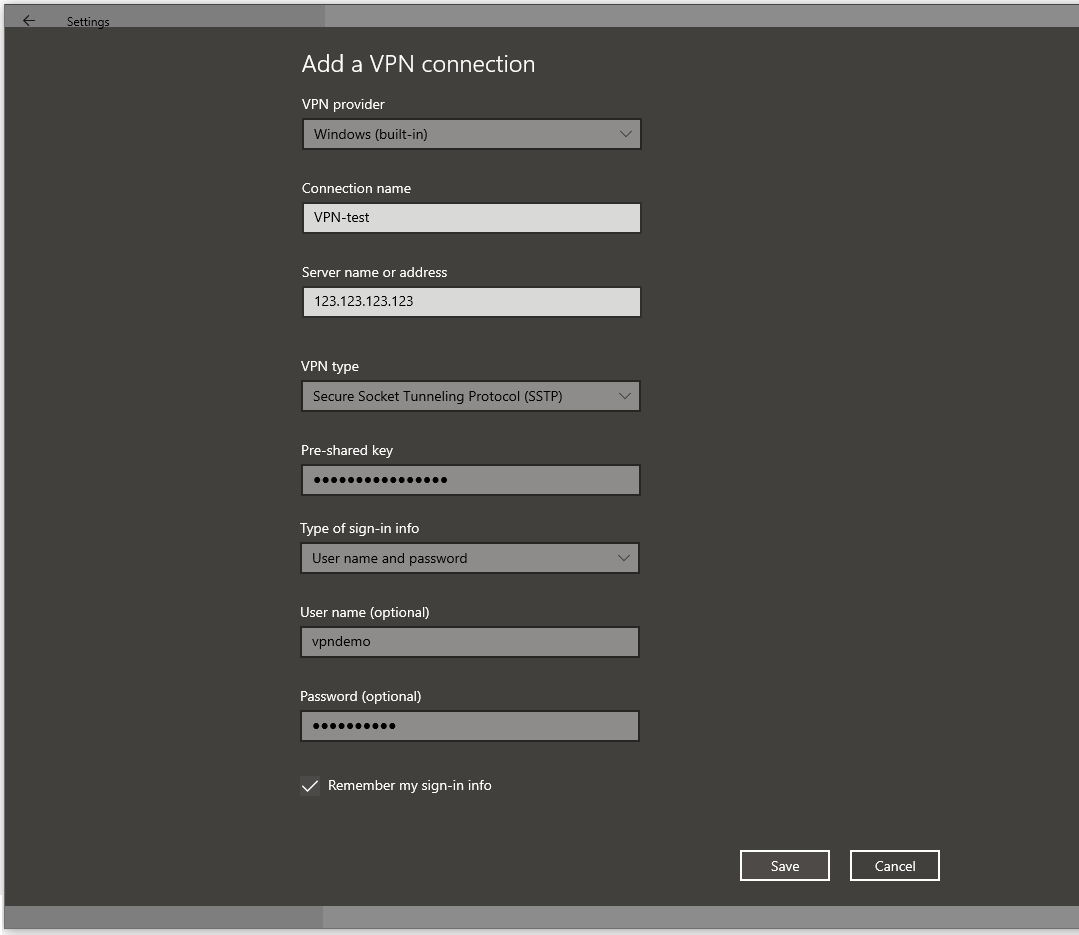
Enter the details on the 'Add a VPN connection' screen that appears. Mind the following:
- Select 'Windows (built-in)' as the VPN provider
- As 'Server name or address', use the IPv4 address of your server, or a domain name that refers to your VPS.
- Choose as VPN type: 'Secure Socket Tunneling Protocol (SSTP)'.
Step 5
All your internet traffic is standard over the VPN and uses the default gateway of the VPN server. This means that if you navigate on a client computer in a browser, you are using the connection of your VPS.
We assume in this tutorial that for your regular internet traffic you would like to use your own connection. You can achieve this by setting your own connection as the default gateway for your VPN as follows:
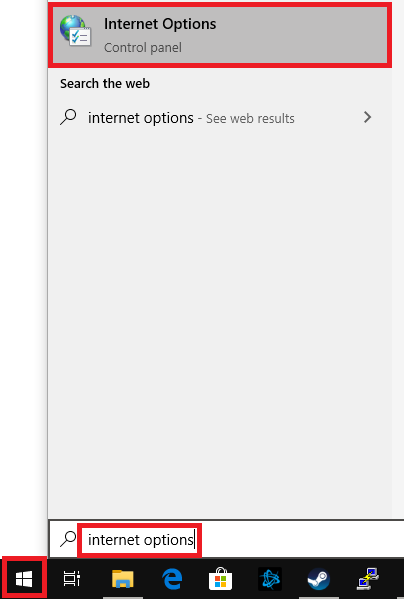
Click on the Windows Start button, type 'Internet Options' and click on the top result.
Step 6
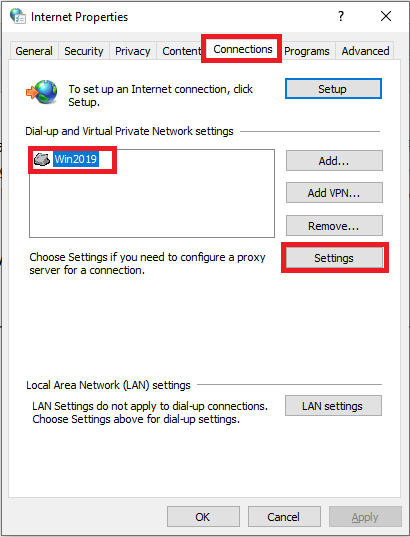
Go to the 'Connections' tab, select your VPN connection and click 'Settings'.
Step 7
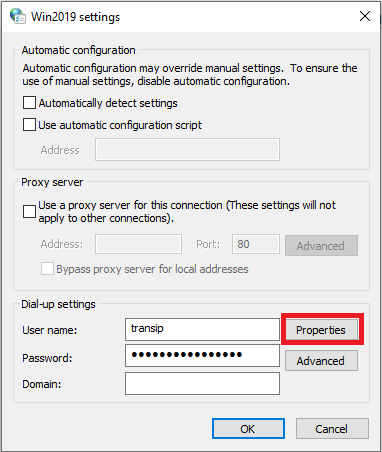
In the window that appears, click on 'Properties'.
Step 8
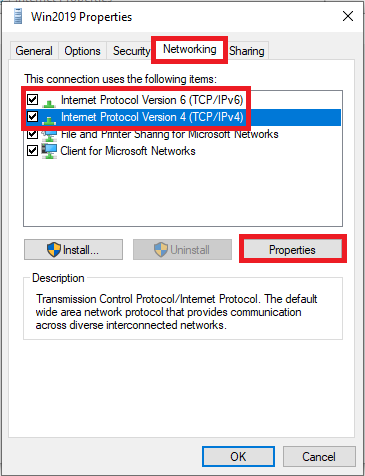
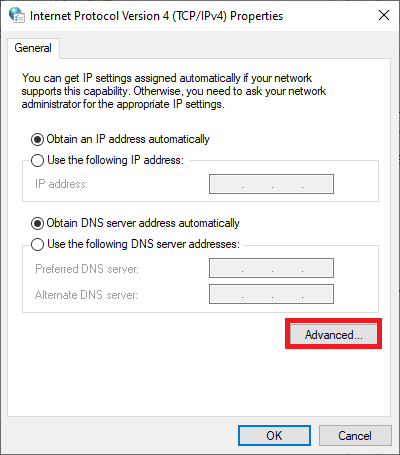
Go to the 'Networking' tab and select 'Internet Protocol Version 4 (TCP / IPv4)' followed by 'Properties'.
Step 9
Click on 'Advanced'.
Step 10
Uncheck 'Use default gateway on remote network' and click 'OK'.
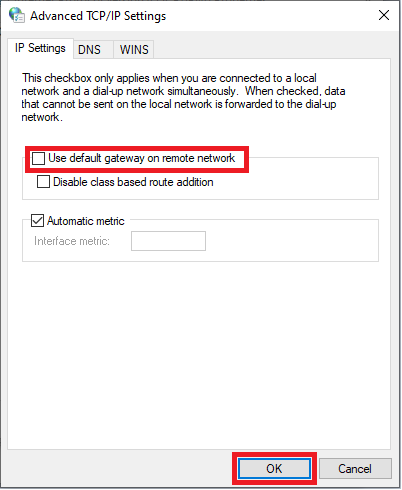
You will now return to the window from step 9. Click on 'OK' there as well and repeat steps 8 to 10, but then for 'Internet Protocol Version 6 (TCP / IPv6)'.
Then click 'OK' at each screen where you return until you return to the 'Internet Properties' screen from step 6 and click 'Apply' and 'OK' there.
Step 11
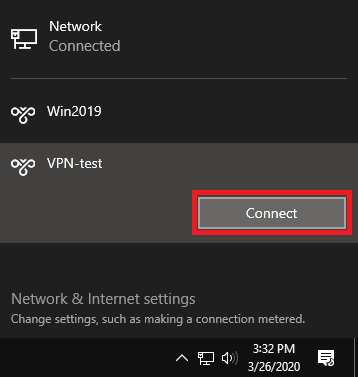
Finally, click on the network icon at the bottom right of your screen and click on the name of your VPN connection, followed by 'Connect'. From now on, this is the only step you need to go through to reconnect to your VPN server.
Use Cases
Now that your VPN connection is working, you may be wondering what you can do with it. A VPN connection is powerful in combination with a firewall. You can set a scope for a rule in most firewall software, for example in Windows Defender Firewall with Advanced Security, see for example our tutorial on changing the Remote Desktop port.
By only allowing the range or specific addresses of your VPN connection as Remote IP address in the scope of your firewall rule, you limit access to the associated service to those IP addresses. Some examples of applications are:
- Restrict access to the Remote Desktop port to the IP range of your VPN network (10.10.0.0/24 for example).
- Restrict access to a website that you host on a server in your VPN network. This is useful, for example, for an internal administration system that can be reached via a web interface/website. You achieve this by limiting access to ports 80 and 443 on the server hosting your website to the IP range of your VPN network.
- Restrict access to an SMB server by restricting access to port 445 on the SMB server to the IP range of your VPN network.
That brings us to the end of this tutorial for setting up a VPN server in Windows Server 2019.
If you have any questions regarding this article, please do not hesitate to contact our support department. You can reach them via the button 'Contact us' at the bottom of this page.