


Every modern Windows operating system comes with a handy built-in firewall called the 'Windows Defender Firewall'. This firewall is very useful and offers a wide range of options, including logging blocked connections and successful connections. Remarkably, these logging options are disabled by default.
In this guide, we show you how to enable logging in the Windows Defender Firewall and how to interpret the data.
Enable Windows Defender Firewall logging
Step 1
Connect to your Windows Server via Remote Desktop or the VPS console.
Step 2
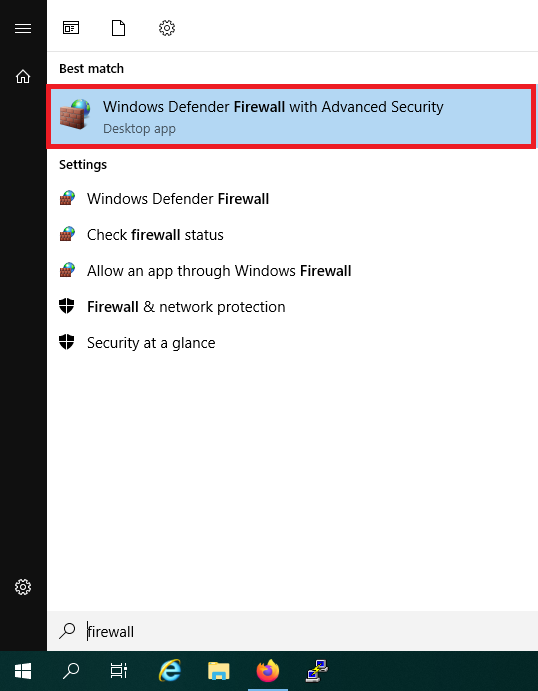
Click the Windows Start button, type 'firewall' and click 'Windows Defender Firewall with Advanced Security' in the search results.
Step 3
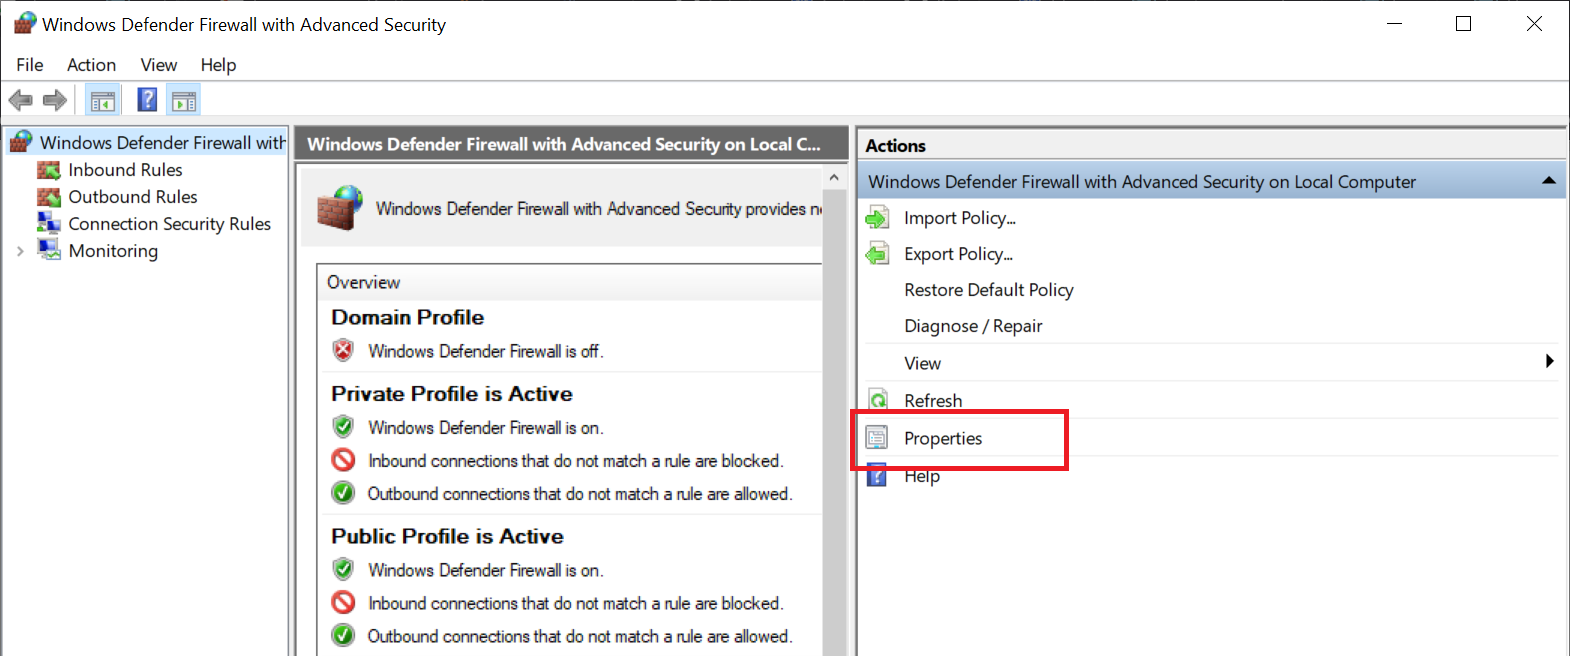
In the 'Windows Defender Firewall with Advanced Security' window, click 'Properties' on the right side.
Step 4
A new window opens where you first land on the 'Domain Profile' tab. Click 'Customize' in the block under 'Logging'.
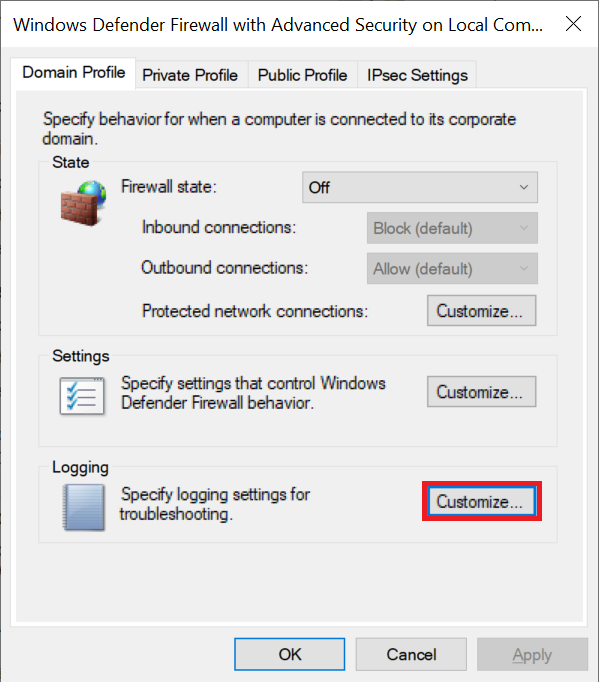
There are a few more options visible in the Domain Profile, Private Profile, and Public Profile tabs. You do not need to adjust these, but for completeness sake, here's what they're for:
- In this example, the 'Firewall state' is set to 'Off'. The VPS used for this guide is not part of a Windows Domain (Active Directory). When you add a VPS to a Windows Domain, the firewall for the Domain Profile is also activated.
We recommend keeping the state always 'On' under 'Private Profile' and 'Public Profile'. - By default, 'Inbound connections' are set to 'Block' and 'Outbound connections' to 'Allow' on all profiles.
- Under 'Protected network connections', you can adjust which network adapter the firewall applies to.
- We recommend not changing the settings under 'Settings' > 'Customize'. The option to receive a notification when an incoming connection is blocked would lead to a disruptive number of notifications.
Step 5
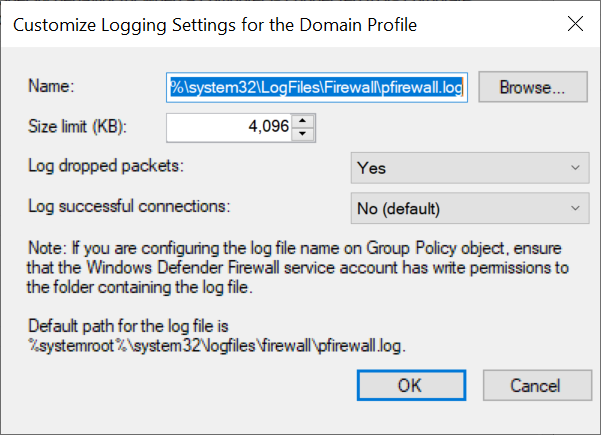
You can now enable logging and adjust the following associated options:
- Name: The name and location where the log file is saved. The default value is c:\Windows\system32\LogFiles\Firewall\pfirewall.log and does not need to be changed.
- Size limit (KB): The maximum size of the log file (default 4MB). Under normal circumstances, this is more than sufficient.
- Log dropped packets: This option determines whether a log entry is created when the firewall blocks traffic.
- Log successful connections: Determines whether successful connections should also be logged. We recommend disabling this option; it also logs successful outgoing traffic, which can cause a lot of clutter in your logs. If you need to know who logged in successfully, you can use the Windows Event Viewer.
Set the option 'Log dropped packets' to 'Yes' and click 'OK'.
Step 6
You return to the previous window and the 'Domain Profile' tab. Now click on the 'Private Profile' tab and repeat steps 4 & 5. Then click on the 'Public Profile' tab and repeat steps 4 & 5 again. You can now close all remaining Windows Firewall windows.
Step 7
Finally, restart your VPS. If you do not do this, there is a high chance that you will soon stop seeing updates in your log files due to a conflict with the 'Base Filtering Engine' service. Any missing log entries will be updated after a restart of your VPS or the Base Filtering Engine.
Interpreting Windows Firewall Log Data
The data from your Windows Firewall log file is relatively easy to interpret. When you open the file, you see what each line is composed of:
date time action protocol src-ip dst-ip src-port dst-port size tcpflags tcpsyn tcpack tcpwin icmptype icmpcode info path pid
- date: The date the Firewall event was logged
- time: The time the Firewall event occurred
- action: The action the Firewall took. If you follow this guide, this will generally always be 'DROP'. If you also log successful connections, you will see 'ALLOW' entries here as well.
- protocol: The protocol used, such as TCP, UDP, or ICMP.
- src-ip: The IP address from which the connection is established.
- dst-ip: The IP address being connected to, for 'DROP' entries, this is almost always your VPS's IP address.
- src-port: The port number from which the sending computer establishes a connection.
- dst-port: The port number the computer on src-ip is trying to connect to. Interestingly, if you change your Remote Desktop port, almost no attempts to connect to port 3389 are logged. A potential attacker will quickly realize there is no service active on that port and make no further attempts.
Note: All information under this point is almost always redundant for investigating security-related matters (perhaps with the exception of 'path' and 'pid').
- size: The size of the logged network packet in bytes.
- tcpflags: Data on any TCP control flags in TCP headers that are attached to the network traffic.
- tcpsyn: The TCP sequence number in the network packet.
- tcpack: Shows the TCP acknowledgment number in the packet.
- tcpwin: The TCP window size in bytes in the logged packet.
- icmptype: In the case of an ICMP message, the type is shown here (usually this field is empty).
- icmpcode: In the case of an ICMP message, the ICMP code is shown here (usually also empty).
- info: Can show additional information, but is usually an empty field.
- path: Shows the direction of the traffic SEND (outgoing network traffic), RECEIVE (incoming traffic), FORWARD (forwarded), and UNKNOWN (unknown).
- pid: Every process in Windows (and also Linux and MacOS) has a unique Process ID. The PID shows this unique Process ID.
Two examples:
2022-10-21 12:04:12 DROP TCP 123.123.123.123 111.222.333.444 63573 3389 52 S 2140869953 0 8192 - - - RECEIVE 4
2022-10-21 12:04:49 ALLOW UDP 111.222.333.444 239.255.255.250 61929 1900 0 - - - - - - - SEND 932
- We previously stated that the size, tcpflags, tcpsyn, tcpack, tcpwin, icmptype, icmpcode, and info flags are not relevant for security investigations. The still relevant fields are marked in bold and italic.
- In this example, we see a 'RECEIVE' and a 'SEND' path. This tells us at a glance that the first entry is incoming traffic and the second is outgoing.
- In the first entry, we see a blocked attempt (DROP) to connect to the Remote Desktop port 3389 from IP address 123.123.123.123. For security reasons, we recommend always changing your Remote Desktop port and only allowing your own IP addresses to connect to it.
- The second entry shows us that traffic is successfully (ALLOW) being sent from the VPS's IP address (123.123.123.123) to the IP address 239.255.255.250. In this case, it is innocent broadcast traffic. Unless you have a reason to suspect that attacks are being carried out from your VPS, you can safely ignore all 'SEND' messages (they are not visible by default unless you enable the 'Log successful connections' option in the first section).