This is the fifth part of our DirectAdmin Tutorial Series. If you're setting up a new VPS, we recommend starting with part 1.
Uploading your website to your VPS
In this chapter, we will show you how to upload your website to your VPS. To upload your site, you can use SFTP/FTPS or the DirectAdmin File Manager.
After reading the section on creating a database, use the following guides if you want to install WordPress, Joomla, or Drupal on your VPS with DirectAdmin. These guides can only be used after creating a database (see the explanation in this article)!
Creating and importing a database
Websites often use an SQL database. In this part, we will show you how to create a database (see further down in this article) and optionally import your existing database here. If your website doesn't use a database, you can skip ahead to chapter 6 to set up your email after uploading your website.
DirectAdmin uses phpMyAdmin for database management. Before you can use phpMyAdmin and import your database, you must first create a database.
Using SSL on your website
If your website processes sensitive customer data (for example, in an online store) or in light of GDPR regulations, it's important to secure your website with SSL. You can enable SSL after your website is online. DirectAdmin offers several SSL options, but we cover these:
- Use a custom SSL certificate
- Use a free Let's Encrypt/ZeroSSL certificate
In this article, we explain how to install your own SSL certificate or Let's Encrypt/ZeroSSL certificate in DirectAdmin.
SFTP/FTPS
Your DirectAdmin server is automatically configured to use SFTP and FTPS. You don't need to make any configuration changes and can start using FTPS right away. If you encounter any issues, check if port 22 (SFTP) or port 21 (FTPS) is open in your firewall (they are open by default).
FTPS is more secure than FTP and uses an SSL connection. DirectAdmin automatically uses self-signed certificates for this FTPS connection. For more information about FTP, FTPS, SFTP, and related terms, see our article on the differences between FTP, FTPS, and SFTP.
In step 2, you may see a warning. It's advisable to first follow the steps in this article to link an SSL certificate to
Step 1
You can use SFTP/FTPS out-of-the-box with DirectAdmin for your 'admin' account. For resellers and users, it depends on whether you allowed SSH access (SFTP) and/or FTP access when creating a user package in part 1. If not, use the DirectAdmin File Manager.
In this guide, we use the program FileZilla and recommend using FileZilla to follow these steps one-on-one.
Start FileZilla and click on 'File' > 'Site Manager' > 'New Site', then enter the details as shown in the example below and click on 'Connect'.

- Host: This is your domain name. In the example above, it is example.com.
- Port: Use port 21. DirectAdmin is configured to use FTPS on port 21. For SFTP, use port 22.
- Protocol: Select ‘FTP - File Transfer Protocol’ for FTPS or ‘SFTP - SSH file transfer protocol’ for SFTP.
- Encryption: Change this option to 'Require explicit FTP over TLS' for optimal security.
- Logon Type: Change 'Logon Type' to 'Normal'. This indicates that a username and password are required to connect to your VPS via FTPS.
- User: The username you created in step 3, or your 'admin' user. In this case, simply enter 'admin' as the name under 'User'.
- Password: Enter the password for the relevant user. For the 'admin' user, this is the password sent in the delivery email, which you also use to log in to DirectAdmin as admin.
Step 2
You may see a message like the one in the screenshot below. In this example, it's a warning you might see when connecting directly via an IP address or hostname without linking an SSL certificate (as mentioned in the introduction of this article).
FileZilla expects the actual hostname of your VPS under 'Host' with an associated SSL certificate.

Click on 'ok', or first link an SSL certificate to your server and repeat step 1.
Step 3
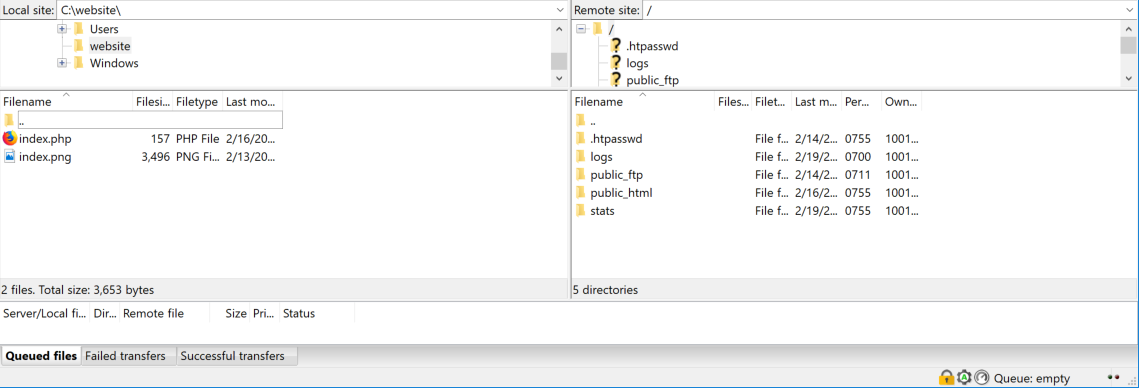
In FileZilla, navigate to the folder on your computer where your website is stored under 'Local site' and double-click 'public_html' under 'Remote site'. Then select the files and folders on your computer (on the left side of the screen) that you want to upload to your website and drag them to the public_html folder on the right.

Your website is now online! If your website doesn't need a database, it will be visible online immediately.
The DirectAdmin File Manager
With the DirectAdmin File Manager, you can upload files directly to your website from your browser, such as Chrome or Safari. It offers an alternative to SFTP/FTPS with two advantages: you don’t need to grant access via SSH or FTP, and no additional software is required.
Step 1
Log in to DirectAdmin with the account that owns the domain, and click on ‘System Info & Files’ > ‘File Manager’ in the left menu.
Do you only host one domain? Then click on 'public_html' in the left menu and proceed to Step 3.

Step 2
You will now see an overview of the folders and files. Click on ‘Domains’ > the desired domain > public_html in the left menu, or double-click the same folders under ‘My Files’ on the right.

Step 3
On a new VPS, you'll see an index.html file and a cgi-bin folder. These are placeholders, and you're free to delete or overwrite them. With one click, select a file, then click on the ‘…’ button at the top right > ’remove'.
Then, click on the plus icon on the left.

Step 4
Click on 'Upload Files' to select files from your disk to upload, or open Windows Explorer/Finder next to your browser and drag the files directly into your browser.

Then click the ‘upload’ button to upload the files. They are now live on your website!

Creating an SQL database
In the steps below, you will create an SQL database. Most dynamic websites (e.g., WordPress) use a database, for example, to store customer or website data.
Step 1
Log in to DirectAdmin as the user for whom you want to create the database and click on ‘Account Management’ > 'Databases'.

Step 2
Enter a name for the database you want to create. The ‘<username>_’ prefix is not optional. You can click on ‘Advanced mode’ to adjust the associated username and password. Then click on ‘Create’.

You will immediately see a confirmation with the username and password for the database. These are shown only once.

Importing your database
Do you have an existing website that you want to host on your VPS? Then you likely have an associated database. The steps below will show you how to import your existing database.
Step 1
Now that you've created a database in the previous section, you can import your existing database. Return to 'User Level' and click on 'Extra Features' > 'phpMyAdmin'.

Step 2
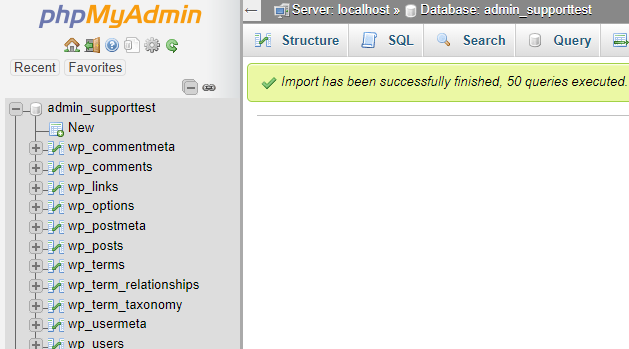
You will automatically land on the main phpMyAdmin screen. Click on the name of your database at the top left and then click on 'Import'. In the example below, this is 'admin_supporttest'.

Step 4
Click on 'Browse' and select your database export on your computer. Adjust the available options as desired or click directly on ‘Import’.
Typically, it is not necessary to adjust the options unless you want to import only part of your database or used a different character set than UTF-8 for your original database.

You will see a success message, and the tables within your database will immediately appear in the left-hand overview.

Note: If your site uses a database, don't forget to check the configuration file on your site to ensure the correct database name, user, server, and corresponding password are set.
In the setup used for this guide, it would look like this:
$servername = "localhost";
$username = "username";
$password = "**********";
$db = "username_demo";
Adjusting the PHP version per domain
In part 3 of this tutorial series, you installed two different versions of PHP. Per domain, you can adjust which version you use by following the steps below.
Step 1
Log in to DirectAdmin as a user (or click on the ‘User' tab in the left menu if you are logged in as admin) and click on ‘Account Manager’ > ‘Domain Setup’ > the desired domain.

Step 2
Click on 'PHP Version Selector' at the top right. Tip: A little further up, you can switch domains if desired.

Step 3
Adjust the PHP version as desired and click on 'Save' to save the change.

Your website is now accessible to the entire world! Proceed to the next part 'Part 6: Creating and using email addresses' to create email addresses for your domain and find your domain's email settings, or proceed to Part 7: Additional articles and other questions if you're not using email for your domain.
Should you have any questions after reading this article, don't hesitate to contact our support department. You can reach them via the 'Contact Us' button at the bottom of this page.
Want to discuss this article with other users? Feel free to leave a message under 'Comments'.


