


Kubernetes, also known as K8s, is an open-source system for automating deployment, scaling, and management of containerized applications.
In this Kubernetes quickstart tutorial, we show you how to get started with Kubernetes: where to place your kubeconfig file and how to use Kubectl to connect to and check the status of your Kubernetes cluster.
Before following this tutorial, install Kubectl on your computer or laptop, see our Kubectl installation guide.
Connecting to your Kubernetes cluster from Windows
To connect to your Kubernetes cluster, you need the Kubeconfig data that you downloaded in the previous section. In this section, we show you where to place this configuration and how to test the reachability of your Kubernetes cluster.
Step 1
Open the command prompt CMD by clicking the Window Start button, searching for 'CMD', and clicking on the result.
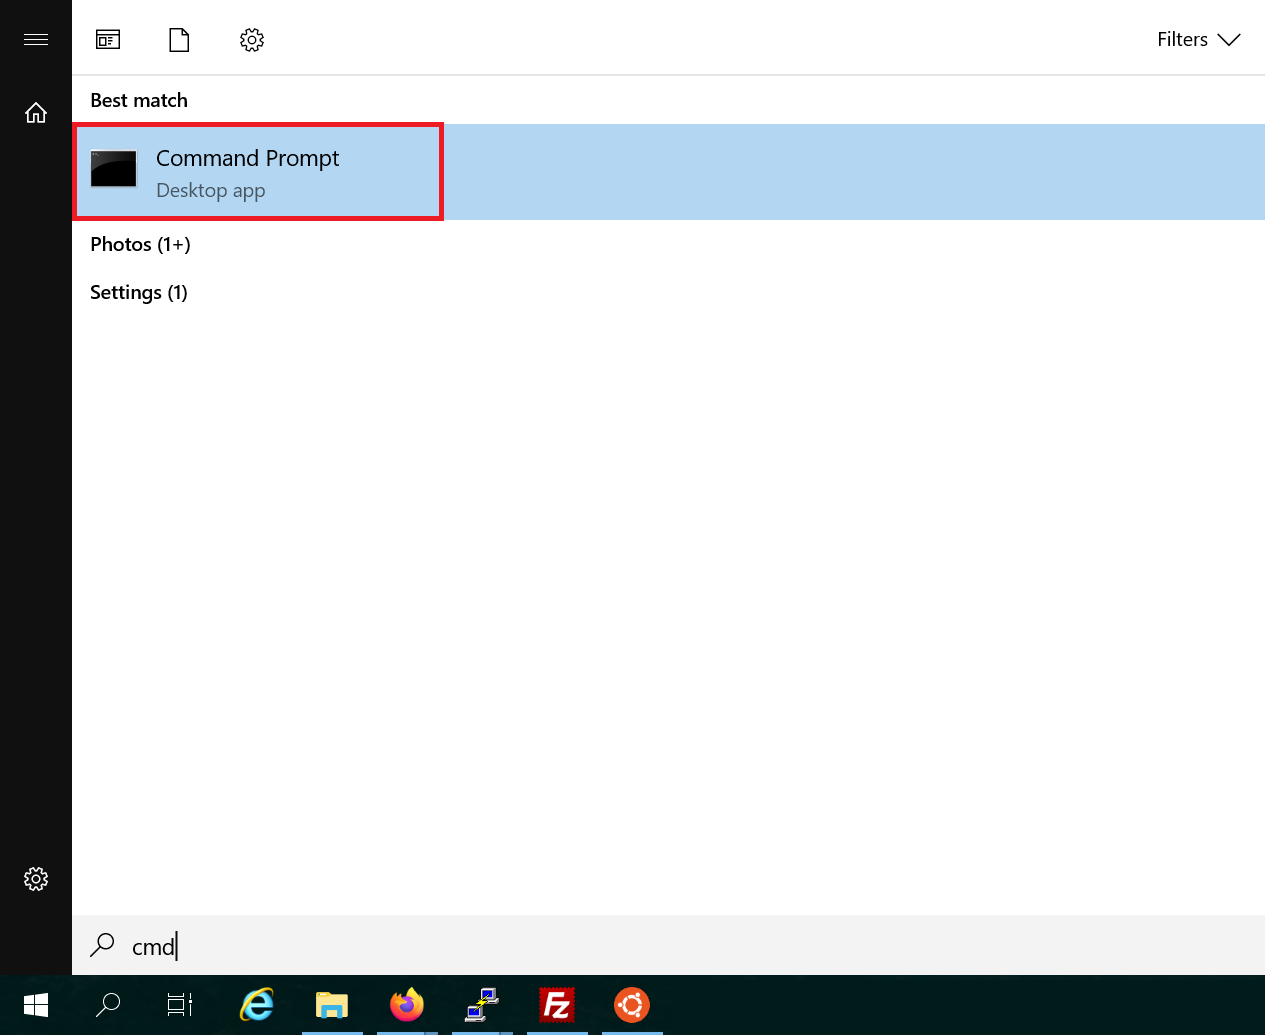
Step 2
The directory where your configuration is stored probably does not exist yet. Create it using the following commands:
cd %USERPROFILE%
mkdir .kube
cd .kube
- The cd commands respectively place you in the %USERPROFILE% directory (e.g., c:\users\user) and the .kube directory within that %USERPROFILE% directory.
- The mkdir command creates a directory.
Step 3
Do not close the command prompt yet; you will need it again in step 4.
After ordering your Kubernetes cluster, you will receive an email with a link to the overview of your Kubernetes cluster in the (new) TransIP control panel.
Open the email and click on the link.
You will now be in the TransIP control panel and see an overview as shown in the example below.
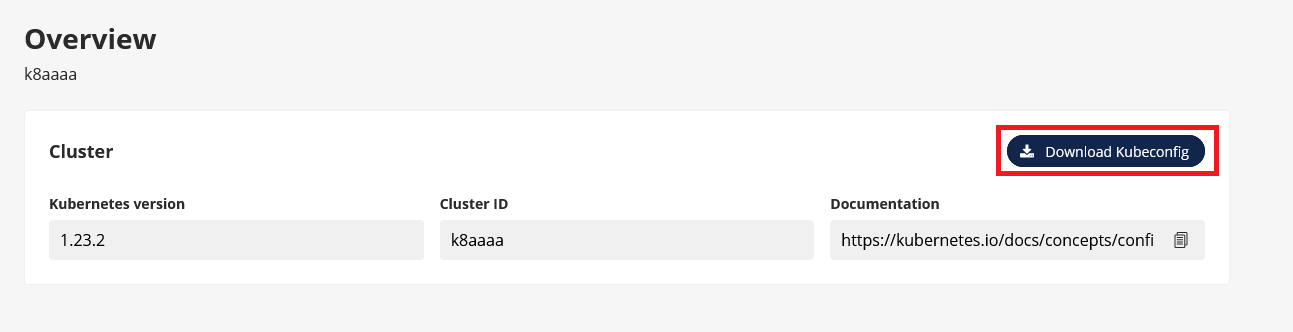
Click on 'Download Kubeconfig' to download your Kubeconfig file to the directory you created in step 2 (e.g., c:\username.kube).
After downloading the file, go to the directory you saved it to in Windows explorer. Rename the file so that it no longer has an extension and is only called 'config'.
Do you not see the extensions of files in your Windows explorer? Navigate to the 'View' tab and make sure the option 'File name extensions' is selected.
The 'Cluster ID' is also the name of your Kubernetes cluster. You can find your cluster under this name in the overview of your products and when using our API.
Step 4
Go back to the command prompt and test the reachability of your Kubernetes cluster with the following command:
kubectl get nodes
You will now see an output that looks like:
NAME STATUS ROLES AGE VERSION
299eb31a-74a0-405a-8478-4b3c351b838d Ready <none> 13d v1.23.2
849d476c-cf61-4e57-b364-2ef30a462397 Ready <none> 13d v1.23.2
d7ea2186-c226-4111-af30-048c439c778b Ready <none> 13d v1.23.2
Congratulations! You can now proceed with your Kubernetes cluster. Below are some useful guides to get started with Kubernetes:
- Is Kubernetes new to you? Take a look at our 'Deploy a hello node' tutorial. Here we show you how to deploy a simple test node and expose it via a load balancer service.
- For deploying your application, you can use several options:
- Also, take a look at the overview of our Kubernetes documentation.
Also, take a look at the Kubernetes website for a comprehensive cheatsheet of available commands for Kubectl.
Connect to your Kubernetes cluster from Linux/MacOS
To connect to your Kubernetes cluster, you will need the Kubeconfig data that you downloaded in the previous section. In this section, we will show you where to place this configuration and how to test the accessibility of your Kubernetes cluster.
Step 1
First, open a Terminal. The directory where your configuration will be stored most likely does not exist yet. Create it and adjust the permissions with the following commands:
mkdir ~/.kube
chmod 644 ~/.kube
The first command creates the .kube directory in your home folder if it does not exist yet. The second command copies the config file that you downloaded to this directory. The last command changes the owner of the config file to your user account.
Step 2
Do not close the terminal yet, you will need it again for Step 3.
After ordering your Kubernetes cluster, you will receive an email containing a link to the overview of your Kubernetes cluster in the (new) TransIP control panel.
Open the email and click on the link.
You will now be in the TransIP control panel and see an overview like the example below.
Click on 'Download Kubeconfig' to download your Kubeconfig file (this file is called 'config' and has no extension) to the directory that you created in Step 1 (for example, ~/.kube).
The 'Cluster ID' is also the name of your Kubernetes cluster. You can find your cluster under this name in the overview of your products and when using our API.
Step 3
Go back to the terminal and test the accessibility of your Kubernetes cluster with the following command:
kubectl get nodes
You will now see an output that looks like:
NAME STATUS ROLES AGE VERSION
299eb31a-74a0-405a-8478-4b3c351b838d Ready <none> 13d v1.23.2
849d476c-cf61-4e57-b364-2ef30a462397 Ready <none> 13d v1.23.2
d7ea2186-c226-4111-af30-048c439c778b Ready <none> 13d v1.23.2
Congratulations! You can now proceed to work with your Kubernetes cluster. Below you will find some useful guides to get started with Kubernetes:
- Is Kubernetes new to you? Take a look at our 'Deploy a hello node' tutorial. Here we show you how to deploy a simple test node and expose it via a load balancer service.
- For almost every use case the use of SSL is highly recommended. For this, various options are available but perhaps the most popular one, which we also recommend, is a combination of:
- For deploying your application, you can use several options:
- Also, take a look at the overview of our Kubernetes documentation.
Also, take a look at the Kubernetes website for a comprehensive cheatsheet of available commands for Kubectl.