A subdomain is a separate part of your domain and is most often used to host a website affiliated to your main website.
This article shows the different uses of subdomains and explains how to create subdomains on your Pro or Max web hosting package at TransIP.
If you do not want to host a separate website on a subdomain, but only want to redirect visitors to your main website, you can add the subdomain as an alias on any web hosting package.
The different uses of subdomains
There are many ways to use a subdomain. Below you can find some of the most popular applications.
Use a subdomain to host a webshop
Redirect visitors to a website based on their device
Subdomains can also be used to redirect visitors to a different view of your website, based on the device they use to visit your website.
For instance, when visiting yourwebsite.com, desktop users will stay on yourwebsite.com, while mobile users can be redirected to m.yourwebsite.com. The website on m.yourwebsite.com can then be configured to be fully responsive for mobile visitors, as it is a different address than the main website.
Direct your visitors based on their location or language
Using subdomains is a solid way to redirect visitors based on their location or language.
For instance, you can let your website check the area of your visitor and direct them to a subdomain specifically tailored to (the language of) that region. For instance, you could identify French speaking visitors and redirect them to the French version of your website located on fr.yourwebsite.com.
As you can see there are many uses for subdomains. Take note that we do not offer direct support on these applications. A lot of information can be found online; if you wish to configure a subdomain in any of the ways mentioned above, please consult the online documentation for these applications.
Creating a subdomain on your web hosting package
When you own a web hosting package Pro or Max, you can create a subdomain with just a few easy steps. Once the subdomain is created, you can directly create a website for it.
Step 1
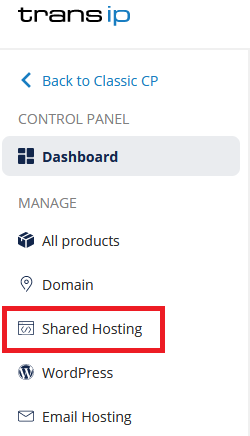
Log in to the control panel and click 'Shared Hosting' in the menu. Next, select your domain below 'Products'.

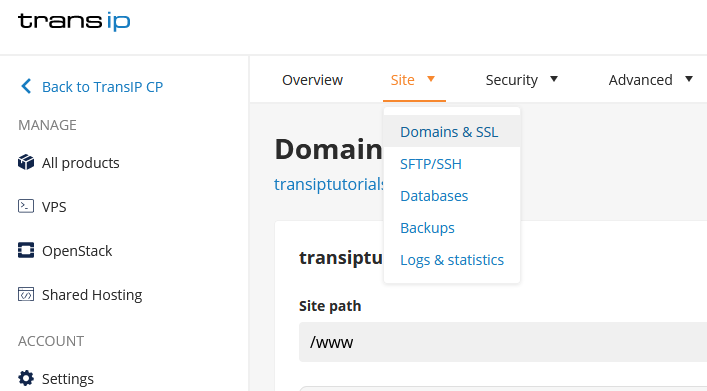
At the top of the page, click the 'Site' tab, followed by 'Domains & SSL'.

Step 2
Here you can create subsites (these can be subdomains or a different domain) for your Pro or Max webhostig package. Create your subdomain by clicking on '+ Add website' next to 'Websites' on the right side of the screen.

Step 3
Select the domain name to which you want to add a subdomain and click ‘Next’.

First select that you want to ‘Use a subdomain’. If you want to add the subdomain 'blog' to your domain yourdomainname.com, enter blog next to yourdomainname.com under 'Domain name'.

What you enter below 'Path creation' determines in which folder the website files for the created subdomain will be placed. For ease of file management, we recommend leaving 'Use generated path' enabled. This means a folder called 'subdomain.domainname.com' will be created in your 'subsites' folder.
In our example we created the subdomain ‘blog.transiptutorials.com’. The path will automatically be '/subsites/blog.transiptutorials.com' below 'Path'. Click 'Save' to create your subdomain.
Manage your subdomain with SFTP
After creating your subdomain, you can use SFTP to add the files of your subdomain's website.
You can add files via 'File manager' in your control panel or by using SFTP software like Filezilla or Cyberduck.
By using one of the methods mentioned above, you will find the newly created subdomain in the folder 'Subsites'. Files uploaded to that folder will be visible when visiting the actual subdomain.
Seperate folders uploaded to the folder of your subdomain will also become visible when visiting the subdomain. For instance, if you've uploaded the folder 'books' to the subdomain folder 'shop', you can reach that page by going to shop.yourwebsite.com/books/.
Check your DNS settings
Once you've created a subdomain and uploaded your website files to it, be sure to check if the website is visible on that subdomain. If that's not the case, we recommend checking your domain name's DNS settings.
If your domain name uses the web hosting package's DNS settings, the subdomain will become active within 24 hours.
In case you've added DNS records to your domain name, you may have to add a seperate DNS record for the subdomain. Use the following DNS record to activate it:
- Name: subdomain
- Type: A
- Value: IP address of your web hosting package
You can find the IP address by going to the 'Domains & SSL' overview and clicking the three dots next to your created subdomain followed by 'Show IP addresses'.

Use the article 'The DNS settings of my web hosting package' to read more on the DNS records of your web hosting package.
Use the article 'Changing DNS and nameservers via the control panel' to read how to configure DNS records for your domain name.
Do you want to delete a subdomain? You can do so by clicking the three dots next to your subdomain, followed by 'Delete website'.
Take note: This will not delete the folder that was created for your website's from the file manager.


