


A Remote Desktop (RD) Gateway is an additional layer of security for using Remote Desktop servers. An RD Gateway occupies a space between the user and the remote desktop servers and allows you to connect to Remote Desktop servers over HTTPS using a secure TLS connection.
You can compare RD Gateways to a VPN connection: you connect from your computer or laptop to a Remote Desktop Gateway before you can connect to a Remote Desktop Server (this happens automatically when connecting to the RD Session Host).
In this tutorial, we will show you how to configure and use a Remote Desktop Gateway in the following steps.
- Installing the Remote Desktop Gateway role
- Configuring/renewing an SSL Certificate
- Setting RD CAP and RD RAP policies
- Firewall Settings
- Using an RD Gateway
- Monitoring RD Connections
- Use a different server than your RD Session Host to install the RD Gateway role on. More information about which role to install to which server in a Remote Desktop Services Deployment can be found in this article.
- Create a group within your Active Directory, for example 'RDS Users', to which you add authorized Remote Desktop Users.
Installing the Remote Desktop Gateway role
There are several options available for adding the Remote Desktop Gateway role to a Windows Server, of which we will show the two most commonly used (and logical):
- Adding the RD Gateway through a server pool
- Installing the RD Gateway role directly on the Windows Server that will serve as the Gateway
Installation through a server pool
For the steps via this method, it is important that you manage your Windows servers through a server pool. This makes it easier to manage roles and features on multiple Windows Servers. In this tutorial, you can read how to add Windows Servers to a server pool.
Step 1
Connect via Remote Desktop or the VPS console to the Windows Server on which you manage your server pool.
Step 2
Click the Windows Start button and then click 'Server Manager'.
Step 3
In the left menu, click 'Remote Desktop Services' > 'Overview' and then click 'RD Gateway'.

Step 4
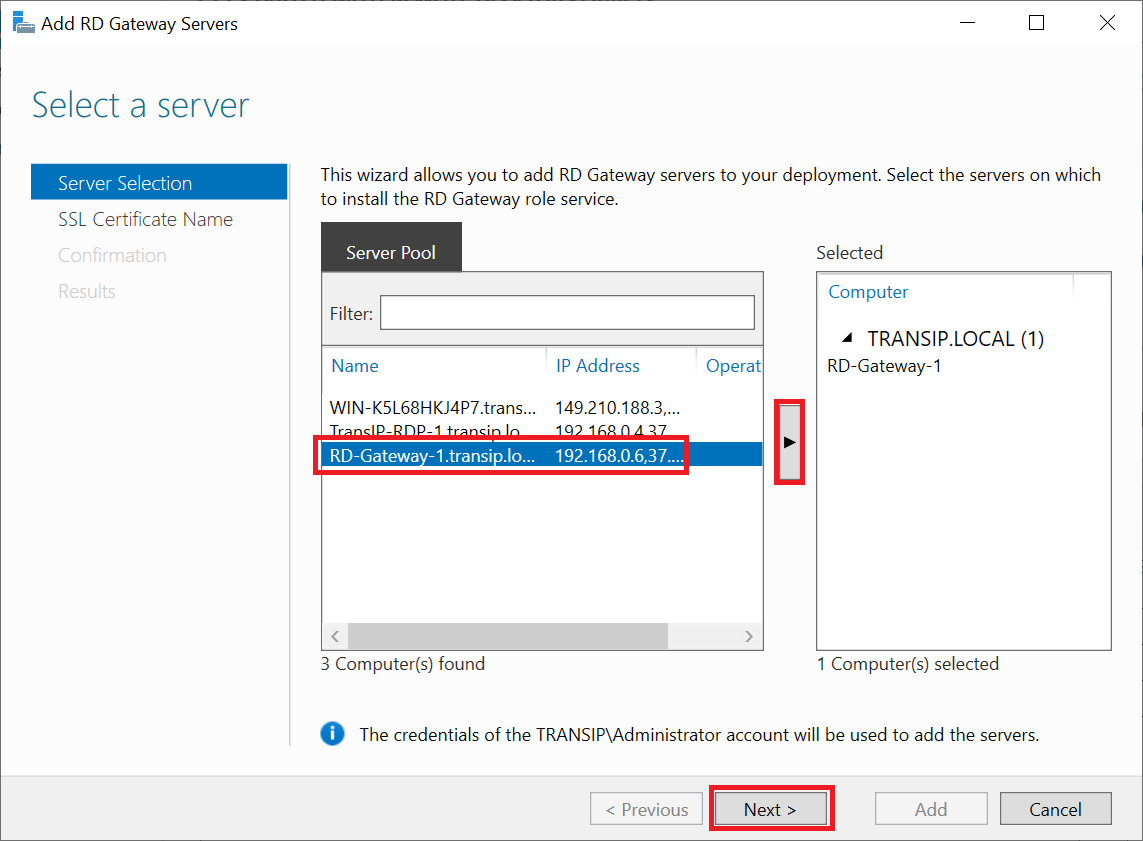
In your server pool, select the VPS you want to use as Remote Desktop Gateway. If you set up a larger Windows domain with multiple RD Gateways, select all servers that you want to deploy as RD Gateway. After making a selection, click 'Next'.
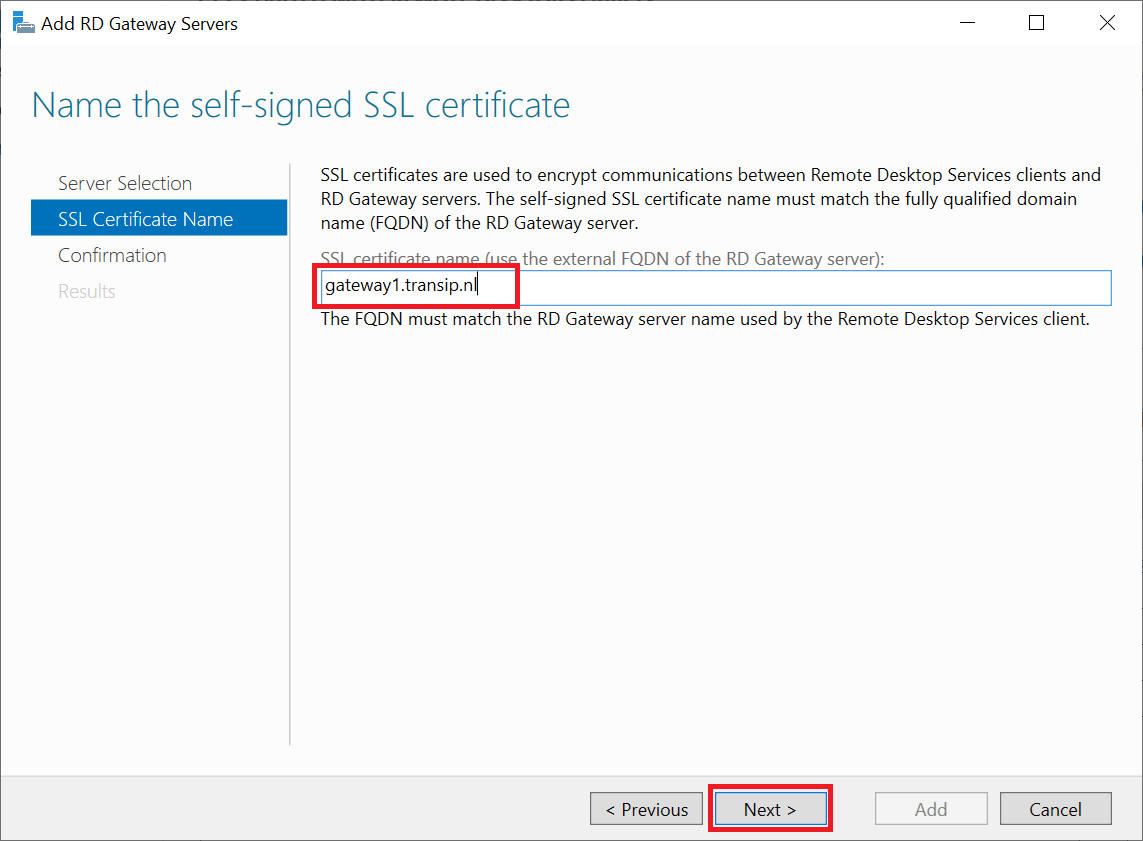
The wizard automatically associates a self-signed SSL certificate with the RD Gateway. Do not use a self-signed certificate for a production environment. Later in this manual, we'll show you how to replace the self-signed certificate with your own SSL certificate.
Enter a name for the self-signed certificate and click 'Next'. The name must be a (sub)domain name whose DNS points to the RD Gateway.
Step 6
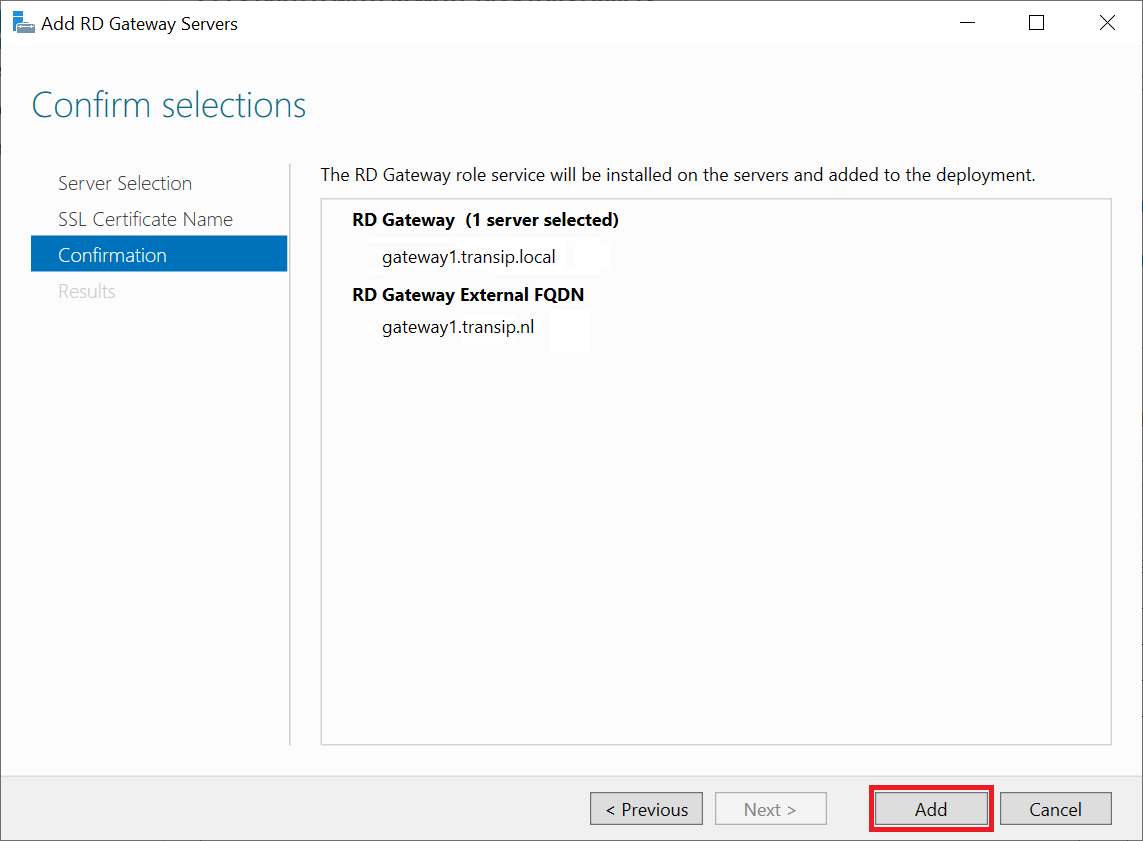
You will now see a confirmation of the installation. Click 'Add' to start the installation.
Step 7
After installation you will see a warning that the SSL certificate needs to be configured. We do not do this from this wizard but through the method which you will also use to replace certificates in the future when they expire. Click 'Close' to close the wizard.
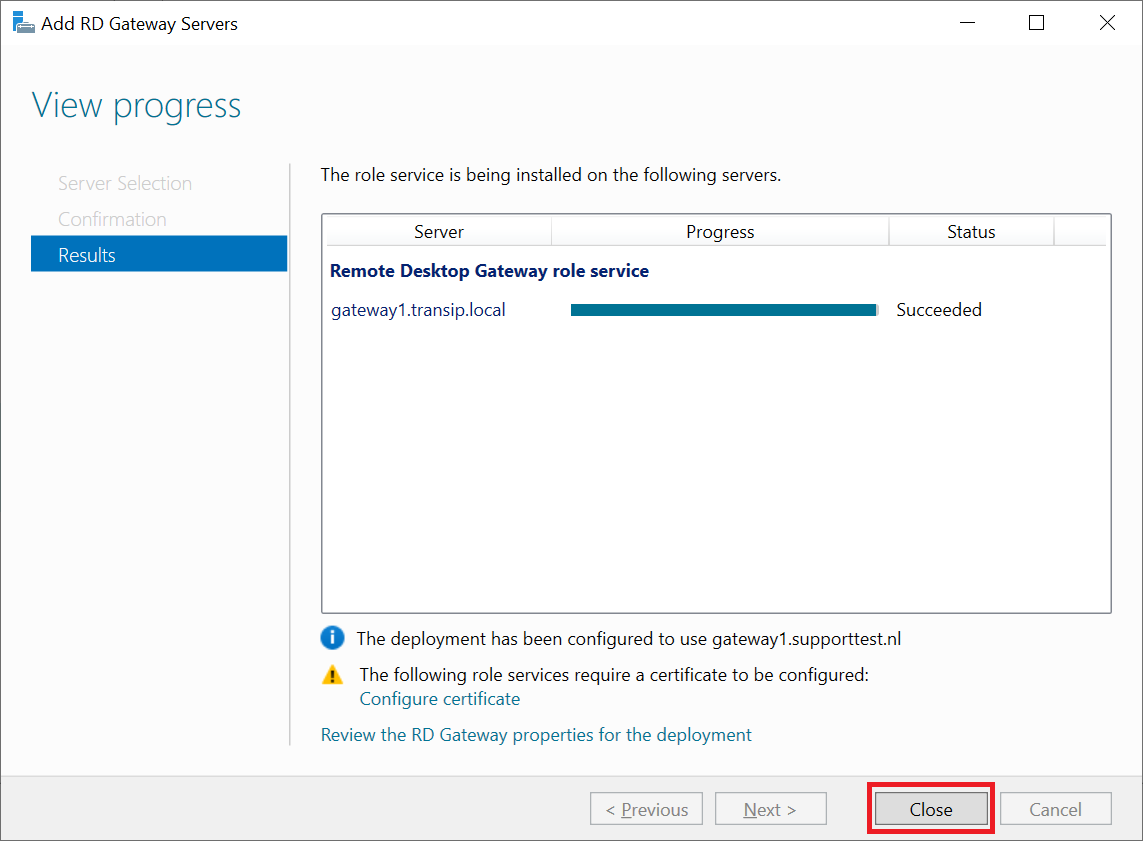
Please note: The step 'SSL Certificate Name' has disappeared in the screenshot. This was due to a spontaneous network error that prevented the wizard from completing. We were unable to reproduce this issue, but if you run into a problem here as well, please restart the Remote Desktop Gateway and then go through these steps again.
Now proceed to the next section 'Configuring/Renewing an SSL Certificate'.
Step 1
Connect to the Windows Server you will be using as RD Gateway via Remote Desktop or the VPS console.
Step 2
Click the Windows Start button and then click 'Server Manager'.
Step 3
Then click 'Add roles and features'.

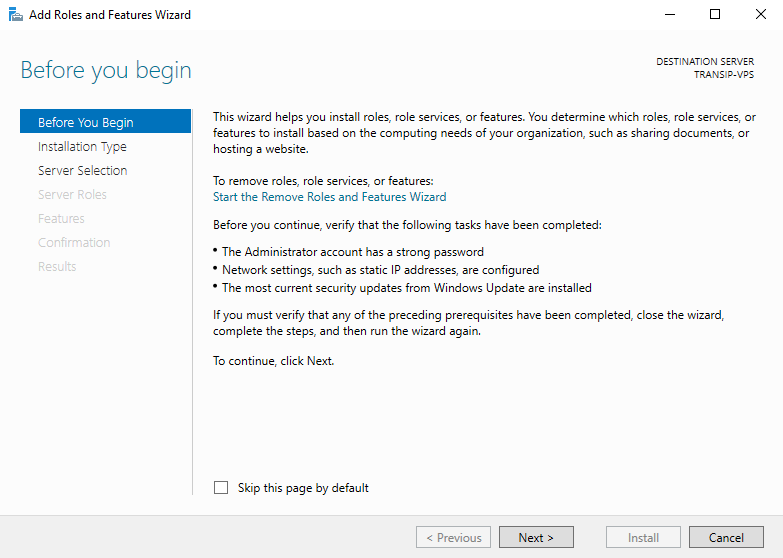
Step 4
You will now see the 'Before You Begin' page. You can select not to see this page anymore when you add roles & features in the future. Click 'Next' after you have gone through the steps under 'before you continue'.
Step 5
Select the 'Role-based or feature-based' option as the 'Installation Type' and proceed to the next step.
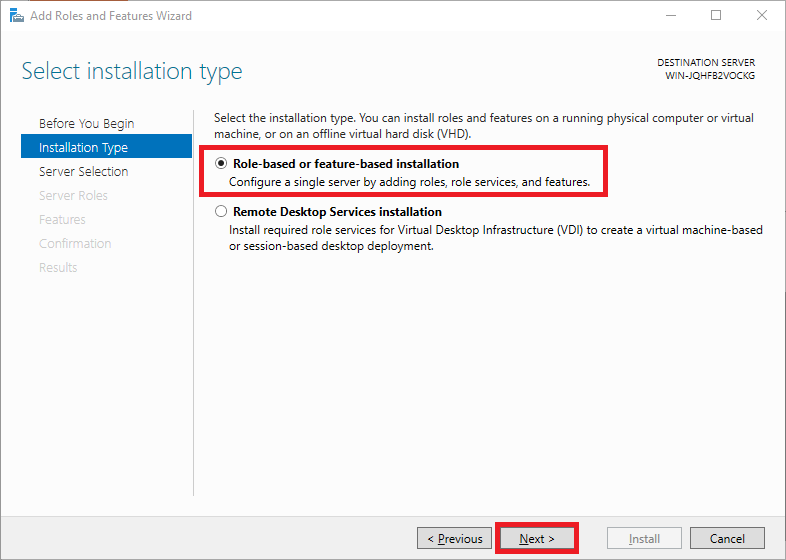
Roles add software focused on specific tasks such as hosting websites to Windows Servers, features add extra functionality to that software.
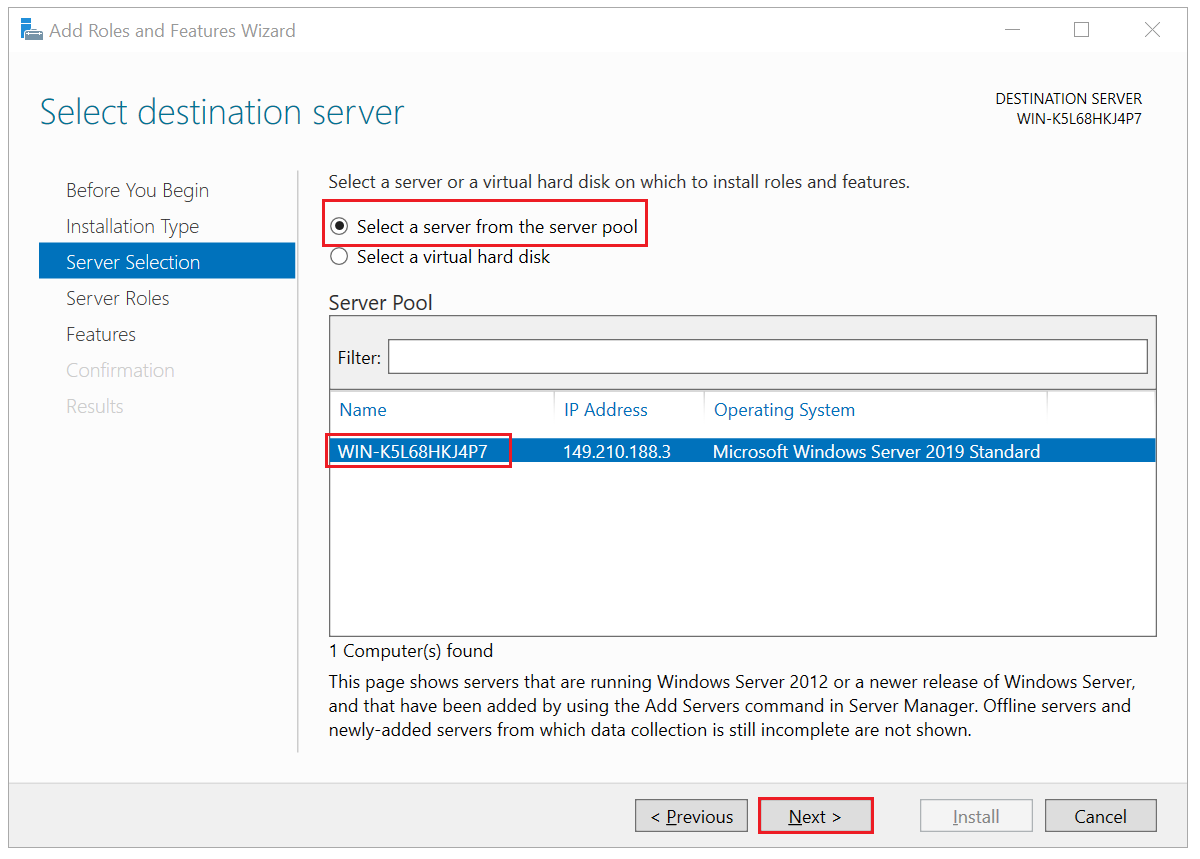
Step 6
Then choose on which VPS you want to perform the installation. By default, the VPS on which you will go through the installation will be selected. Click 'Next' to continue.
Step 7
Select 'Remote Desktop Services' and click 'Next'.
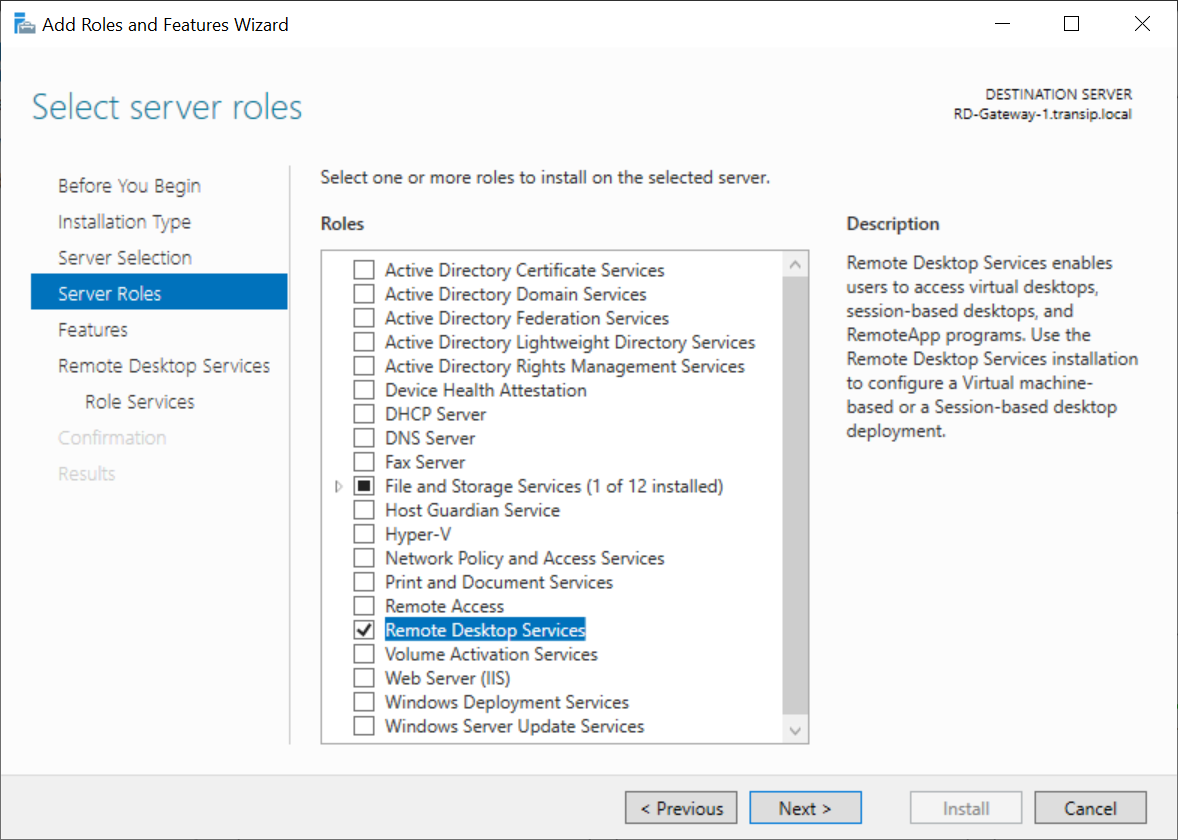
Step 8
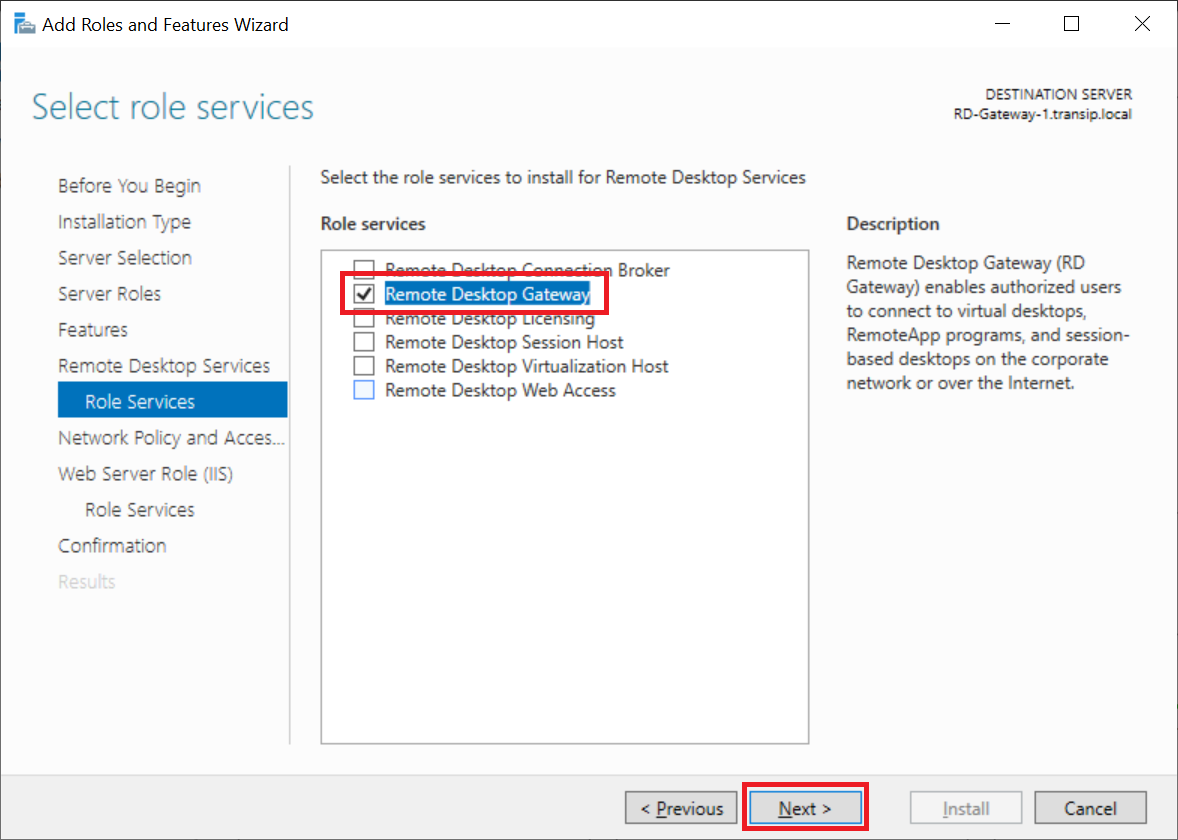
Click 'Next' twice to proceed directly to 'Remote Desktop Services Role Services' and select 'Remote Desktop Gateway'.
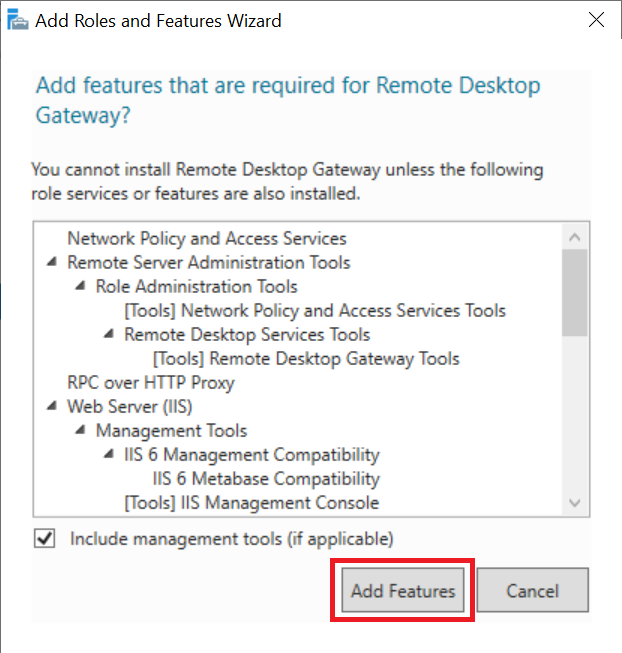
You will now see a pop-up asking you to install the required features. Click 'Add Features' to add them.
Step 9
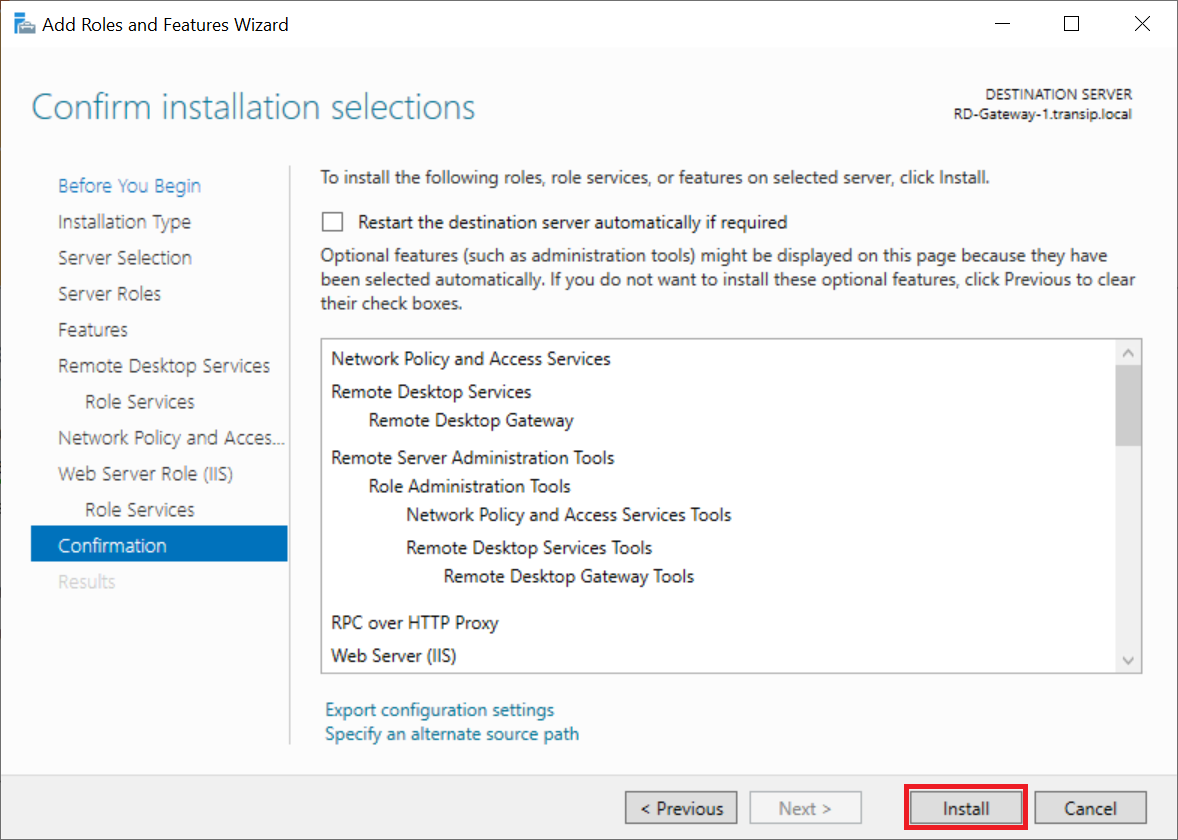
Click 'Next' in the following screens without making any changes until you reach 'Confirmation'. Now click 'Install' to start the installation.
Step 10
After installation, click 'Close' to close the wizard.
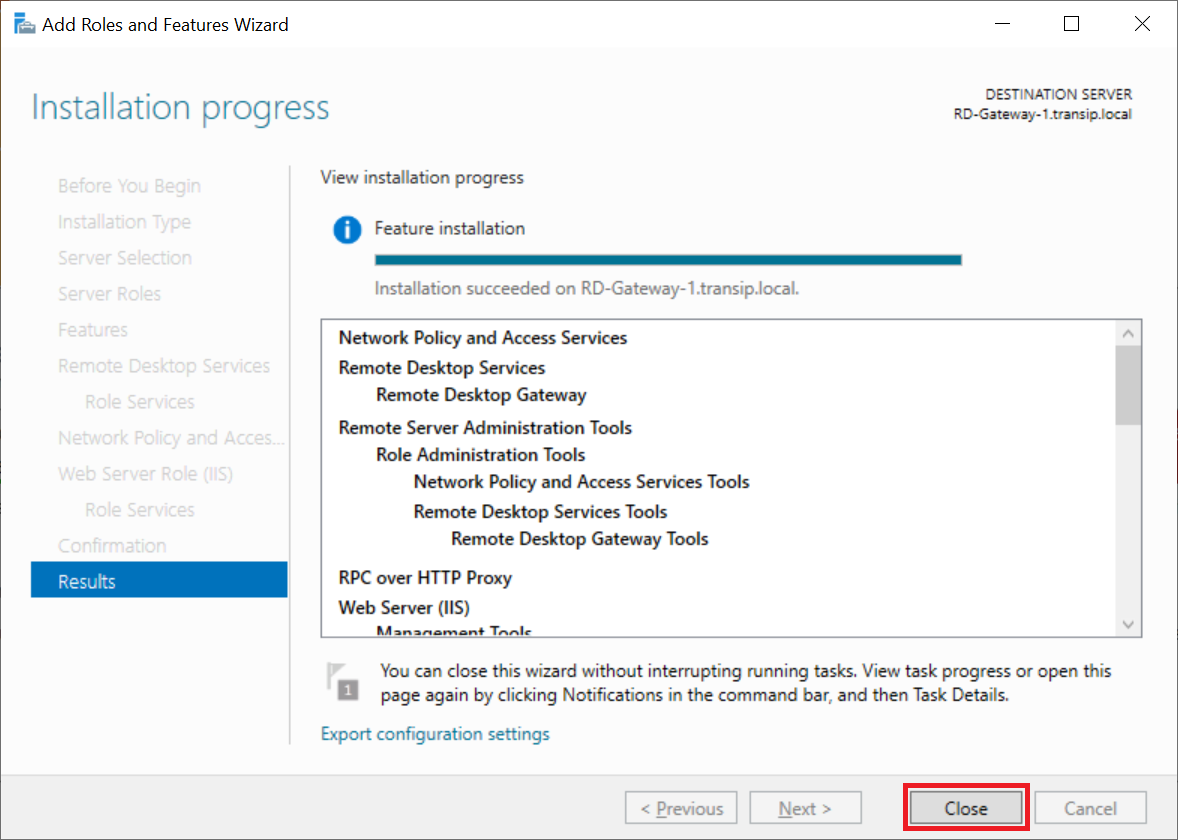
Now proceed to the next section 'Configuring/Renewing an SSL Certificate'.
Configuring/Renewing an SSL Certificate
For this tutorial we use a Sectigo SSL certificate. By default, it comes without a .PFX file that Windows uses. Follow steps 1 to 5 in this tutorial to generate a .PFX file for a Sectigo certificate.
In this section, we'll show you how to configure an SSL certificate for your RD Gateway. You can also use these steps to renew a certificate.
Step 1
If you have closed the Server Manager, start it again and click in the left menu on 'Remote Desktop Services' > 'Overview' and then click 'Tasks' > 'Edit Deployment Properties'.
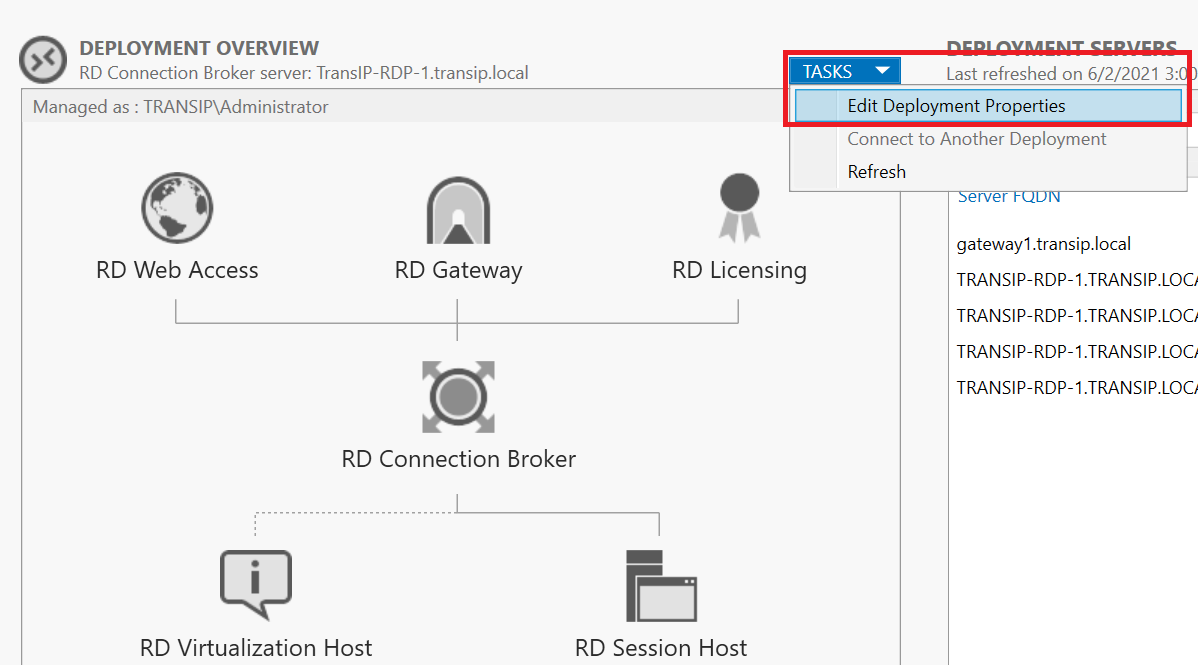
Step 2
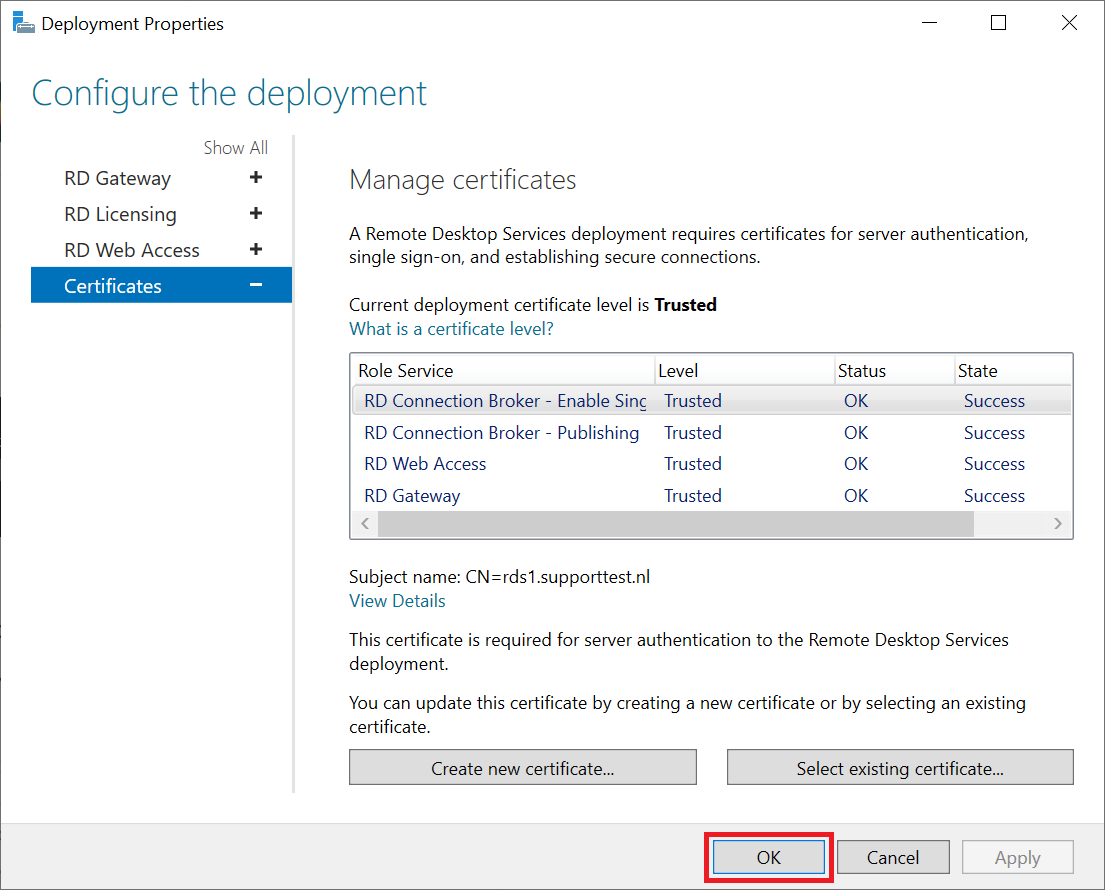
Click 'Certificates' in the left menu; You don't have to change the other deployment parts, but they are useful as a kind of review of your RD environment.
Then select 'RD Gateway' and click 'Select existing certificate'.
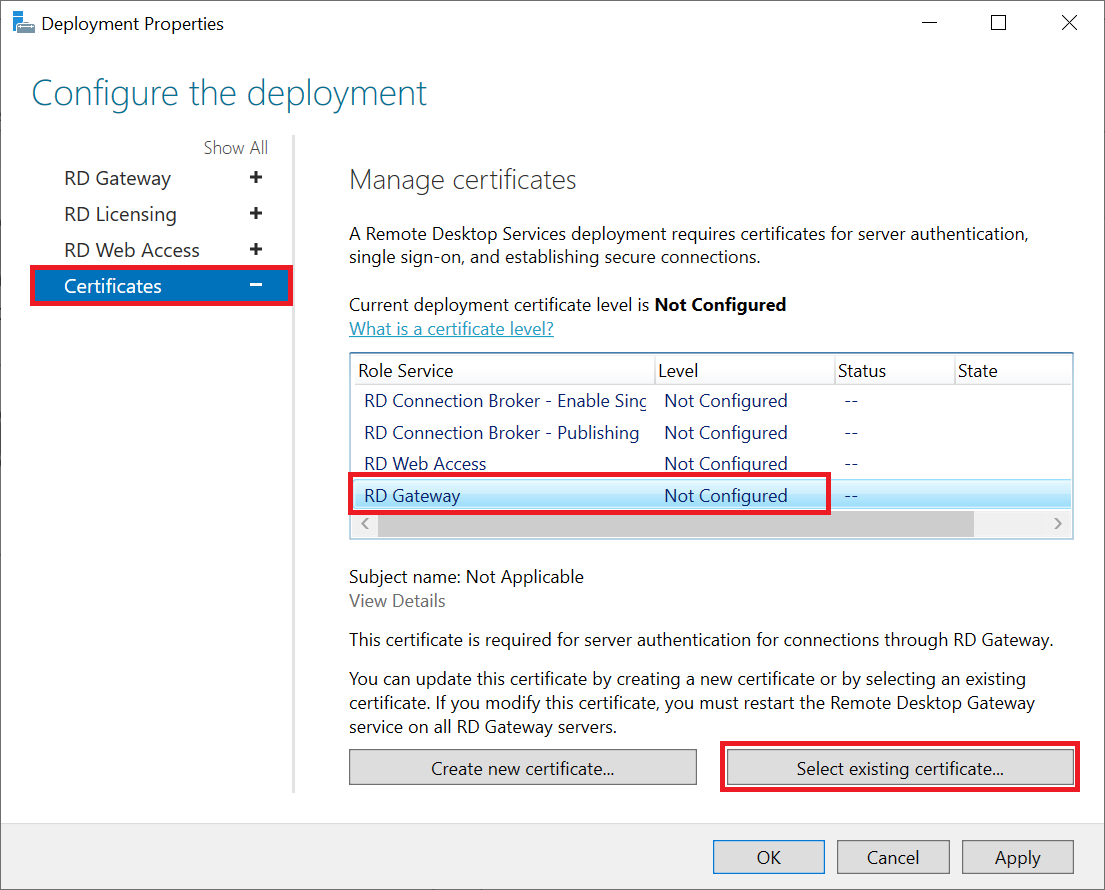
Step 3
Check the option 'Allow the certificate to be added to etc....' and click 'Browse' to select the location of your certificate. Then click 'OK' to close the window.
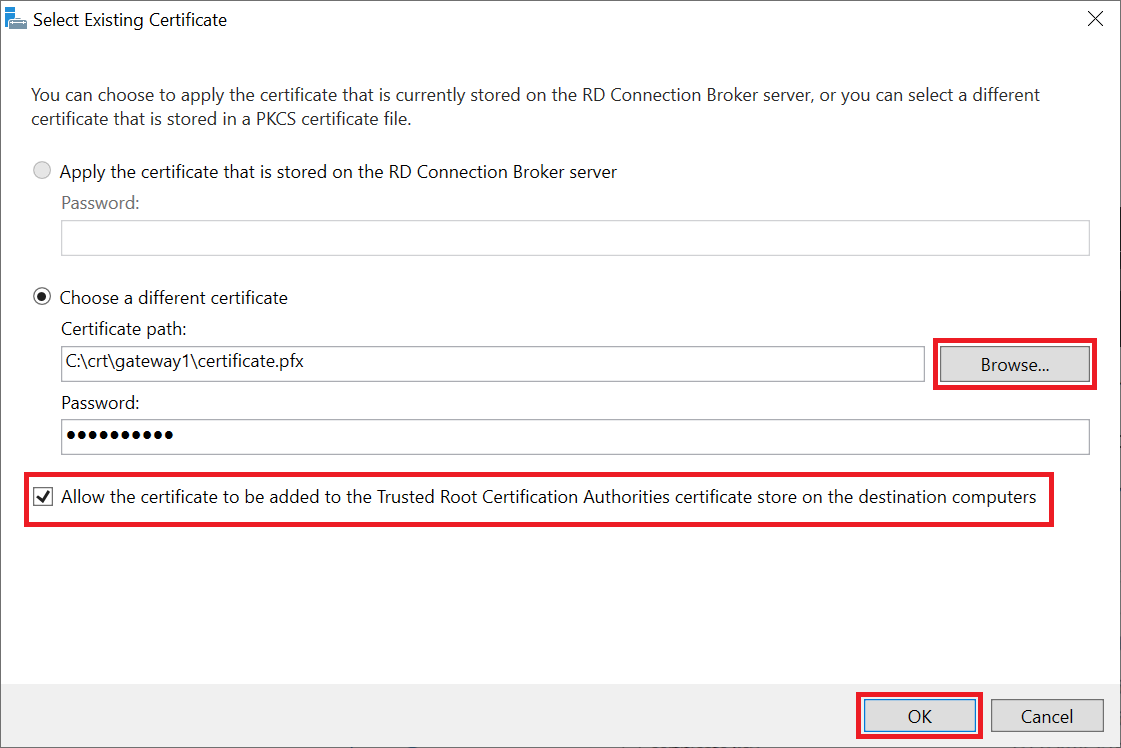
You can only add one certificate at a time. Therefore, first click 'Apply' and then repeat this step for the RD Connection Broker and RD Web Access (assuming you want to use the latter). If you are not sure which server you are using, you can check it under Server Manager > Remote Desktop Services > Overview > Deployment Servers.
Finally, click 'OK' when all certificates show the status 'OK' and 'Trusted'.
You will now return directly to the Remote Desktop Services Overview. Now proceed to the next section 'Setting RD CAP and RD RAP policies'.
Setting RD CAP and RD RAP policies
Before you can use your RD Gateway, you must set up a Remote Desktop Connection Authorization Policy (RD CAP) and Remote Desktop Resource Authorization Policy (RD RAP). By default, examples of these are present on your server, but they don't work when using your gateway (even though they are enabled by default).
Follow these steps on the RD Gateway itself regardless of which installation method you chose to install the RD Gateway role. Otherwise, from a central server on which you manage roles and features, you will incorrectly receive an SSL error message that can lead to problems in going through these steps (at least at the time of June 2021).
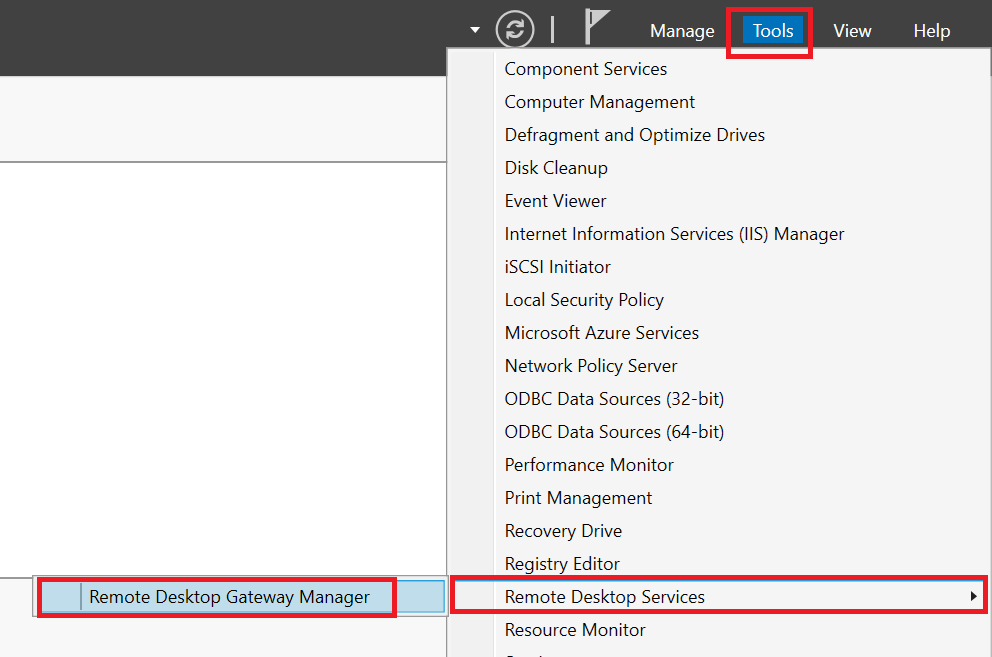
Step 1
Open the Server Manager and click 'Tools' > 'Remote Desktop Services' > 'Remote Desktop Gateway Manager' at the top right.
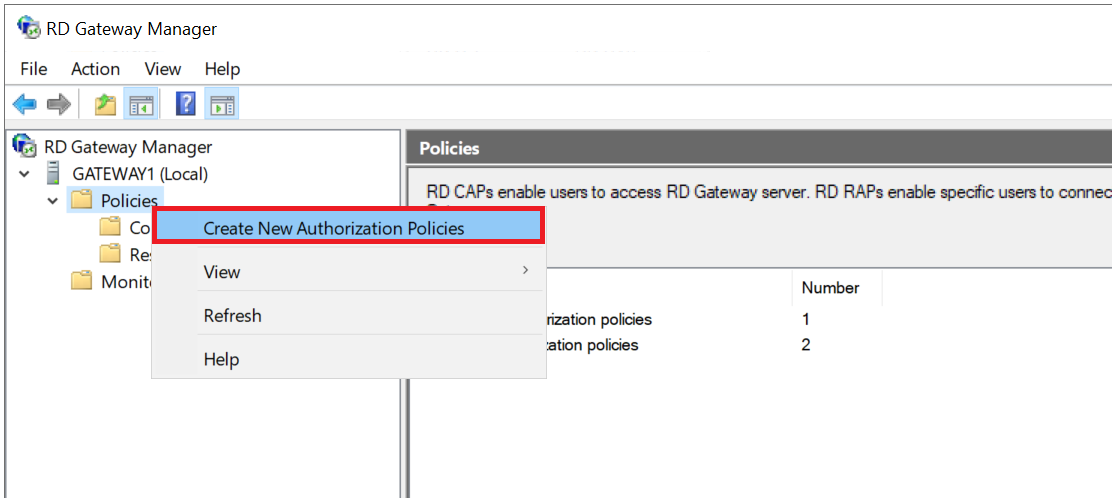
Step 2
Expand the name of your gateway in the RD Gateway Manager, right-click 'Policies' and select 'Create New Authorization Policies'.
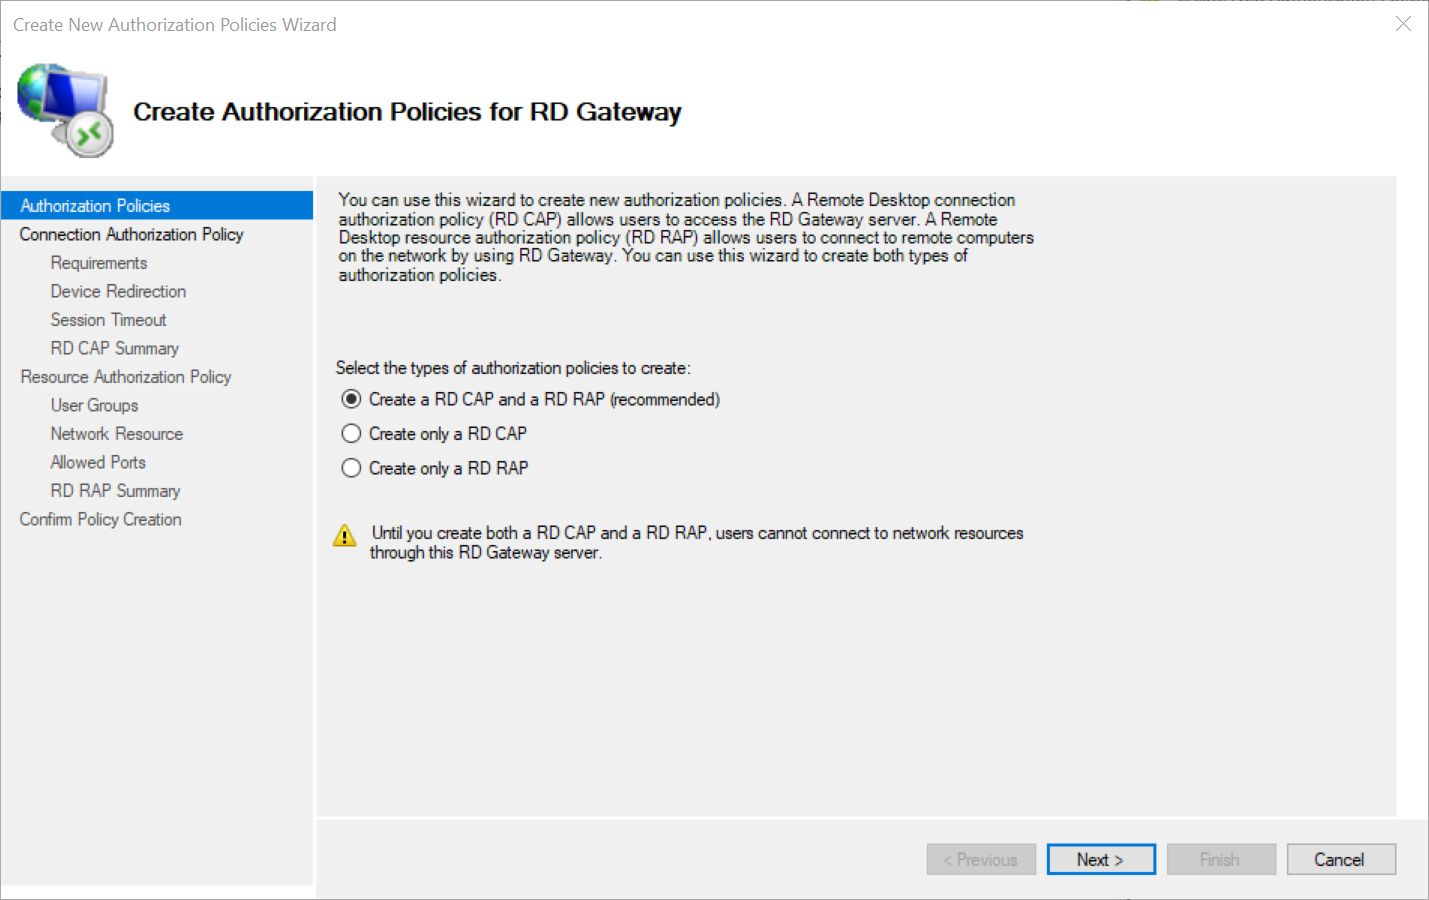
Step 3
You will be asked what type of policy you want to create. Since both an RD CAP and RD RAP are required to use a Remote Desktop Gateway, select both. Click 'Next' to continue.
Step 4
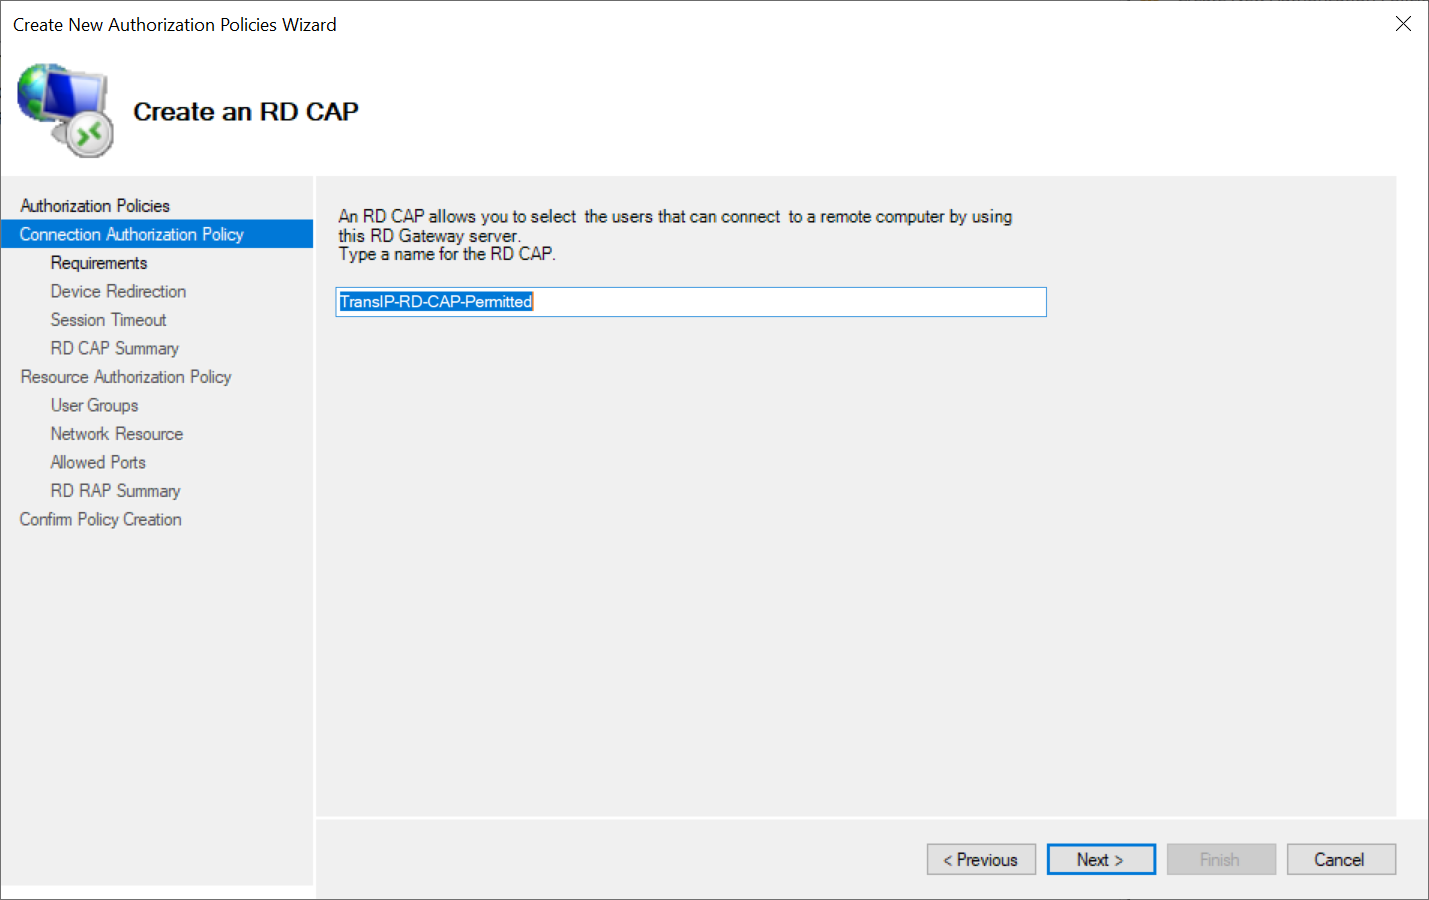
Give the RD CAP policy a name and click 'Next'.
Step 5
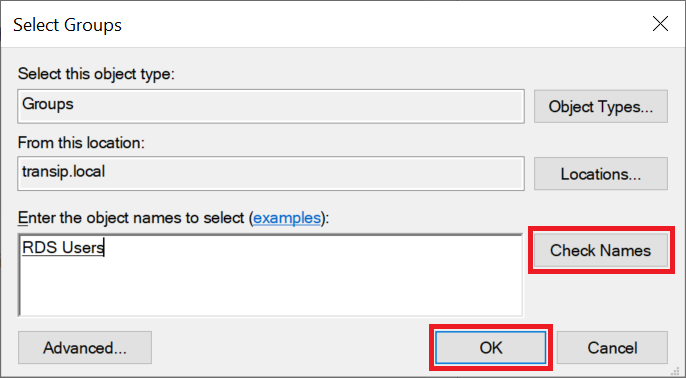
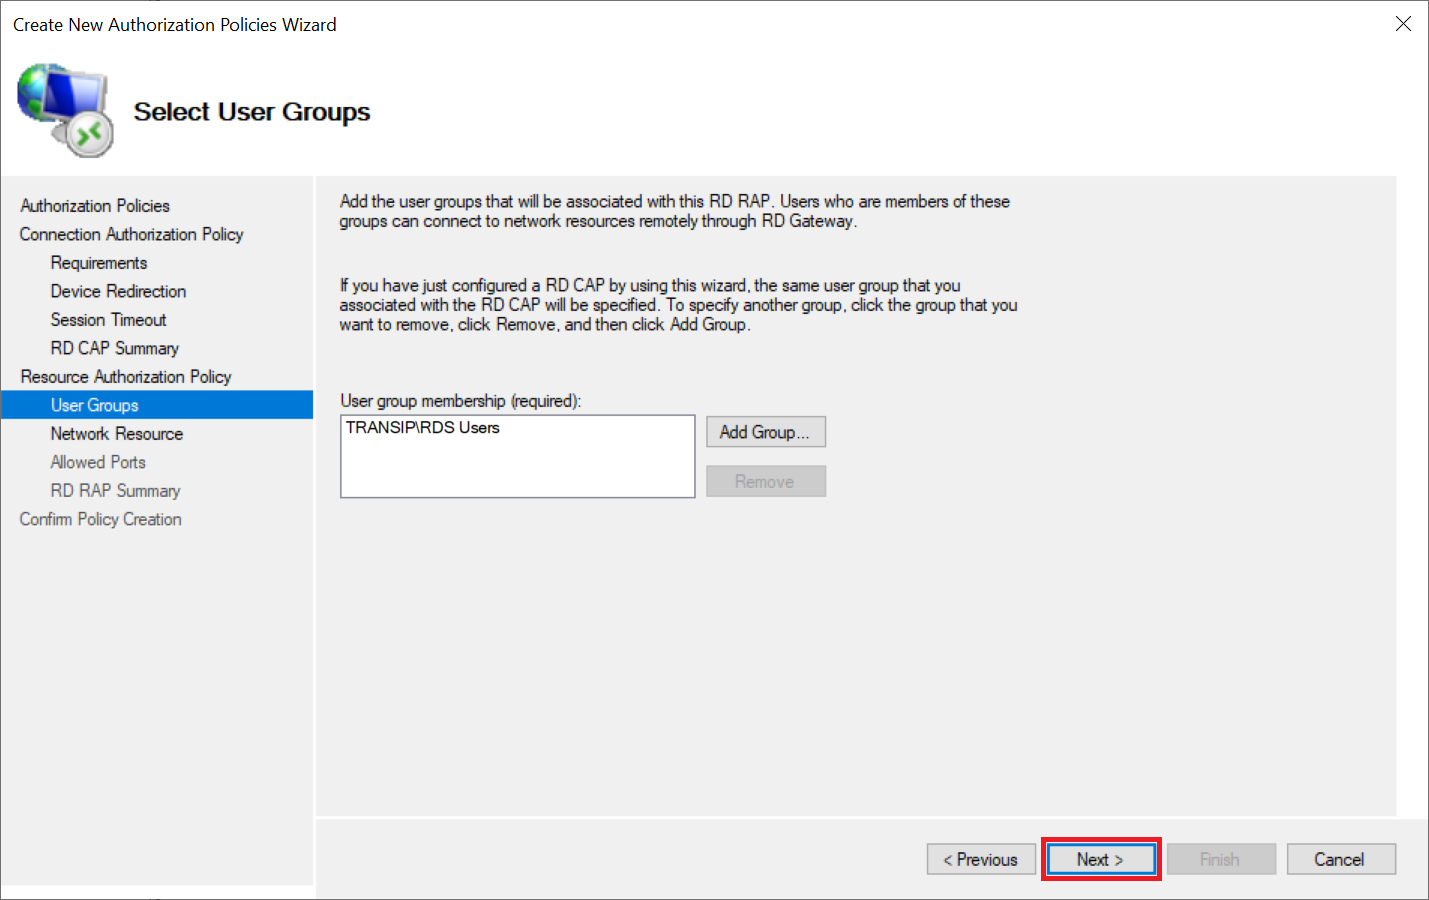
Leave 'Password' selected as authentication method and click 'Add Group' behind 'User Group Membership' to select an AD group that is authorized to connect via Remote Desktop to the Remote Desktop servers behind your gateway.
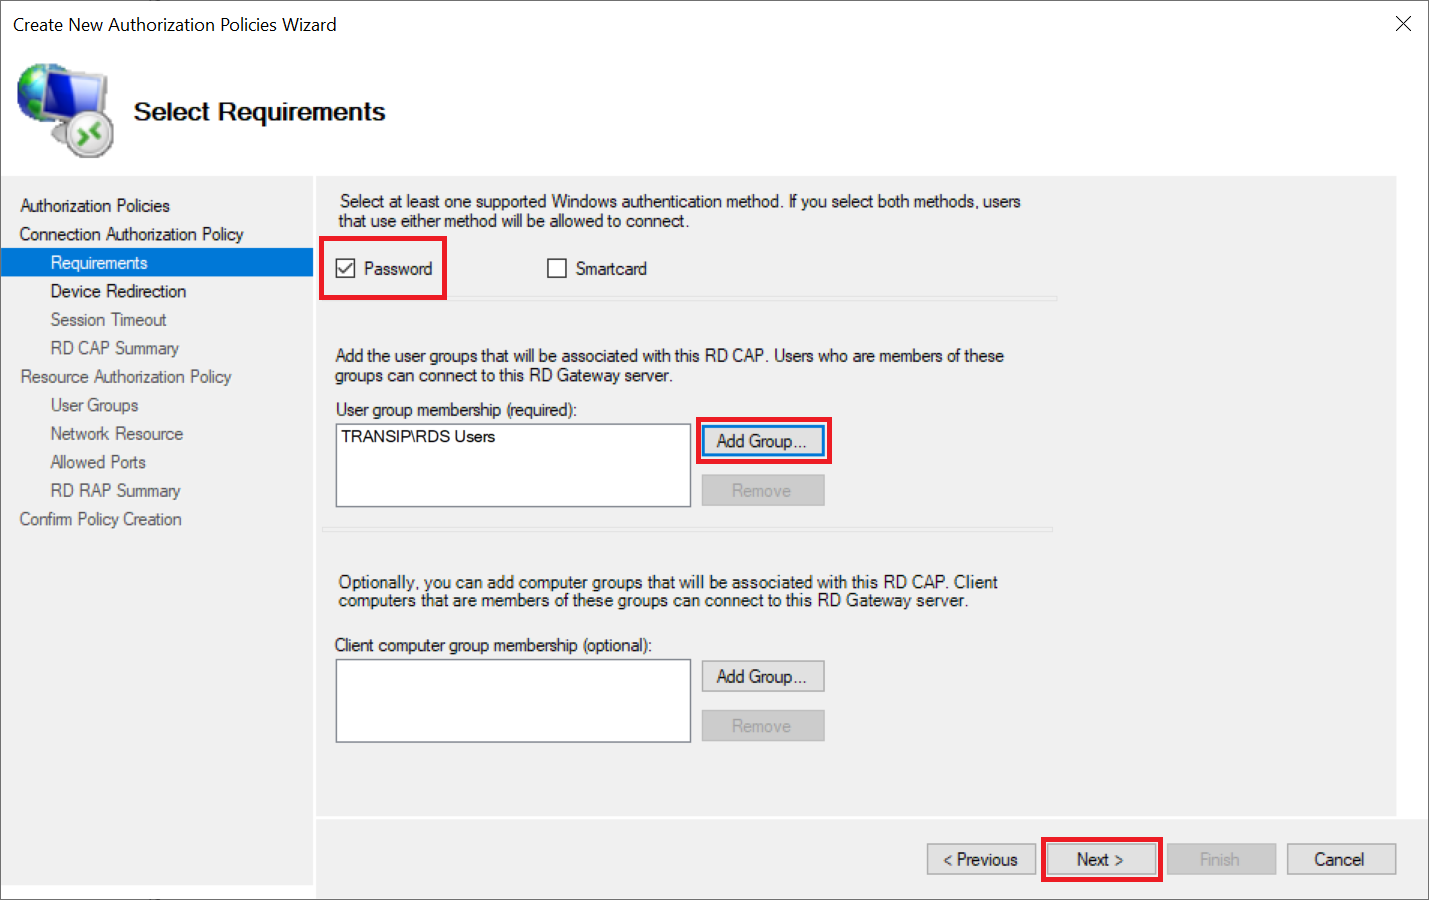
It may happen that when you search your Active Directory you will not find a group, even though everything indicates that you are searching your AD correctly. This is a DNS error that can occur when your VPS's public internet connection tries to check the AD domain instead of the private network connection. This will not succeed because the AD domain is usually a local domain whose DNS records can only be obtained directly from a Domain Controller with a DNS role. A simple solution to work around this is to turn off your public internet connection and go through this step via the VPS console in the TransIP control panel. After that you can immediately turn on the public internet connection again and continue via Remote Desktop.
Step 6
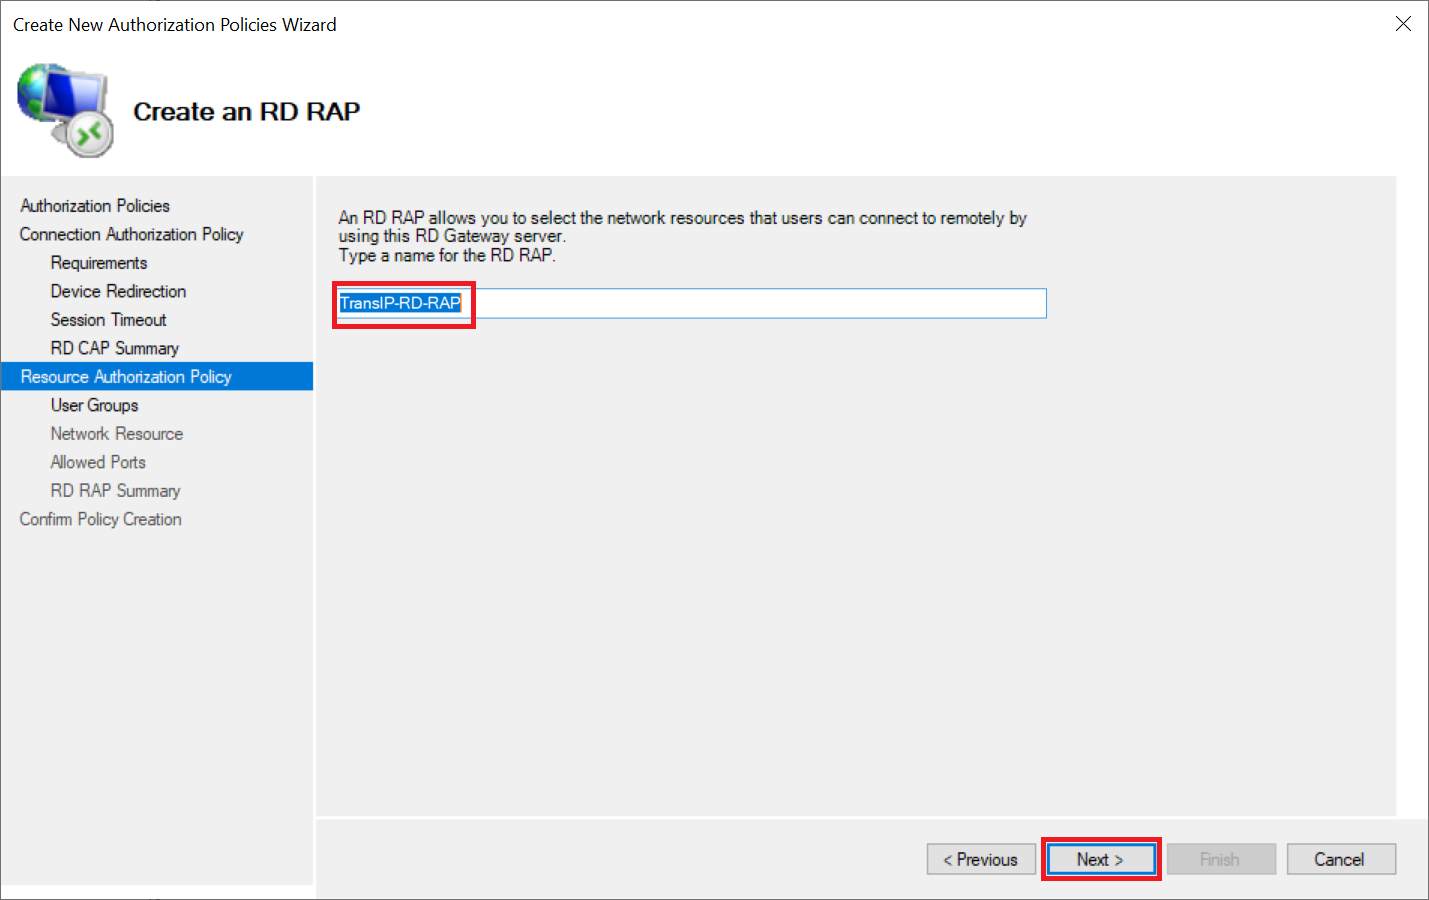
Do not make any further adjustments under 'Device Redirection' or 'Session Timeout' (unless you specifically want to use other settings) and click 'Next' until you arrive at 'Resource Authorization Policy'. Give the RD RAP policy a name and click 'Next'.
Step 7
Under 'RAP User Groups' the group that you also chose for the RD CAP policy is automatically selected. Do not change anything here and click 'Next' to continue.
Step 8
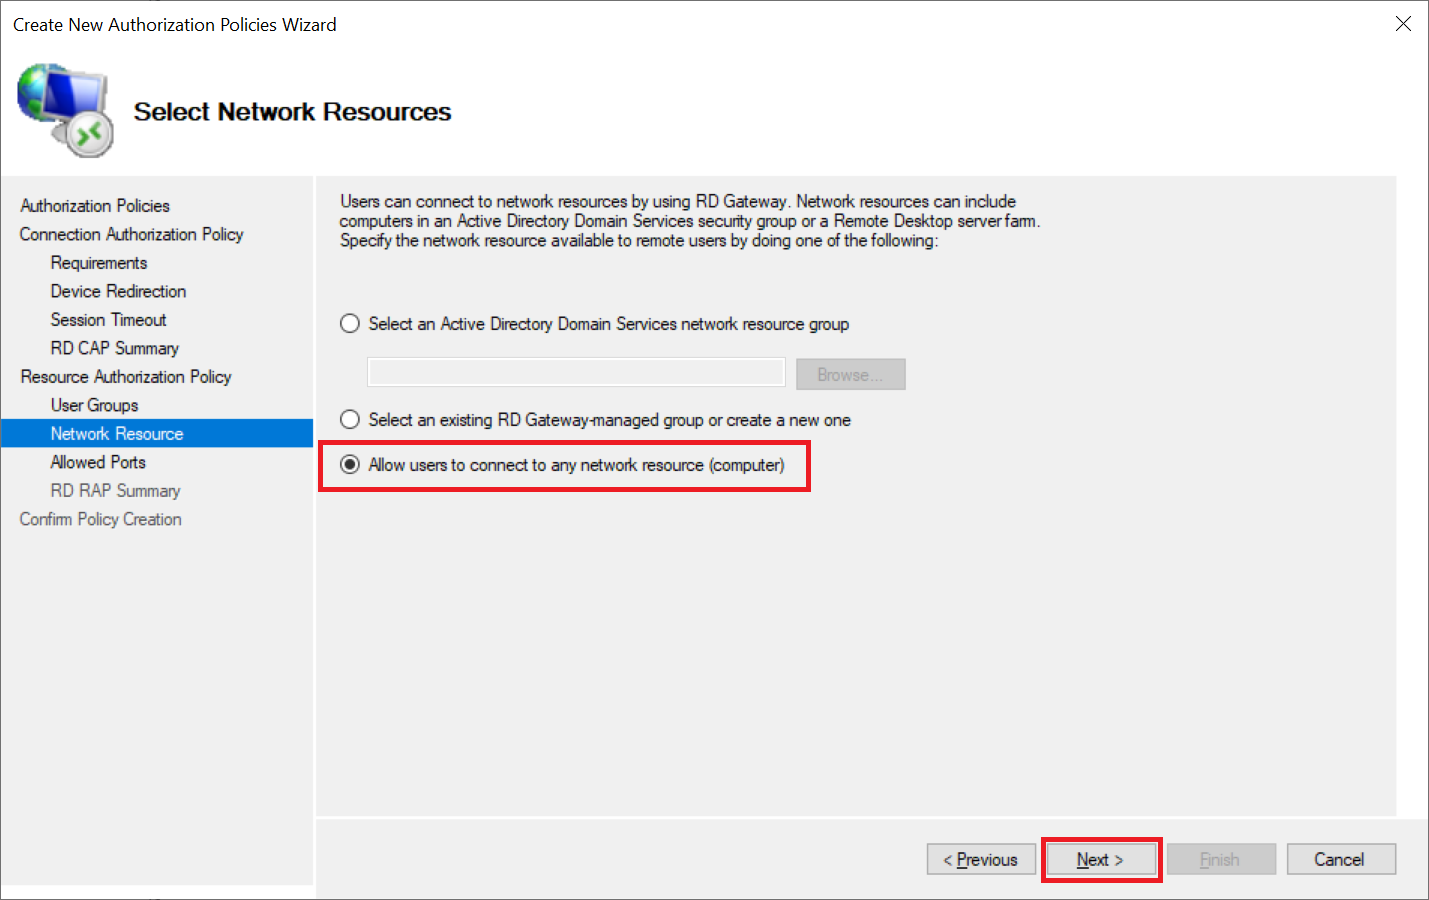
Under 'Network Resource' you specify which network resources you can access when you are connected via the RD Gateway.
Select the option 'Allow users to connect to any network resource (computer)'. At the time of writing (June 2019), the other options present the problem that you cannot connect through the gateway because the user would not be authorized to use the RD Host, even if you add all your Windows Servers to an AD group, for example.
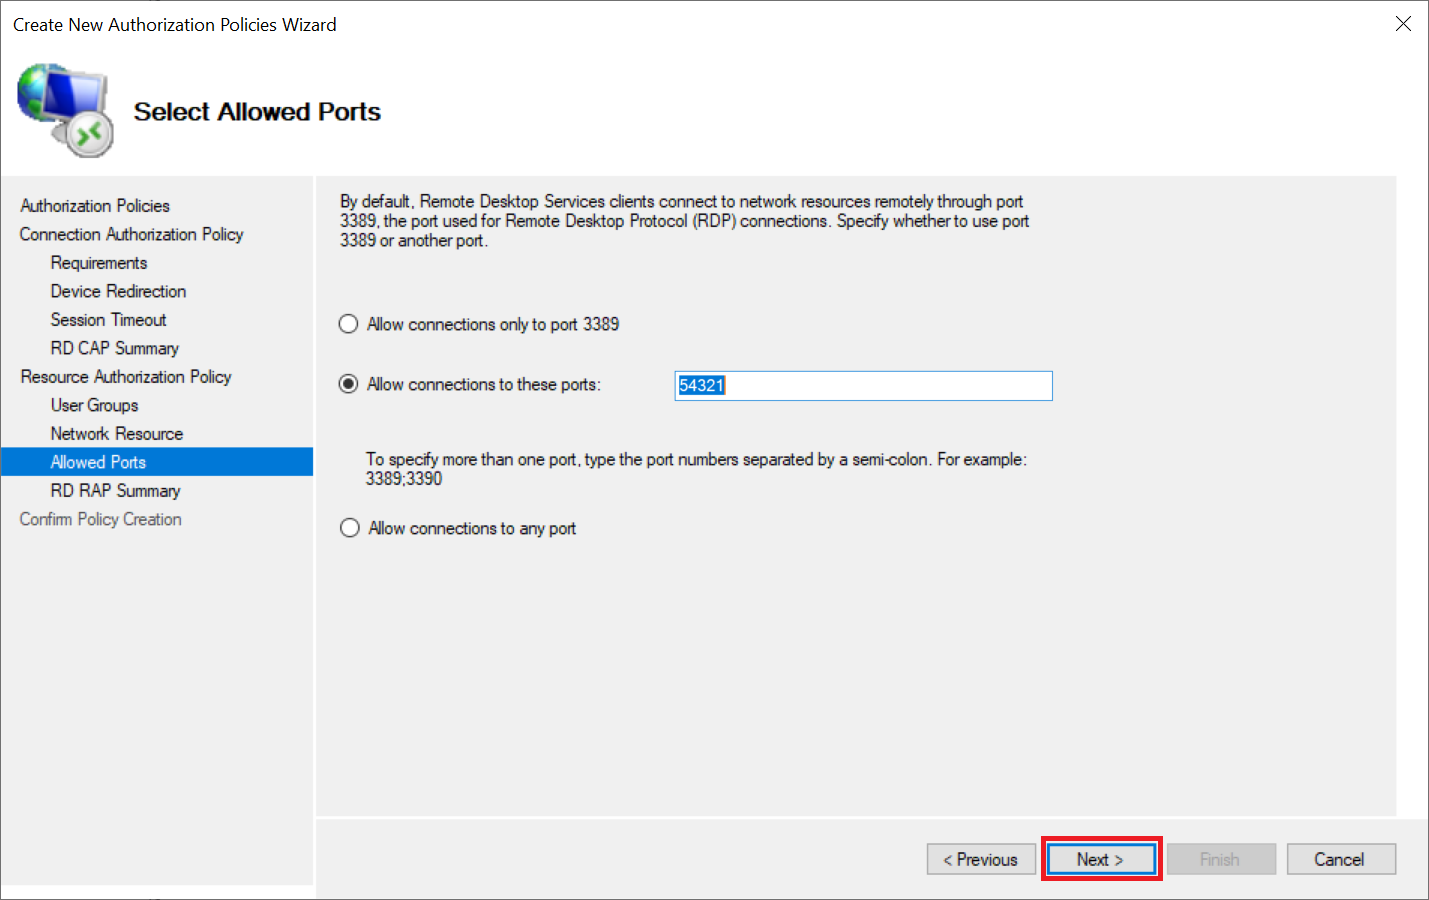
Step 9
In the 'Allow Ports' step you specify which port may be used. The default RDP port is 3389 but, in the example, below we specify a custom port number. There are several security measures you can take to secure your Remote Desktop connection. Changing the default RD port is one of those we highly recommend.
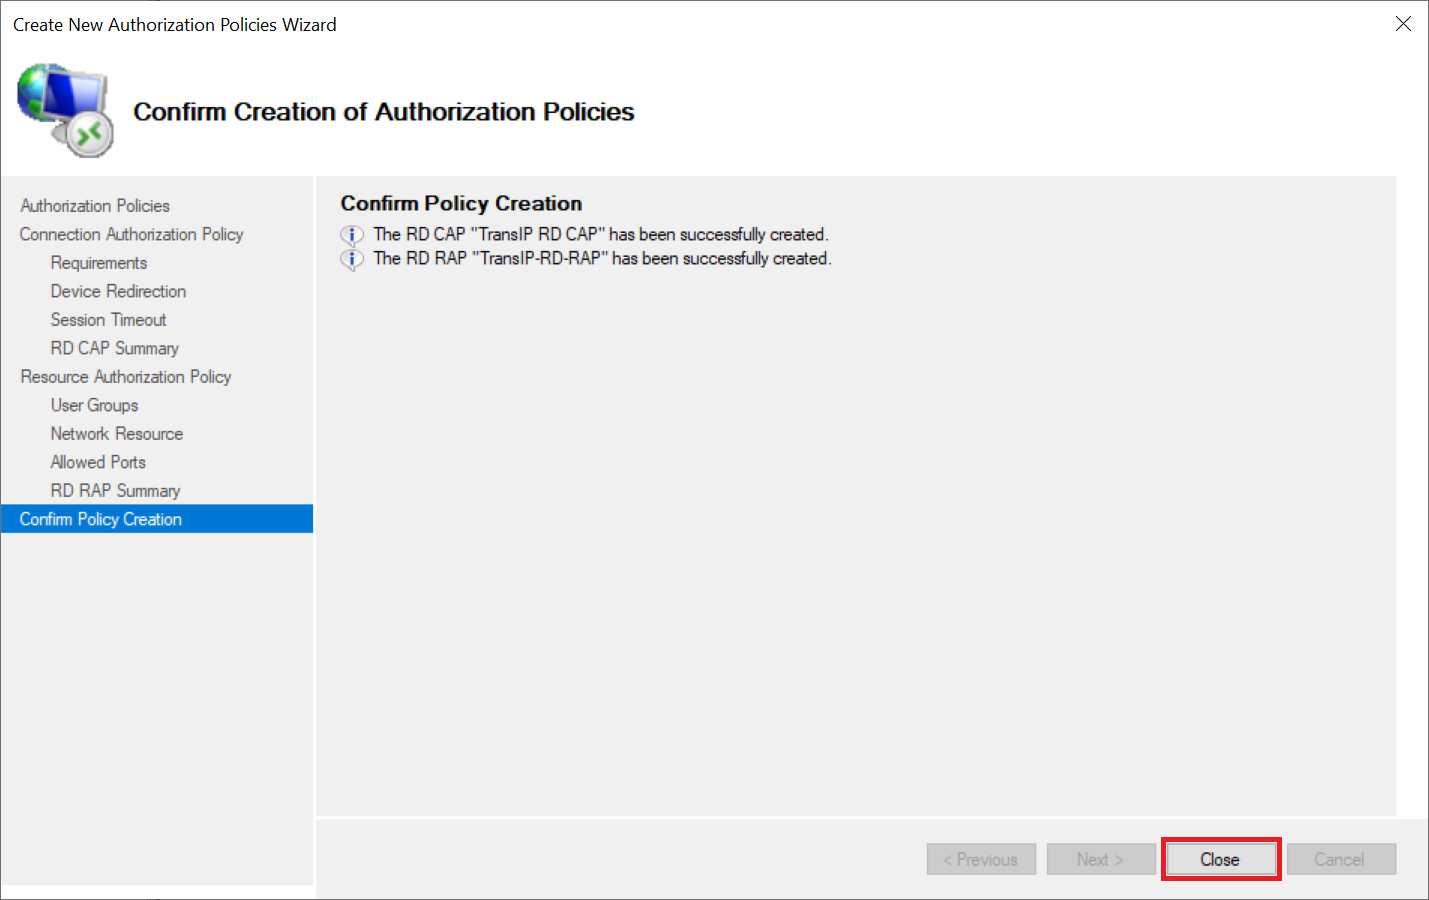
Step 10
Click 'Next' until you reach the step 'Confirm Policy Creation' and then click 'Close' to close the wizard.
Firewall Settings
When connecting to a Remote Desktop Session Host, a Remote Desktop Client (e.g., your computer or laptop) will always try to connect without a Remote Desktop Gateway. In fact: this will also always succeed (with a correct configuration) unless you specify when connecting (via mstsc) that you use an RD Gateway and limit access to the Remote Desktop Port on your Remote Desktop Session Host(s) to your RD Gateway.
Therefore, before continuing with the next paragraph, first adjust the access to the RD Gateway in your Windows Firewall. Use the steps in this tutorial and in step 4-5 you enter the public IPv4 address of your RD Gateway as 'Remote IP Address'. The public IPv4 address of your RD Gateway can be found in the TransIP control panel by selecting the relevant VPS and looking under 'Network' > 'Primary IP'.
Using a Remote Desktop Gateway
Before you start using your RD Gateway, it is nice to first test whether connections are actually blocked without your RD Gateway. Therefore, first try to connect to your Remote Desktop Session Hosts without your RD Gateway. You'll find that doesn't work. To use your RD Gateway and to be able to connect it again, a few small steps are required.
Step 1
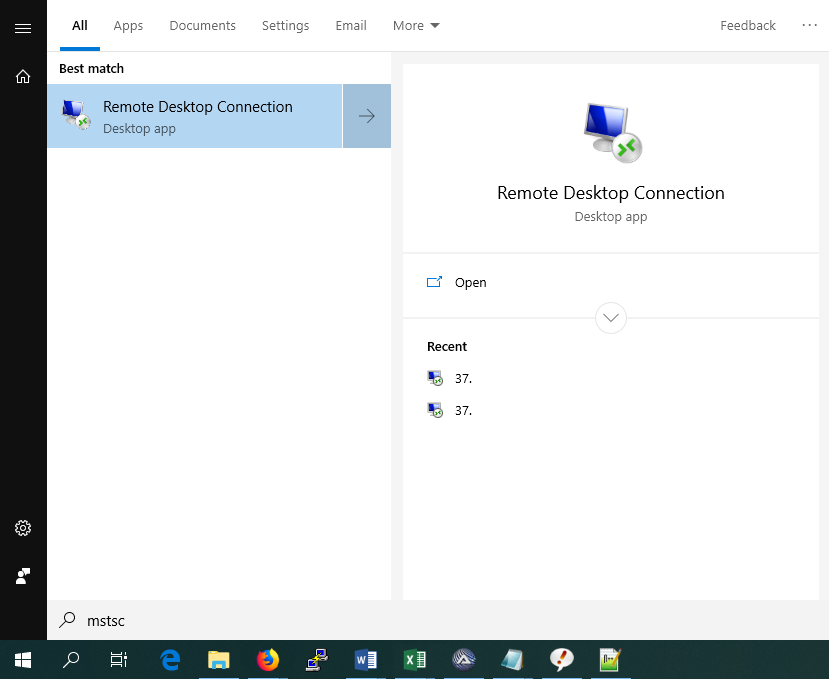
Click the Windows Start button, search for 'mstsc' and click the result.
Step 2
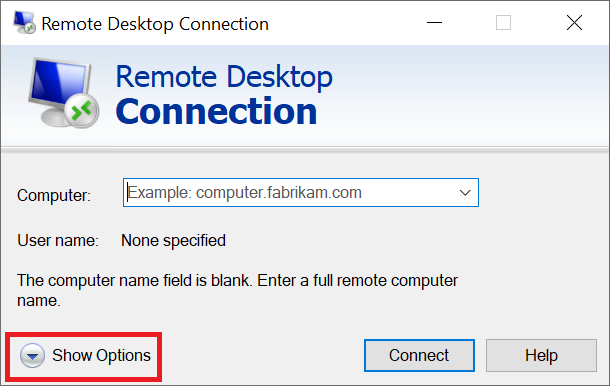
In the Remote Desktop Connection window, click 'Show options'.
Step 3
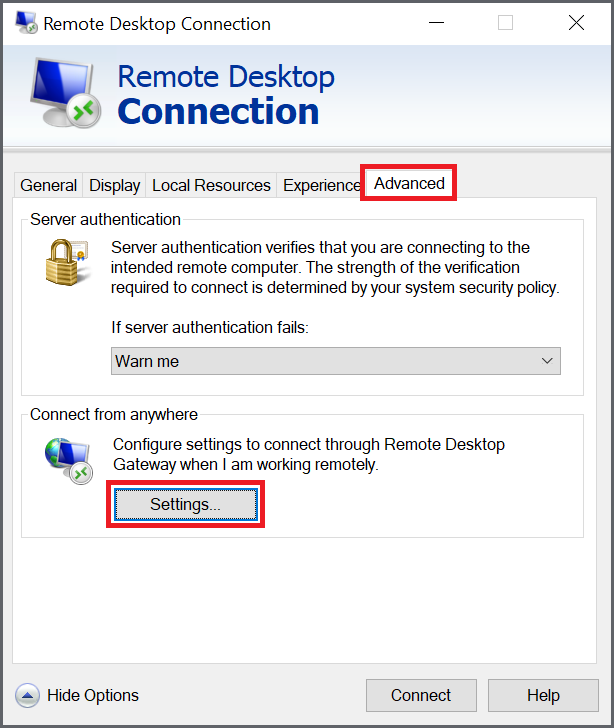
Go to the 'Advanced' tab and click 'Settings'.
Step 4
Select the option 'Use these RD Gateway Server settings' and enter the public name of your RD Gateway that you also used in step 5 of configuring a remote desktop gateway. Finally, uncheck the option 'Bypass RD Gateway server for local addresses' and click 'OK'.

Step 5
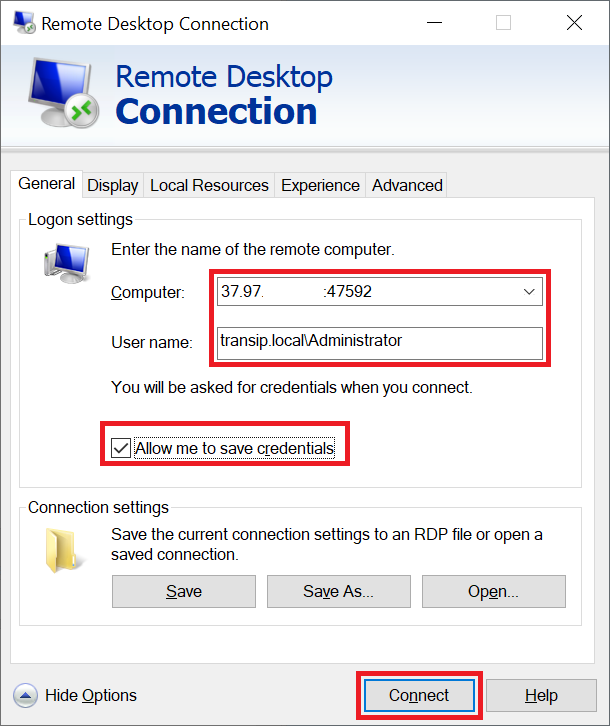
Go to the 'Connect' tab and enter the IPv4 address or DNS name (e.g., rdp1.example.nl) of your Remote Desktop Session Host, the username you want to connect to (your users will use their own account for this). Optionally, tick 'Allow me to save credentials' and finally click 'Connect'.
Step 6
Finally, you will see a pop up to enter your credentials for the RD Gateway. These are the same as the credentials you provided in the previous step.
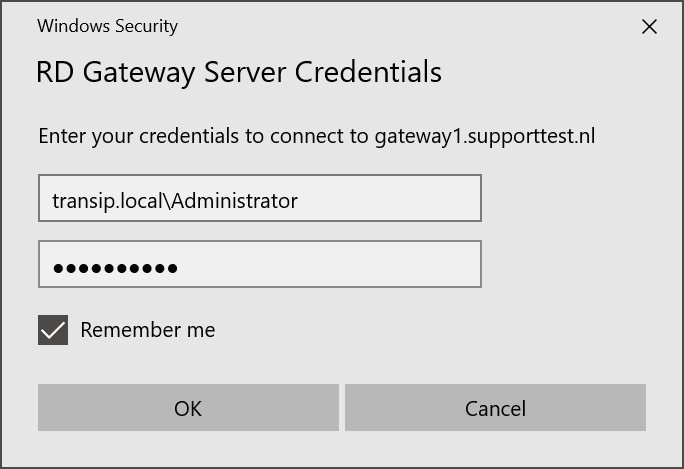
You may rightly wonder whether it is useful that the credentials for your Gateway and Session Host are the same. That can't hurt, since the main purpose of the RD Gateway is to set up an encrypted connection to the RD Session Hosts as a kind of VPN. In addition, it is easier if everyone uses their own account (instead of, for example, an extra account for the RD Gateway prompt) to find out who has logged in and when.
It is important not to give all your users direct Remote Desktop access to your RD Gateway. You can achieve this by, for example, limiting access in your firewall to the Remote Desktop port of the RD Gateway to the IP addresses or user accounts of your administrators.
Monitoring connections
One of the useful tools of an RD Gateway is that you can monitor who is connected via your RD Gateway to an RD Session Host. You can do this from the Remote Desktop Gateway Manager by clicking 'Monitoring'.
The RD Gateway Manager shows that an HTTP connection is being established to the RD Gateway while expecting HTTPS. SSL is a hard requirement for the use of an RD Gateway and is also used here: however, monitoring and logging tools record this under the name HTTP instead of HTTPS.

Please note: To be able to use the RD Gateway Manager from a central administration server (instead of directly on the RD Gateway), install the following feature (no role) via 'Add roles & features': Remote Server Administration Tools > Role Administration Tools > Remote Desktop Services Tools > Remote Desktop Gateway Tools. Click here for a detailed tutorial.
Remote Desktop Gateways are a very extensive topic, but... we have really come to the end of this tutorial.