When you have a VPS at TransIP, you can use our own mail service free of charge, also known as ‘Carefree Emailing’. This gives you the ability to send outgoing mail without worries after a one-time configuration of this mail solution within your VPS. By using this service, you don’t have to worry about your emails ending up in the spam folder because your reverse DNS or SPF record isn’t set up correctly, or that a blacklist prevents your emails from being delivered. Additionally, you benefit from the IP reputation of our mail servers.
To set this up correctly on your VPS, you must perform a few actions on your VPS to ensure that your VPS and domain names are authenticated for sending mail via our platform.
Before you enable the mail service, please review the points of attention in this article to check whether the mail service suits your use case.
Information for Setting Up the VPS Mail Service
To set up your VPS mail service, you need the following details. In the steps below, we will show you how to locate these in your control panel.
- Your account’s username and password.
- The SPF record required to allow our mail servers to send mail on behalf of your domain.
- The TXT record that contains your authentication hash.
- The DKIM records that serve as an extra layer of verification for trusted sending from our platform.
The above-mentioned DNS records can be automatically added to domains that are included in the same TransIP account as the VPS on which you want to set up the mail service. Note that this only works if you use the TransIP nameservers.
Step 1
Log in to the TransIP control panel, go to the ‘VPS’ tab, and click on the name of your VPS.
Step 2
Scroll down and click on ‘Activate’ behind ‘VPS mail service’ (or the gear icon if already activated).

If you clicked ‘Activate’ you'll be shown a domain selection page next. If so, click on ‘Back’ twice.

Step 3
Click on ‘Username and Password’.

Step 4
Note the username and password. You will need these later. Then click the ‘Back’ button in your browser to return to the previous page.

Step 5
Click on ‘Manage Domains’.

Step 6
Select the name of your domain and click on ‘Continue’. If your domain is not in the same account as your VPS, then proceed to Step 8.

Step 7
You will see an overview of the required DNS records. Click on Add now to add them to your domain automatically. You are now finished with this part and do not need to complete Steps 8 and 9.

Are you using a domain that is not included in your TransIP account? Select ‘My desired domain is not listed’ and click on ‘Continue’.

Step 9
You will see an overview of the required DNS records. Add these manually to your domain. In this article you can find more information about manually setting DNS records in a TransIP account.

You are now finished with this part of configuring your VPS mail service.
DKIM records in DirectAdmin: DirectAdmin supports underscores in CNAME records. If you experience an issue, check in directadmin.conf that the option allow_dns_underscore=1 is indeed set to 1 and not 0.
DKIM records in Plesk: The DKIM records for our mail service use an underscore. However, due to a bug in Plesk, this cannot be added normally. You can add it using:
plesk bin dns --add yourdomain.com -cname transip-A._domainkey -canonical _dkim-A.transip.emailNote that you should repeat this for the B & C record).
Setting Up Your VPS for the Mail Service

How you configure your specific mail server software (MTA) largely depends on the solution you are using. The most commonly used mail transfer agents (MTAs) are Postfix and Exim, which are also used by web control panels such as DirectAdmin, Plesk, and cPanel.
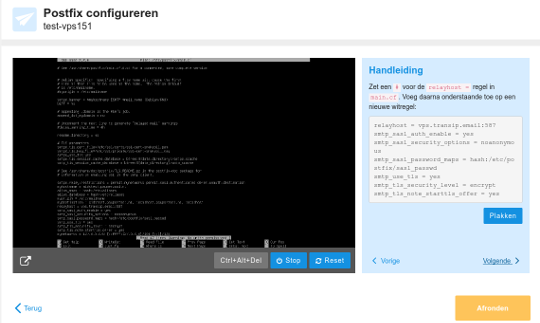
Within the control panel, you start the configuration wizard that guides you through the steps to set up the mail service. You can find this under VPS > click on the VPS > VPS Mailservice > the gear icon > Configure VPS.
For the following MTAs, we have guides available with specific settings:
- Postfix
- Exim
- Windows Server IIS SMTP
- Exchange
- DirectAdmin (Exim)
- cPanel (Exim)
- Plesk (Postfix)
- MailEnable
Is your MTA not listed here?
Then it is advisable to consult the documentation of that mail transfer agent. Look for the section on external relay services and configure it so that vps.transip.email is the relay server (via port 587). The second requirement is that your username and password must be sent along to authenticate your VPS via that route.
Should you have any questions regarding this article, please do not hesitate to contact our support department. You can reach them via the Contact Us button at the bottom of this page.


